Manuals
/
Kodak
/
Photography
/
Photo Scanner
Kodak
2400DSV
service manual
0820-0004-58A
Models:
2400DSV
1
127
131
131
Download
131 pages
40.19 Kb
124
125
126
127
128
129
130
131
Troubleshooting
Specs
Install
Cb Communication Error
Symbol Name
Maintenance
System Configuration
1 S1 Auto Reset
Connectors Layout
Disassembly and Cleaning
Page 127
Image 127
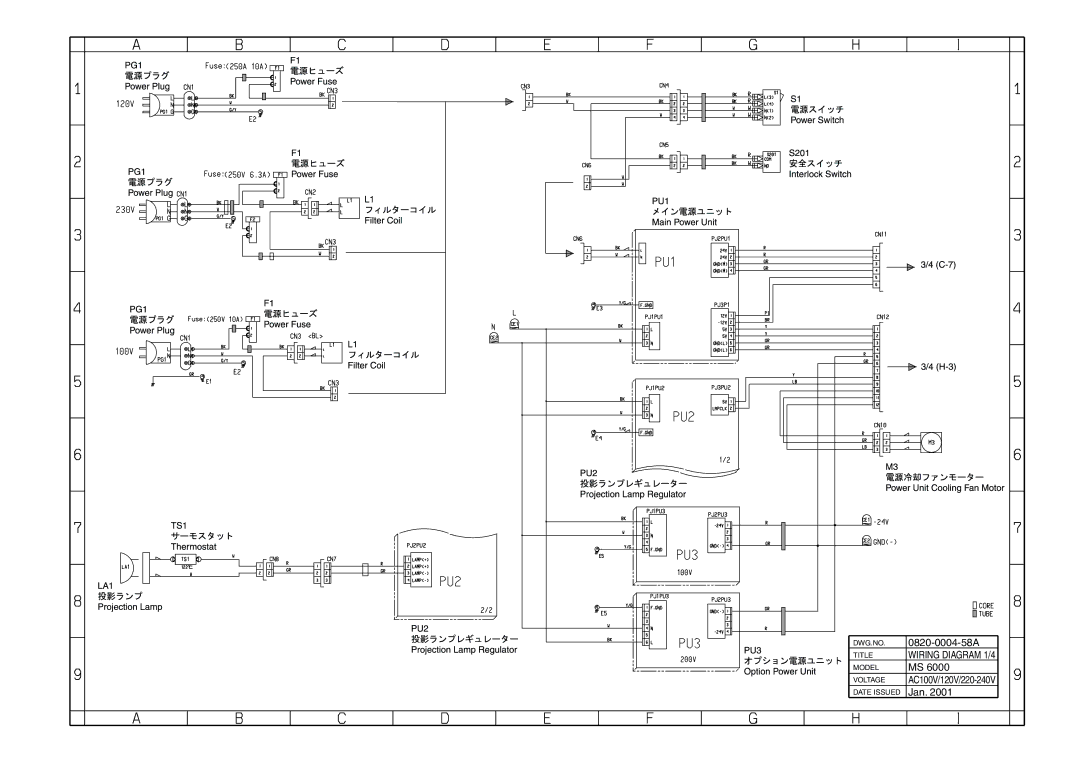
DWG.NO.
0820-0004-58A
TITLE
WIRING DIAGRAM 1/4
MODEL
MS 6000
VOLTAGE
AC100V/120V/220-240V
DATE ISSUED
Jan. 2001
Page 126
Page 128
Page 127
Image 127
Page 126
Page 128
Contents
2400DSV
Preface
Contents
Mechanical and Electrical
Disassembly and Cleaning
Handling of P.W.Boards
Function Mode and Adjustment
Precautions Overview Function Mode List
Mode Operations
SE The print function at the time of Toner Empty detection
110
Troubleshooting
Troubleshooting for malfunction 113
Image Troubleshooting 117
Safety Precautions for Inspection and Service
Page
Page
Safety Precautions for Inspection and Service
Avoid Direct Exposure To Beam
Other Precautions
Vorsicht
Used Batteries Precautions
Usage Environment
Installation Environment
Installation Space
Installing The Power Supply
1 MS
Specifications
General Information
2 MS 6000 & MSP3000 Printer System
System Configuration
Connection Mode
Parts Identification
Component Layout
Electrical Components Layout
Symbol Name
PWB-D PWB-F
Electrical Parts Function
Symbol Name Function
PC I/F Board Communicates with the Personal Computer Machine
Connectors Layout
PJ3F 2P
2 I/F Board PWB-EE
Electrical Service Parts on P.W.Boards
3 I/F Board PWB-SS
RSW1 .. For Scsi ID setting
Masking
Explanation of Control Panel
Control Panel Basic Output
Selection
When this lamp is lit
Page
Manual Masking → OFF
Itive for print production
Display Contents Unit
Tion set to ON, the previous setting remains valid
Correction
Control Panel Shift Function Output
Maximum level
Screen Image → Print Image Explanation
Image Processing
General Information
Projection Lamp LA1
Illumination Mechanism
Projection Lamp Voltage Control Circuit
OFF
Thermostat TS1
Condenser Lens
Projection Lens
Prism Rotation
Image Rotation
Auto Image Rotating Motor M5 Control Circuit
Optical Section
Scan Path
Reader Path
Scan Table Drive Mechanism
Scan Mirror Motion Control
DC24V
Mirror Scan Motor M1 Control Circuit
CCD Section
CCD PWB-A PWB-BB
Image Bus
Mechanical and Electrical Converts the output resolution
PWB-EE
Masking Area Detection
Auto Masking
Requirements for Auto Masking
17mm or more
10mm or more
Requirements for Auto Skew Correction
Auto Image Skew Correction
Manual Frame Masking
J K
Operation
2 to 1 Printing Function
Identification Marks
Precautions for Disassembly and Cleaning
Precautions
Handling of P.W.Boards
Precautions regarding transportation and storage
Precautions when replacing PWBs
Precautions when checking PWBs
Preventive Maintenance Schedule List
Maintenance and Inspection
Details of readjustments needed when parts are replaced
Removal of the Outer Covers
Disassembly and Cleaning Procedure
Page
Page
Replacing of the Projection Lamp
Cleaning of the Condenser Lens and Mirrors
Cleaning of the Projection Lamp
Cleaning of the each Mirrors
Cleaning of the CCD Filter
Removal of the CCD Assy
Loosen the four screws
Removal of the Power Unit
PWB-BB
Replacing Scan Motor bushing and friction plate
Replacing the Fuse of the Power Unit
Replacing the Main Fuse
Exchanging the Oscillator Chip
Reinstall all the covers
Overview
Function Mode and Adjustment
Mode Setting Function
Function Mode List
Mode Setting Function
Mode Setting Function
Mode machine operation checks
About the Function Mode Setting Label
Entering the Function Mode
Operation of the Function Mode
Execution method in F and b mode except F4, F8 and b6
Execution method in S, y and o mode
Execution method in F and b mode F4, F8 and b6
Leaving the Function Mode
4 S4 Coin Vender / Foot Switch Setting
Mode Operations
1 S1 Auto Reset
2 S2 Auto Power Save
6 S6 Paper Tray feed size MSP 3000 Printer
5 S5 Fine Mode Setting
7 S7 Machine ID Printing
9 S9 Nega Contrast Adjustment
8 S8 Cycle print mode
SA Posi Contrast Adjustment
SC Scan Table Stop Position Adjustment Reader Position
Sb Scan Table Stop Position Adjustment Scan Position
SE The print function at the time of Toner Empty detection
Sd Auto image rotation 90 degree rotation function
2 y3 Auto Film Format Select Print
1 y2 Auto Paper Source Switching
3 y5 Memo Image Masking
YC Print Reserve Function
4 y6 Prescan Operation
5 y7 Auto Skew Correction Retain
Yb Magnification Warning Display
1 o1 Inch/Metric Select
2 o2 N-P Auto Exposure Coarse Adjustment
3 o3 P-P Auto Exposure Coarse Adjustment
4 o4 Scan Speed Adjustment
5 o5 Adjustment of the image area Lengthwise Position
6 o6 Adjustment of the Top and Bottom Frame Black Band Width
7 o7 Adjustment of the Right and Left Frame Black Band Width
OA Host Driver Setting
8 o8 Projection lamp burn out detection L2 setting
Ob Vender/Model Name Setting
4 F4 Counter Clear
1 F1 ROM Version Check
2 F2 Scan Counter
3 F3 Print Counter
7 F7 Projection Lamp Voltage Adjustment
PU2
8 F8 Reset the Setting Data
2 b2 Scanning mirror operation check
1 b1 Checking the Scan Table Unit Function
3 b3 For Factory use
5 b5 Single scan operation check
4 b4 Prism rotation operation check
6 b6 Shading Correction
8 b8 For Factory use
7 b7 Test Print Function
How to Use This Section
Troubleshooting
Malfunction Indications
3 C2 Scan Mirror Drive malfunction
Malfunction Detection Timing
1 L2 Projection Lamp malfunction
2 C1 Scan Unit Drive malfunction
CL Printer Clock malfunction
Cb Communication Error
4 C3 Shading Correction malfunction
5 C4 Cooling Fan Motor malfunction
↓OK
Troubleshooting for malfunction code
Replace M3
Reinstall the Oscillator
No Power
Troubleshooting for malfunction
Projection Lamp does not Light Up
Electrical Components Check
7 PC4 Scan Position Sensor
8 PU1 Power Unit
10 S1 Power Switch
6 PC3 Reader Position Sensor
12 TS1 Thermostat
11 S201 Interlock Switch
Image Troubleshooting
Troubleshooting 118
0820-0003-51D
0820-0004-58A
Title Wiring Diagram 2/4 Model Voltage
Title Wiring Diagram 3/4 Model Voltage
Title Wiring Diagram 4/4 Model Voltage
Copyright
Top
Page
Image
Contents