Optra Color
User’s Guide
United States Government Restricted Rights
Table of contents
Using color
Managing memory
Appendix B Printer specifications
Appendix C Fonts
Viii Table of contents
About the manuals
Preface
Conventions
Other sources of information
Online documents
Lexmark web site Automated fax system
Xii Preface
Trademarks
From The Monotype Corporation plc, is a
Introducing your printer
Memory Print quality
MarkVision
Introducing your printer
Changing printer settings
Using the operator panel
Operator panel buttons
Activity
MarkVision’s remote operator panel
New menu item or value
Then press Go
Printing current menu settings
Menus
Changing menu settings
To unlock the menus, repeat steps 1-3 above
Menus
FAX Menu
Supplies Menu
Supplies Menu
Maintenance Menu
Printed
Color Correction Vivid
Color Menu
Color Menu
For more information, see
Paper Source Tray MP Feeder Manual Paper Manual Env
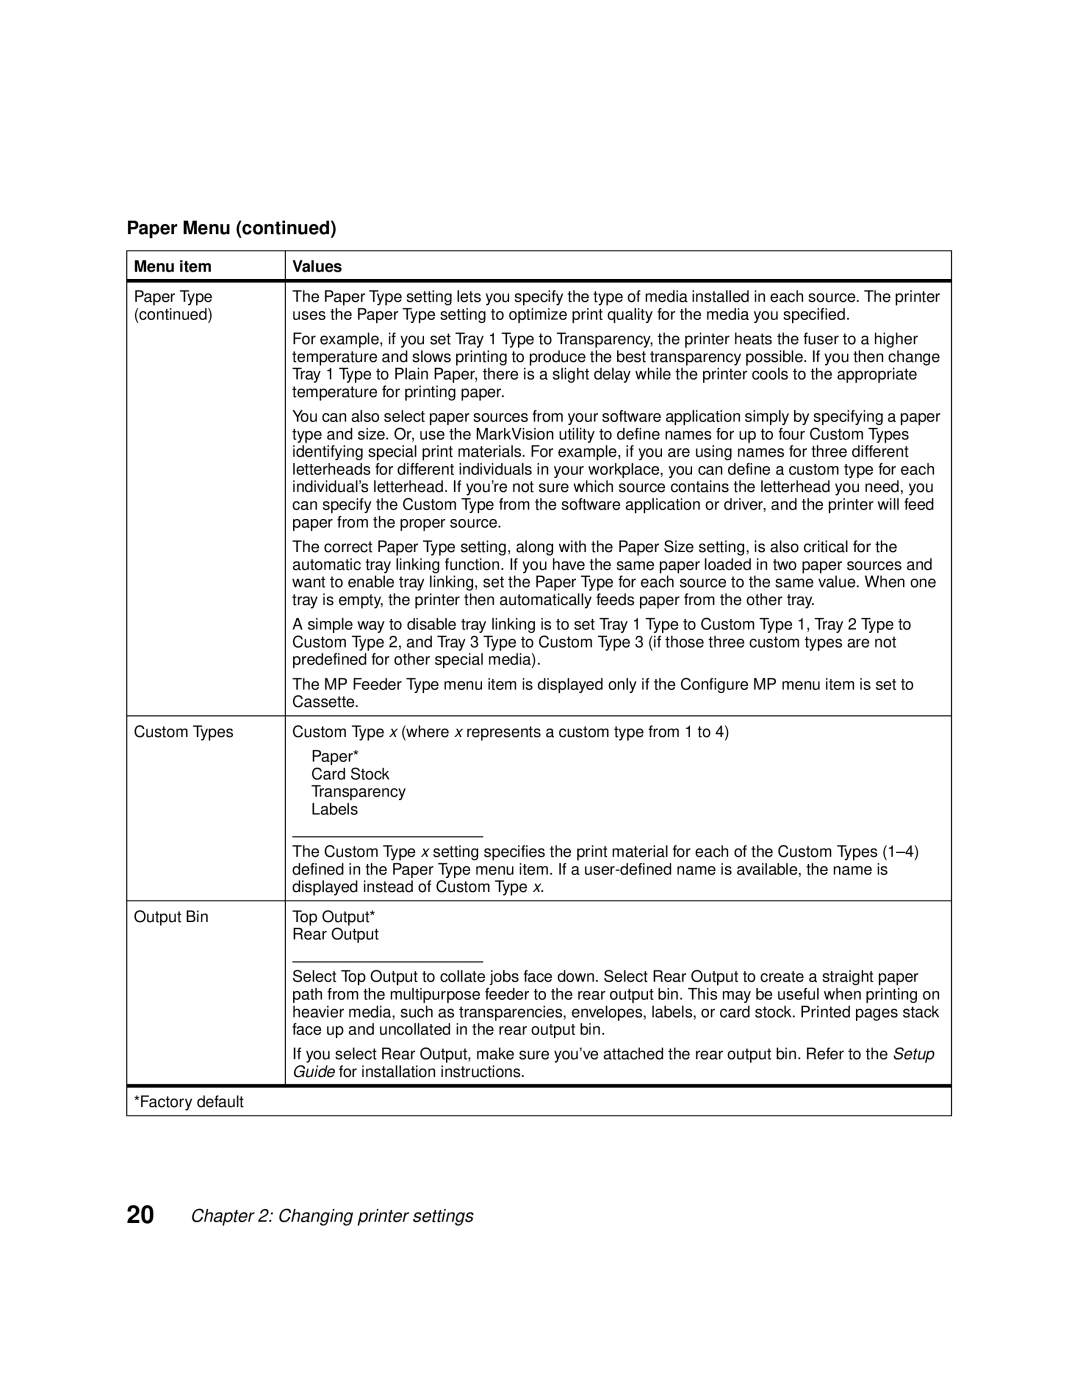
Paper Menu
Paper Menu
Displayed
Manual Env Size
Paper Size Manual Pap Size A4* Country specific
Legal
Envelope
Paper Menu
Paper Menu
Paper Type
Temperature for printing paper
Guide for installation instructions
Paper from the proper source
Substitute Size Off Letter / A4 11x17 / A3 All Listed
Requested size
Finishing Menu
Finishing Menu
Stacking transparencies in the output bin
Separator Source menu item
Copy of the job
Separator Source Tray MP Feeder
Bottom, left to right
Auto setting horizontal order
Tests Menu
Tests Menu
Format Disk Yes
Second line. Press Select
Job Menu
Job Menu
Or copying a DOS file
Setup Menu
Setup Menu
Setting has no effect on PCL emulation print jobs
Print Timeout Disabled …255
Printer receives a Form Feed command
Download Target
Pages
Printing may slow
If you do not want the alarm to sound, select Off
Protect Off
Every ten seconds
Depending on the mix of mono and color pages
Job Buffer Size Disabled 10…100%
Handles all pages as if they require color printing
96 for more information about conserving printer supplies
Memory available on the disk
Tests Menu
Statistics for the specified number of jobs
Disk is discarded
Resident, F for flash, K for disk, and D for download
PCL Emul Menu
PCL Emul Menu
Then PCL Fonts from the Tests Menu
Portrait
T2 Default =
MPF Default =
T1 Default =
T3 Default =
PCL Emul Menu
PostScript Menu
Effect on images downloaded at 300 dpi or higher resolution
Image Smoothing Off
Parallel Menu
Parallel Menu
Recommended setting
NPA Mode Off Auto
Parallel Buffer Disabled Auto 3K to maximum size allowed
Job Buffering Off
Honor Init Off
Parallel Mode Off
About the parallel interface
Turned on and off
Serial Menu
Serial Menu
RS-232/RS-422
Serial Buffer Disabled Auto 3K to maximum size allowed
Cases, Auto is the recommended setting
Protocol is automatically set to XON/XOFF
Robust XON Off
Prevent stray characters from printing
Network Menu
Network Menu
Network x Setup
Available values
Infrared Menu
Infrared Menu
NPA Mode Off Auto
Performance
Lower baud rate for the infrared connection
LocalTalk Menu
LocalTalk Menu
Connection
From the printer operator panel
LocalTalk Name Lexmark Default Name
NPA Hosts …10
LocalTalk Addr LocalTalk Node Number
Fax Menu
Fax Menu
Mended setting
Using color
Communicating in color
Defining color
Guidelines
Additive colors Subtractive colors
Using color
What Why When
Color Correction
Print Quality
Business graphics
Printing color and mono jobs
Toner Saver
Maximum Yield Paper path for mono pages
Managing memory
Solving memory problems
64MB
Default input buffer size
32MB 192K 150K
300K
Job buffering Collating jobs
Managing resources downloaded to flash or disk
Storing job statistics
Managing memory
Paper handling
Paper sources and output bins
Paper source specifications
Source Media Sizes Weight Capacity Print side
148 x 210 mm Long edge
Paper size specifications
Envelope size specifications
182 x 257 mm Long edge 13.5 210 x 297 mm
Paper handling
Letterhead
Recommended transparencies
12A0541 12A0540 Letter
Loading transparencies
Paper handling
Labels
Card stock
Storing media Avoiding paper jams
Loading paper in the trays
Select the same Paper Type setting for all the sources
Using the multipurpose feeder
Printing from the multipurpose feeder
Press Menu or Menu to enter the menus
Feeding media manually
Paper handling
Using the multipurpose feeder
Paper handling
Routine maintenance supplies
Replacing supplies
Other supplies
Contacts for supplies information
Storing supplies
When do I replace them?
Toner cartridges
Replacing supplies
When do I replace them?
Recycling used supplies
Conserving supplies
Black & White printing
Maintenance kit
Replacing service items
11G0601 115V, 750W 11G0602 220V, 750W
Solving printer problems
Understanding printer messages
Status messages
Control code strings are printed, not executed
User defaults
Ready Hex
About the menu
Status messages
Attendance messages
Save from the Setup Menu
To disable Resource Save and continue printing, press Go
To enable Resource Save after you get this message
Jobs from the disk without printing them
Set Page Protect On from the Setup Menu and resend the job
Than what you have installed in your printer
To avoid another Complex Page error
Install additional printer memory
Parallel Option x Error
Disk functions
Serial Buffer menu item
Port
Disk before you can downloading resources to it
More information about ordering new supplies
More information
Priority is posted-until you replace the photoconductors
Each time you open and close the top cover
Identifying other problems
Print quality problems
Has 100% coverage
Conductors. See page 94 for more information
Make sure you’re using recommended paper or other media
Insert sheets in envelopes
Meter envelopes or use pre-canceled stamps
Fold sheets with the text facing outward
Pre-barcodeand pre-sort all envelopes
Tration
Drive gears, which may improve registration
Printer problems
Other printing problems
Turn the printer power on
Turn the printer power off
Turn the modem power on
Or blinds
Indicated on the tray or feeder
Print, these adjustments may significantly slow print time
Properly for the paper you loaded
Menu. See page 21 for more information
You can’t collate a large job
Setting
Using. Then open and close the top cover and press Go
Number and complexity of images, and the number of pages
Clearing paper jams
Paper jam messages
Remove any paper stacked in the top output bin
Solving printer problems
Clearing paper jams
Solving printer problems
Clearing paper jams
Open the jam access door at the back of the printer
Clear any paper from the area Close the jam access door
Cleaning the LEDs
Cleaning the fuser coating roll
Use a dry, lint-free cloth to clean the roll
Calling for service
Solving printer problems
Operating systems supported
MarkVision
Introducing MarkVision
Appendix a MarkVision
Appendix a MarkVision
Network adapter firmware setup Yes Printer configuration
Selected MarkVision features
Visual status Yes Alerts Remote operator panel
Centralized setup
Remote monitoring
Printer management
Appendix a MarkVision
MarkVision online Help
Job management
Installing MarkVision on a network
MarkVision network support
Getting updated utilities and drivers
Online services Automated fax system
Appendix a MarkVision
Printer specifications
Standard features
Options
Printer supplies
Appendix B Printer specifications
Fonts
Printing font samples
Appendix C Fonts
Line Printer Postnet Barcode
Symbol sets for PCL emulation
Symbol sets
ISO-10 Swedish ISO-11 Swedish
PC-8 PC Nova
Downloadable fonts
Safety information
Consignes de sécurité
Norme di sicurezza
Pautas de Seguridad
Sikkerhedsoplysninger
Informació de Seguretat
Appendix D Safety information
Appendix D Safety information
Appendix D Safety information
Appendix D Safety information
Appendix D Safety information
Energy Star
Acoustics
Electronic emissions notices
European Community EC directives conformity
United Kingdom Telecommunications Act
Warranty
Statement of Limited Warranty
Extent of warranty Limitation of liability Additional rights
Glossary
Application. See software application
Bin. See output bin
Color registration. See registration
DSR. See Data Set Ready DTR. See Data Terminal Ready
Glossary
Hard disk. See disk
LAN. See local area network
Up printing. See multipage printing
Operator panel display. See display
Print material. See media
Process black. See composite black
Glossary
Timing adjustment. See calibration
Glossary
Index
Numerics
See printer drivers
See paper jams
Index
See printer messages mono printing 33
Index
Index
Setup Guide
Technical Reference
Index
Reader’s Comment Form
Business Reply Mail