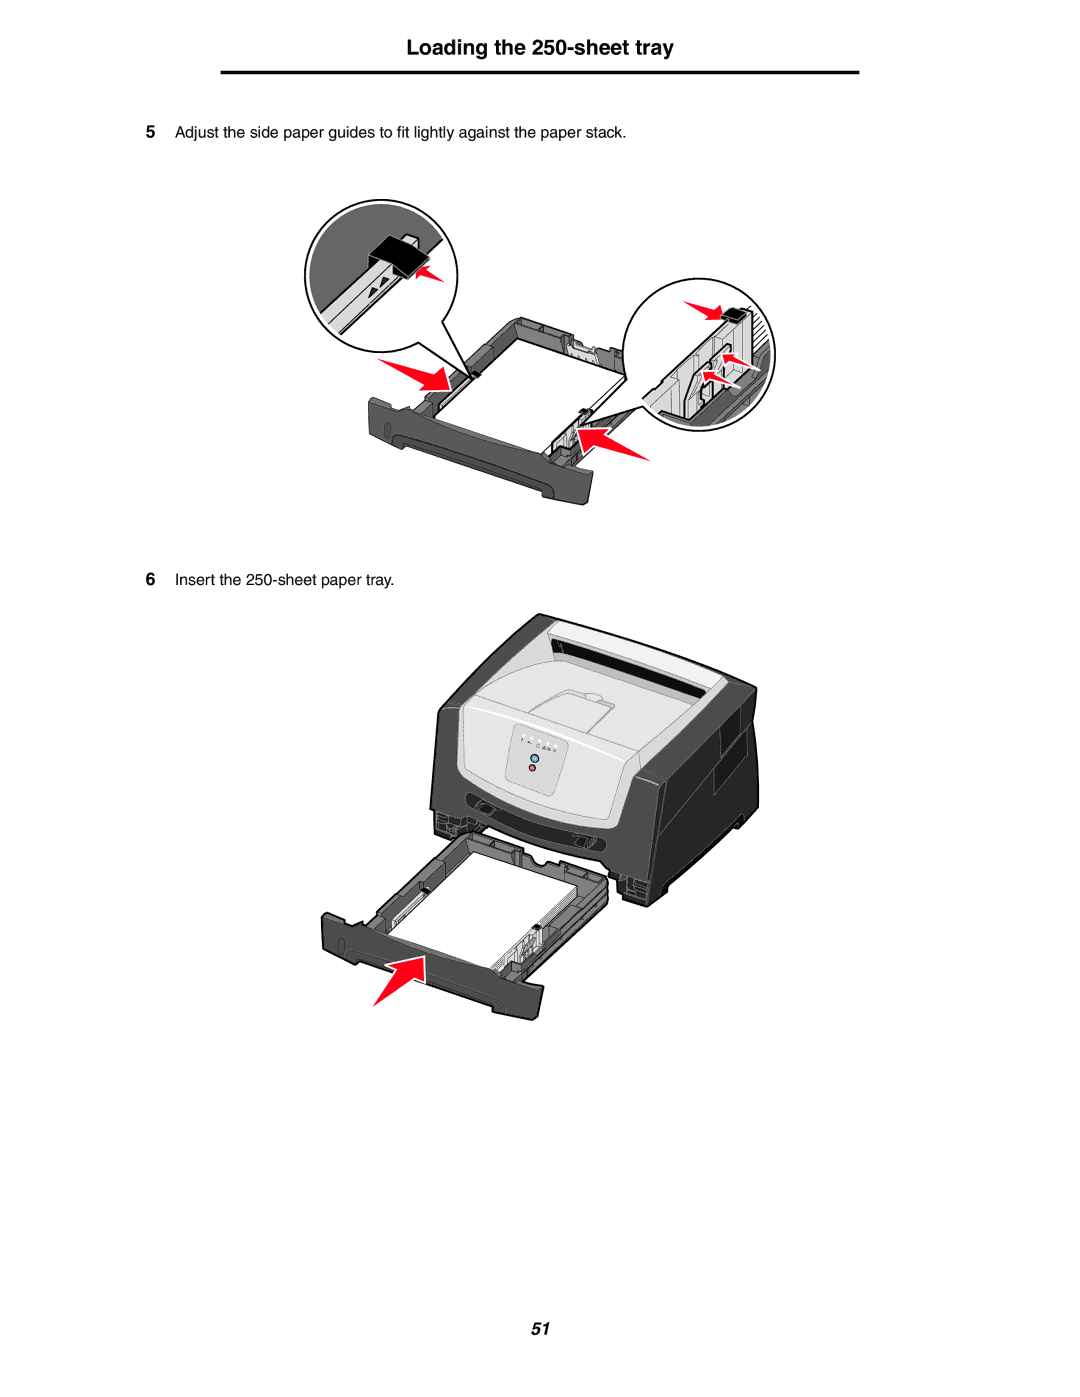
Manuals
/
Lexmark
/
Computer Equipment
/
Printer
Lexmark
250dn manual Loading the 250-sheet tray, Insert the 250-sheet paper tray
Models:
250dn
1
51
101
101
Download
101 pages
39.57 Kb
48
49
50
51
52
53
54
55
<
>
Troubleshooting
Install
Warranty
Maintenance
Configuration menus overview
General problems
to reset the printer
Setup menu
Error
Setting
Page 51
Image 51
Loading the
250-sheet
tray
5
Adjust the side paper guides to fit lightly against the paper stack.
6
Insert the
250-sheet
paper tray.
51
Page 50
Page 52
Page 51
Image 51
Page 50
Page 52
Contents
2006 Lexmark International, Inc. All rights reserved
E250d and E250dn
User’s Guide
June
2006 Lexmark International, Inc. All rights reserved
Safety information
Edition June
Trademarks
Chapter 1 Printer overview
Contents
Chapter 2 Using the control panel
Chapter 3 Understanding the printer configuration menus
Chapter 7 Software tasks
Contents
Chapter 6 Installing options
Chapter 9 Troubleshooting
250-sheet tray
1 Printer overview
150-sheet output bin
Front door
Rear exit
Power button
Power connect
Printer overview
Press and release Cancel
2 Using the control panel
Error
Cancel button
Understanding the control panel lights
Ready / Power Saver
Flushing / Resolution
Understanding the control panel lights
Toner Low
Common light sequences continued
Error
Understanding the control panel lights
Printer error
Network interface errors
Host interface disabled
Service error
Primary codes
Ready / Power Saver
for a list of current printer settings
to reset the printer
buffer
to print the contents of the print
Understanding the control panel lights Hex Trace Ready
Waiting
Press and hold Cancel
Understanding the control panel lights Flushing / Resolution reduced
Not ready
Press and release Cancel
Light sequence
Understanding the control panel lights Close door
Insufficient collation area / Insufficient memory
Complex page
Light sequence
Understanding the control panel lights Cancel job / Reset printer
Press Cancel
Load print media
Press and hold Cancel
Understanding the control panel lights Load manual feeder
Toner low
sequence and continue processing the print job
and how do I order them? on page
Note The Toner Alarm see Secondary error
Toner cartridge region mismatch
Photoconductor kit life warning
Light sequence
Replace photoconductor printer hard stop
Programming engine code / Programming system code
Understanding the control panel lights
Network interface errors / Host interface disabled
Service error
Invalid engine code / Invalid network code
to clear the secondary message
Understanding the control panel lights Printer error
Paper jam printer error
more information
What this light sequence means
Understanding the control panel lights Short paper
Output bin full
Light sequence
Secondary light sequences
Secondary errors
When the Error and Continue
When the Paper Jam
unsupported size
Font error
Secondary light sequences continued
Paper jam duplex
mismatch
Invalid engine code
Invalid network code
Toner cartridge region
What this light sequence means
Understanding the control panel lights Secondary error codes
Paper jam at the input sensor
Light sequence
Light sequence
Understanding the control panel lights Paper jam in the manual feeder
Paper jams between the input and exit sensors
Paper jams as a printed job exits the printer
Understanding the control panel lights
Paper jam in the 250-sheet tray
Paper jam in the 550-sheet drawer
Paper jam duplex rear
Light sequence
Paper jam duplex - unknown location
Paper jam duplex - unsupported size
Understanding the control panel lights
What you can do
Understanding the control panel lights Complex page
Light sequence
What this light sequence means
printing the job. The job may not print correctly
Network interface errors
to cancel the print job
Understanding the control panel lights Insufficient collation area
Press and release Cancel
Understanding the control panel lights Font error
Insufficient printer memory
printing
What this light sequence means
Host interface disabled
Understanding the control panel lights ENA connection lost
Light sequence
page
Understanding the control panel lights Memory full
Short paper
printing the job the job may not print correctly
Light sequence
Understanding the control panel lights Invalid engine code
Invalid network code
Toner cartridge region mismatch
Understanding the control panel lights
Change toner cartridge/invalid refill
Missing / Defective toner cartridge
sequence
What you can do
Understanding the control panel lights Unsupported toner cartridge
Light sequence
What this light sequence means
Printing the Printer Settings Configuration sheet
3 Understanding the printer configuration menus
Setting
Configuration menus overview
and Error
Standard
Setup menu
Parallel menu
Protocol
Reset
Reset Factory
Defaults
Reset Maint Cnt
Source
Weight
4 Print media tasks and tips
What types of print media can be loaded?
Where can print media be loaded in the printer?
Selecting print media
Power cord connect
Selecting print media
Paper
Curl
Paper characteristics
Weight
Moisture content
Recycled paper
Fiber content
Preprinted forms and letterhead
Unacceptable paper
Selecting print media
Transparencies
Envelopes
Labels
Storing supplies
Tips on storing print media and supplies
Card stock
Storing paper
Tips on preventing jams
Loading the 250-sheet tray
4 Insert the paper stack with the print side facing down
Loading the 250-sheet tray
5 Adjust the side paper guides to fit lightly against the paper stack
Loading the 250-sheet tray
6 Insert the 250-sheet paper tray
Loading the 250-sheet tray
Extending the tray for legal- or folio-size paper
Loading the 250-sheet tray Attaching the dust cover
Loading the manual feeder
Using the rear exit
Using the rear exit
and Continue
Secondary error codes on page 25 for more information
Clearing jams
Clearing jams
Clearing jams
5 Install the 250-sheet paper tray
Clearing jams
6 Open the front door, and remove the print cartridge assembly
8 Open the rear exit door, and remove the jammed pages
Clearing jams
Manually feeding a print job
5 Printing tasks
Manually feeding a print job
Landscape
Printing on both sides of the paper duplex printing
Portrait
Landscape
4 Select either Long Edge or Short Edge 5 Select 2-sided printing
Printing on both sides of the paper duplex printing
Portrait
Down
Printing multiple page images on one page N-up printing
Across
Page
Printing on letterhead
Printing using an overlay or a watermark
Using an overlay
Printing on letterhead
1 Click Start Æ Settings Æ Printers
Canceling a print job
Using a watermark
Canceling a print job
Canceling a job from a Macintosh computer
Canceling a print job from a computer running Mac OS
Canceling a job from a computer running Mac OS
Accessing the system board
6 Installing options
3 Open the rear exit door
Accessing the system board
7 Remove the cover and set it aside
Accessing the system board
Adding a memory card
1 Access the system board see Accessing the system board on page
10 See Recognizing installed options on page
Adding a memory card
3 Click File Æ Properties 4 Click the Install Options tab
Installing an optional 550-sheet drawer
Recognizing installed options
Installing an optional 550-sheet drawer
3 Click File Æ Properties 4 Click Print Test Page
Printing the menu settings and network setup pages
7 Software tasks
Printing a test page from the computer
Paper Settings
Using the Local Printer Settings Utility
Finishing Settings
Description
8 Supplies information
What supplies do I need and how do I order them?
Part number
Conserving supplies
What supplies do I need and how do I order them?
Storing supplies
Checking the toner and photoconductor levels
Knowing when you need new supplies
Ordering a maintenance kit
Knowing when you need new supplies
life warning
Recognizing the control panel light sequences
Toner low
Photoconductor kit
Changing the toner cartridge
4 Unpack the new toner cartridge
Changing the toner cartridge
Changing the photoconductor kit
Lexmark products
Solution / Answer
9 Troubleshooting
General problems
Problem / Question
Turning on Reduced Curl mode
General problems
Settings Utility on page
Selecting printer operating mode
Print quality problems
Transparency print quality is poor
when sheets are handled
A BCD E
Print is too light or too dark
Skewed print
Ghost Images
Uneven printing
Incorrect margins
Print quality problems
Solid black pages
Print media curls badly once it
prints and exits to the output bin
Print quality problems
Cleaning the printhead lens
5 Gently wipe the printhead lens with a clean, dry, lint-free cloth
Print quality problems
Industry Canada compliance statement
Notices
Conventions
Electronic emission notices
Hot surface notice Power regulation notice
Notices
Japanese VCCI notice Korean MIC statement
Total energy usage
Noise emission levels
Product energy consumption
Off mode
Laser advisory label
Statement of Limited Warranty for Lexmark E250d and E250dn
Waste from Electrical and Electronic Equipment WEEE directive
Laser notice
Limitation of liability
Limited warranty service
Extent of limited warranty
Statement of Limited Warranty for Lexmark E250d and E250dn
Additional rights
Statement of Limited Warranty for Lexmark E250d and E250dn
Notices
Index
Index
Index