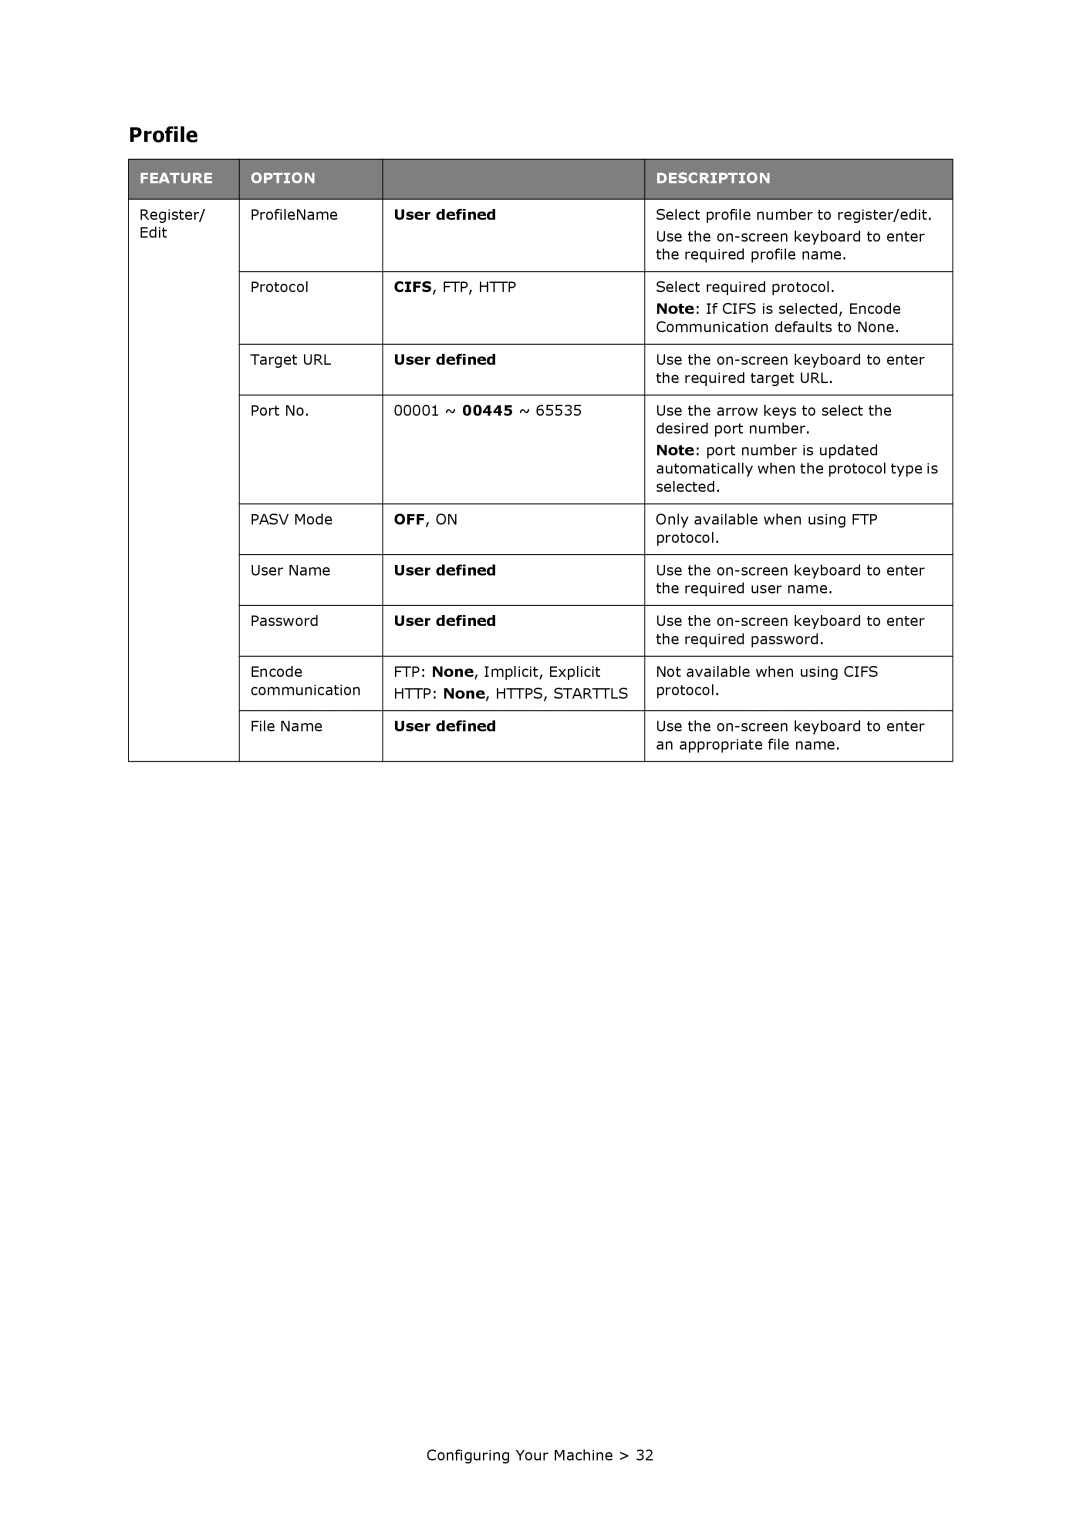
59311701
MC860n MFP
User’s Guide
Copyright Information
Document Information
Disclaimer
Trademark Information
Contents
from the Web Page from the Configuration Tool Utility
Troubleshooting
Specifications
Need Help? Visit our Web Site
my.okidata.com
Notes, Cautions and Warnings
A note provides additional information to supplement the main text
Emergency First Aid
Introduction
High speed USB 2.0 interface
DESCRIPTION
MFP overview
Front view
Rear view
DESCRIPTION
Control Panel
4. RESET button
REF. DESCRIPTION
1. Touch screen display
14. Indicator lights
REF. DESCRIPTION
7. STOP/START buttons
START
Changing the Display Language
Make sure the scanner is in the UNLOCKED position before operating
Getting started
Releasing the Scanner Locks
Power Save Mode
Switching Off
Installing Drivers and Utilities
Installing the Fax Printer Driver
Twain and Printer Drivers
Fax Driver
Configuration Tool
Setting up the Actkey Utility
Actkey Utility
Paper Recommendations
Cassette Trays
Multi Purpose Tray
Face Down Stacker
Face Up Stacker
Duplex Unit
Loading Paper
Cassette Trays
To prevent paper jams
Do not leave space between the paper and the guides and rear stopper
Do not load damaged paper
Do not load paper of different sizes or types at the same time
Multi Purpose Tray
1. Open the multi purpose tray 2. Fold out the paper supports
Configuring Your Machine
Minimum Configuration Requirements
Pre-configuration Information
Fax Set Up
Network Set Up
Explanation
Scan to NetworkPC
Internet Communication Features
Scan to e-mail
from the Web Page
Configuration
from the Configuration Tool Utility
from the Control Panel
Address Book
FEATURE
OPTION
Paper Setup
FEATURE
OPTION
DESCRIPTION
Store Doc Settings
FEATURE
FEATURE
OPTION
Profile
FEATURE
automatically when the protocol type is
OPTION
FEATURE
OPTION
DESCRIPTION
Darker Enhance image sharpness and
DESCRIPTION
FEATURE
OPTION
View Information
Admin Setup
FEATURE
OPTION
DESCRIPTION
FEATURE
OPTION
DESCRIPTION
Right&Left, Top
DESCRIPTION
FEATURE
OPTION
FEATURE
Password, enable Rx Protect, Auto
This sets the transmission mode to
OPTION
FEATURE
OPTION
DESCRIPTION
not registered in the Address Book
DESCRIPTION
FEATURE
OPTION
FEATURE
OPTION
DESCRIPTION
High G4, Medium
FEATURE
OPTION
DESCRIPTION
User defined
FEATURE
When Mismatch If a paper size or
Only available when Duplex is ON
OPTION
FEATURE
page. When black and white pages
per page when raw text is received
dimensions of physical page sizes
FEATURE
should perform jam recovery after
OPTION
DESCRIPTION
FEATURE
OPTION
DESCRIPTION
Selecting this will perform the auto
FEATURE
this is done on power on and when
Performs fine adjustment of image
OPTION
FEATURE
button. When set to Auto, they are
OPTION
DESCRIPTION
FEATURE
OPTION
DESCRIPTION
78 Column
FEATURE
same size and type you can enable
continuous paper mode. When one
OPTION
DESCRIPTION
FEATURE
OPTION
FEATURE
Enables or disables communication
OPTION
DESCRIPTION
FEATURE
OPTION
DESCRIPTION
Set a user ID for the SMTP server
Doc Type
FEATURE
acknowledge when a particular job
OPTION
DESCRIPTION
FEATURE
Disable
OPTION
DESCRIPTION
FEATURE
machine enters power save mode
OPTION
DESCRIPTION
FEATURE
OPTION
DESCRIPTION
If you need to move your machine
Job Programs Setting
Shutdown
FEATURE
FEATURE
Explanation of Filing Protocols
HTTP
Setting IIS Anonymous Access
Setting IIS Privileged Access
CIFS
Advanced Set Up
Setting the Fax Facility
Initial Set Up
3. Press Speed Dial
From the Setup screen
Assigning Fax Numbers to the Address Book
3. Press Speed Dial
Deleting an Entry from the Address Book
From the Fax Ready screen
Connecting to a PBX
Reception Mode
Automatic Redial
Adding a Telephone Handset
Logging Out
Access Control
Logging In
Placing Documents in the ADF
Operation
Loading Documents
Placing Documents on the Scanner Glass
3. Adjust the Paper Guides 1 to centre the document in the ADF
1. Open the document cover
3. Close the document cover
Increasing Copy Count
Copying
Basic Operation
Advanced Operation
FEATURE
OPTION
DESCRIPTION
FEATURE
OPTION
DESCRIPTION
Right&Left, Top
FEATURE
OPTION
DESCRIPTION
Text&Photo
FEATURE
OPTION
DESCRIPTION
Auto
Faxing
If you wish to cancel faxing, press Stop 4 to abort the operation
Basic Operation
Fax transmissions are sent in black and white only
Advanced Operation
FEATUR
OPTION
DESCRIPTION
FEATUR
OPTION
DESCRIPTION
user defined
DESCRIPTION
FEATUR
OPTION
Up to 30 addresses can be entered using the numeric keys
Manual Feed
Broadcasting
Sub Address, Password and ID Code
2. Press Admin Setup
4. Press Fax Setup 5. Press F-Code Box
F Code Communication
a Press Password
6. Press Register/Edit
Registering an F Code Secure Box 1. Press Secure Box
a Press Box name
Registering an F Code Bulletin box 1. Press Bulletin Box
a Press Rx Protect
a Press Auto Print
a Press Password
a Press I.D.Code
a Press OverWrite
a Press Erase Tx Doc
Transmission using a Sub Address F Code Transmission
Deleting an F Code Box
4. Press F-Code Tx
2. Press Admin Setup
Receiving using a Sub Address F Code Polling
3. Press Store Doc Setting
3. Press FPolling
Storing Documents to the Notice Board
2. Press Store Doc Setting
Printing Stored Documents
4. Press F-Code Doc
Deleting Stored Documents
Fax Job Reports and Listings
Fax Job View/Cancel
Fax Receiving
Sending a Fax from your PC
Adding Fax Numbers to the Phone Book
5. Select FAX number - New Group
Adding New Groups to the Phone Book
5. Select FAX number - New FAX number
Server 2003 select Start Printers and Faxes
2000 select Start Settings Printers
Importing and Exporting Fax Numbers
Scanning
Basic Operation
Local PC select target application from the operator panel on the MFP
Remote PC select target application from utility on your PC
Scan to E-mail
FEATURE
OPTION
DESCRIPTION
FEATURE
OPTION
DESCRIPTION
High G4
FEATURE
OPTION
DESCRIPTION
Text&Photo
FEATURE
OPTION
DESCRIPTION
This machine allows you to send scanned documents to multiple e-mail addresses. Simply press the Destination button to add and enter another address
Scan to USB Memory
b Folder
Scan to Local PC
a Application
d Fax
Actkey Interface
c E-mail
Scan to Network PC
FEATURE
OPTION
DESCRIPTION
High G4, Medium
FEATURE
OPTION
DESCRIPTION
Text, Text&Photo
Deleting a Network Profile To delete a network profile
Managing Profiles
Adding a new network profile
Scan to Remote PC
5. Select TWAIN OKI MC860 Twain
7. Press the Scan button to display the scanning options
8. Press the required scan button 1 to start scanning
9. Press Quit to continue
a Press Scan More Pages 2 to continue scanning further documents
Continuous Scan Mode
Functions Common to Copy, Fax and Scan Operations
Job Programs
Creating a Job Program
Using a Job Program
2. Press the Job Programs Setting button
Deleting a Job Program
Changing the Key Speed
Information
Configuration
Reports and Listings
Scan
Print
Maintenance
Consumable Life Expectancy
Consumable Order Details
Toner
Toner Cartridge Replacement
Replacing Consumable Items
2. Press the cover release a and open the top cover b fully
Page
15. Gently lower the scanner
Image Drum Replacement
Static sensitive devices, handle with care
The green image drum surface at the base of the cartridge is very delicate and light sensitive. Do not touch it and do not expose it to normal room light for more than 5 minutes. If the drum unit needs to be out of the MFP for longer than this, please wrap the cartridge inside a black plastic bag to keep it away from light. Never expose the drum to direct sunlight or very bright room lighting
Page
Transfer Belt Replacement
3. Press the cover release a and open the top cover b fully
Cyan cartridge
Magenta cartridge
Black cartridge
The green image drum surface at the base of each cartridge is very delicate and light sensitive. Do not touch it and do not expose it to normal room light for more than 5 minutes. If the drum unit needs to be out of the MFP for longer than this, please wrap the cartridge inside a black plastic bag to keep it away from light. Never expose the drum to direct sunlight or very bright room lighting
13. Gently lower the scanner
Fuser Replacement
4. Identify the fuser handle 1 on the top of the fuser unit
12. Gently lower the scanner
the ADF
Cleaning
the Unit Casing
4. Carefully lift inner cover
Be careful not to stress or damage the touch screen display
the Document Glass
the Touch Screen
2. Press the cover release a and open the top cover b fully
the LED Head
There is no need to switch the MFP off to clean the lens
5. Gently lower the scanner
Order Codes
Installing Upgrades
Memory Upgrade
a Grip the board firmly by its short edges and pull it out of the slot
9. Reconnect the power cable and switch the MFP on
Additional Paper Trays and Storage Cabinet
Inventory
CONTENT
DESCRIPTION
Installation
200mm
600mm
831mm 1000mm
3. Fit stabilizing feet
Page
Setting the Driver Device Options
3. Click Printer Setup…
Windows
Mac OS
2. Click Printing 3. Click Set Up Printers…
Panther Mac OS X
In the ADF
Troubleshooting
Clearing Paper Jams
4. Close the ADF front cover
In the Printer
3. Carefully pull the paper out of the ADF unit
3. Press the cover release a and open the MFP’s top cover b fully
Troubleshooting
Cyan cartridge
Magenta cartridge
Black cartridge
Page
9. Starting with the cyan image drum unit nearest the fuser, replace the four image drums into the drum cavity, making sure to locate them in the correct order
9. Lift the front cover release and pull open the front cover
Troubleshooting
13. Gently lower the scanner
Dealing with unsatisfactory printing
SYMPTOMS
POSSIBLE CAUSES
STEPS TO TAKE
Dealing with Unsatisfactory Copying
SYMPTOMS
POSSIBLE CAUSES
STEPS TO TAKE
Fax Problem Checklist
MFP is set for delayed transmission but it did not send. Check the display to make sure that the MFP is set to the correct time and date see “Time Setup” on page
Information and Error Messages
STATUS
MESSAGE
MEANING / ACTION
HDD Error %ERRCODE%
STATUS
MESSAGE
MEANING / ACTION
STATUS
MESSAGE
MEANING / ACTION
CODE
PUFLASH% Flash Error
STATUS
MESSAGE
MEANING / ACTION
STATUS
MESSAGE
MEANING / ACTION
CODE
STATUS
MESSAGE
MEANING / ACTION
CODE
STATUS
MESSAGE
MEANING / ACTION
CODE
STATUS
MESSAGE
MEANING / ACTION
CODE
STATUS
MESSAGE
MEANING / ACTION
CODE
STATUS
MESSAGE
MEANING / ACTION
CODE
STATUS
MESSAGE
MEANING / ACTION
CODE
STATUS
MESSAGE
MEANING / ACTION
CODE
STATUS
MESSAGE
MEANING / ACTION
CODE
STATUS
MESSAGE
MEANING / ACTION
CODE
Specifications
SPECIFICATION
General
Scanning
SPECIFICATION
Copy Specification
Fax Specification
SPECIFICATION
Network Specification
SPECIFICATION
E-mail Specification
Printing
SPECIFICATION
Filing Specification
SPECIFICATION
Image drum life
20,000 pages at 3 pages per job
Belt life
d Press User Install
f Press Mirror Carriage mode
Appendix A - Moving and transporting
Moving Your System
j On the touch screen, press Close
f Press Mirror Carriage mode
Transporting Your System
d Press User Install
Page
4. Press the cover release a and open the top cover b fully
Appendix A - Moving and transporting
9. Gently lower the scanner
10. Protect the MFP with cushion pads and put it in a box