Introduction
Controller Menu
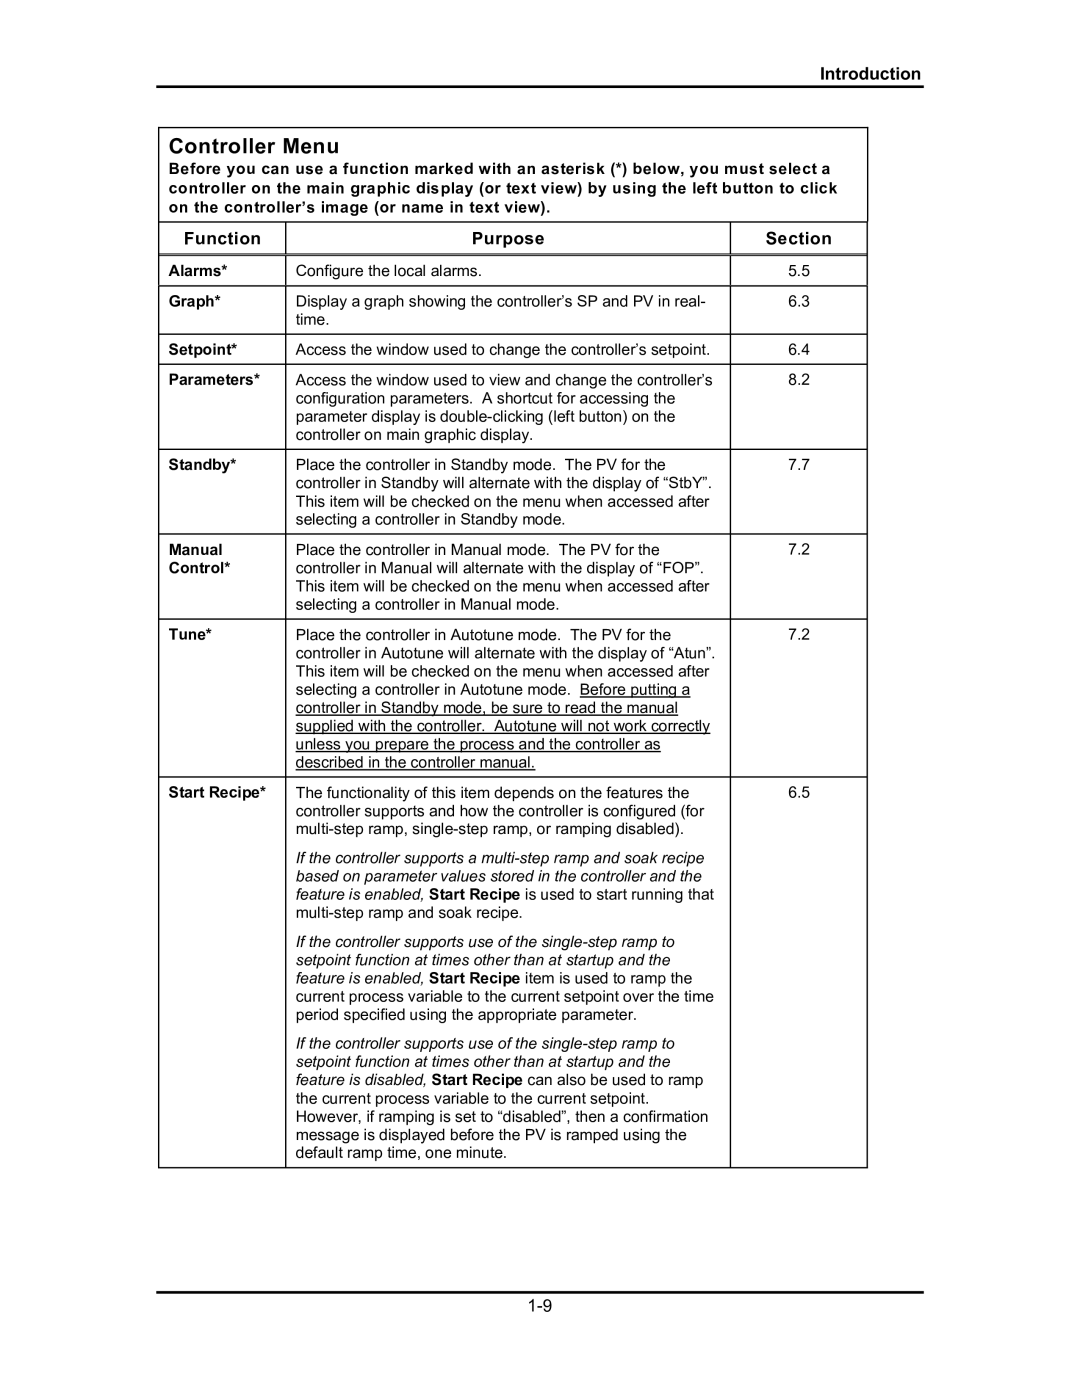
Before you can use a function marked with an asterisk (*) below, you must select a controller on the main graphic display (or text view) by using the left button to click on the controllerÕs image (or name in text view).
Function | Purpose | Section |
|
|
|
Alarms* | Configure the local alarms. | 5.5 |
|
|
|
Graph* | Display a graph showing the controllerÕs SP and PV in real- | 6.3 |
| time. |
|
|
|
|
Setpoint* | Access the window used to change the controllerÕs setpoint. | 6.4 |
|
|
|
Parameters* | Access the window used to view and change the controllerÕs | 8.2 |
| configuration parameters. A shortcut for accessing the |
|
| parameter display is |
|
| controller on main graphic display. |
|
|
|
|
Standby* | Place the controller in Standby mode. The PV for the | 7.7 |
| controller in Standby will alternate with the display of ÒStbYÓ. |
|
| This item will be checked on the menu when accessed after |
|
| selecting a controller in Standby mode. |
|
|
|
|
Manual | Place the controller in Manual mode. The PV for the | 7.2 |
Control* | controller in Manual will alternate with the display of ÒFOPÓ. |
|
| This item will be checked on the menu when accessed after |
|
| selecting a controller in Manual mode. |
|
|
|
|
Tune* | Place the controller in Autotune mode. The PV for the | 7.2 |
| controller in Autotune will alternate with the display of ÒAtunÓ. |
|
| This item will be checked on the menu when accessed after |
|
| selecting a controller in Autotune mode. Before putting a |
|
| controller in Standby mode, be sure to read the manual |
|
| supplied with the controller. Autotune will not work correctly |
|
| unless you prepare the process and the controller as |
|
| described in the controller manual. |
|
|
|
|
Start Recipe* | The functionality of this item depends on the features the | 6.5 |
| controller supports and how the controller is configured (for |
|
|
| |
| If the controller supports a |
|
| based on parameter values stored in the controller and the |
|
| feature is enabled, Start Recipe is used to start running that |
|
|
| |
| If the controller supports use of the |
|
| setpoint function at times other than at startup and the |
|
| feature is enabled, Start Recipe item is used to ramp the |
|
| current process variable to the current setpoint over the time |
|
| period specified using the appropriate parameter. |
|
| If the controller supports use of the |
|
| setpoint function at times other than at startup and the |
|
| feature is disabled, Start Recipe can also be used to ramp |
|
| the current process variable to the current setpoint. |
|
| However, if ramping is set to ÒdisabledÓ, then a confirmation |
|
| message is displayed before the PV is ramped using the |
|
| default ramp time, one minute. |
|
|
|
|