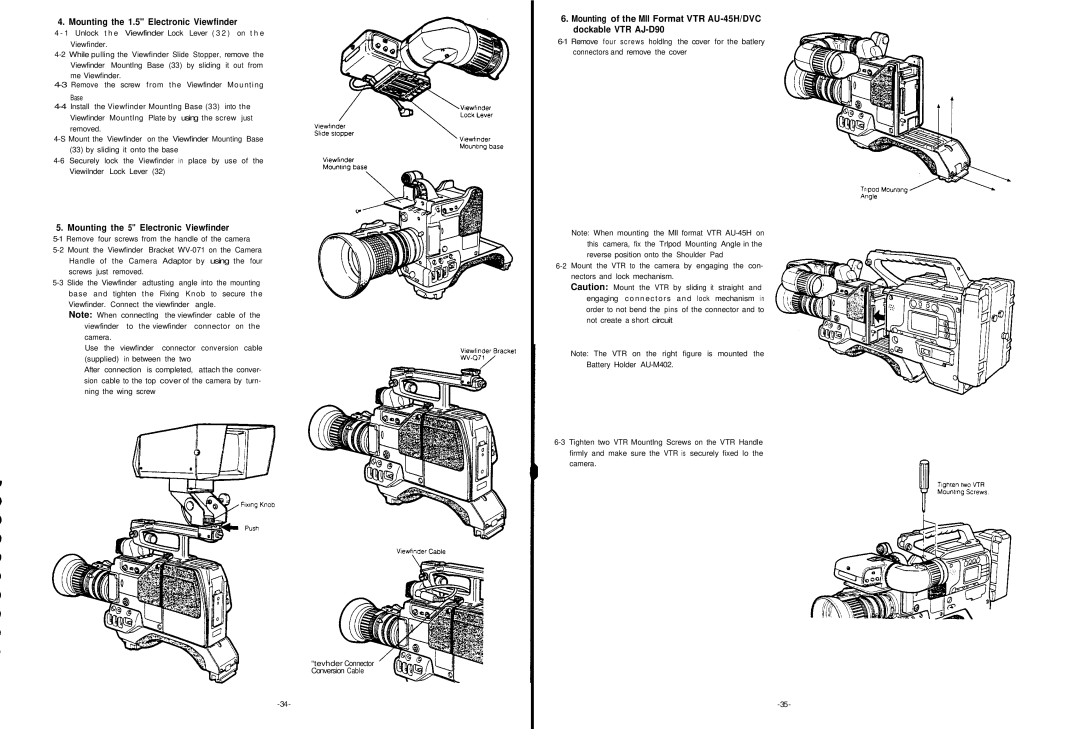
4. Mounting the 1.5" Electronic Viewfinder
4 - 1 Unlock t h e Viewfinder Lock Lever ( 3 2 ) on t h e
Viewfinder.
4-2 While pulling the Viewfinder Slide Stopper, remove the Viewfinder Mountlng Base (33) by sliding it out from
me Viewfinder.
4-3 Remove the screw from the Viewfinder Mounting
Base
4-4 Install the Viewfinder Mountlng Base (33) into the Viewfinder Mountlng Plate by using the screw just removed.
4-S Mount the Viewfinder on the Viewfinder Mounting Base (33) by sliding it onto the base
4-6 Securely lock the Viewfinder in place by use of the Viewilnder Lock Lever (32)
5. Mounting the 5" Electronic Viewfinder
5-1 Remove four screws from the handle of the camera
5-2 Mount the Viewfinder Bracket WV-071 on the Camera Handle of the Camera Adaptor by using the four screws just removed.
5-3 Slide the Viewfinder adtusting angle into the mounting base and tighten the Fixing Knob to secure the Viewfinder. Connect the viewfinder angle.
Note: When connectlng the viewfinder cable of the viewfinder to the viewfinder connector on the camera.
Use the viewfinder connector conversion cable (supplied) in between the two
After connection is completed, attach the conver- sion cable to the top cover of the camera by turn- ning the wing screw
“tevhder Connector Conversion Cable
-34-
6.Mounting of the MII Format VTR AU-45H/DVC dockable VTR AJ-D90
6-1 Remove four screws holdlng the cover for the batlery connectors and remove the cover
Note: When mounting the MII format VTR AU-45H on this camera, fix the Trlpod Mounting Angle in the reverse position onto the Shoulder Pad
6-2 Mount the VTR to the camera by engaging the con- nectors and lock mechanism.
Caution: Mount the VTR by sliding it straight and engaging connectors and lock mechanism in order to not bend the pins of the connector and to not create a short circuit
Note: The VTR on the right figure is mounted the Battery Holder AU-M402.
6-3 Tighten two VTR Mountlng Screws on the VTR Handle firmly and make sure the VTR is securely fixed lo the camera.
-35-

