AW‑HE60HN AW‑HE60SN AW‑HE60HE AW‑HE60SE
Abbreviations
Illustrations and screen displays featured in the manual
Trademarks and registered trademarks
About copyright and licence
Contents
WwRequired personal computer environment
Before use
WwOverview
Usage restrictions
WwDisclaimer of warranty
Before use
WwNetwork security
WwConcerning the plug-in viewer software
英語版 要入手
Basic shooting operations
Select the shooting mode
Pp Power on preset
How to turn the power on and off
WwTurning the power on
Set the Operate switch on the controller to on
Set the Operate switch on the controller to OFF
How to turn the power on and off
WwTurning the power off
WwTypes of shooting modes
Selecting the units
Selecting the shooting modes scene files
Selecting the shooting modes scene files
WwHow to select the shooting mode
AW ‑RP655 display AW ‑HE60 scene file
QqChanging the camera’s direction
QqUsing the zoom function
QqSwitching the direction or zoom speed
Shooting
Menu screen is displayed
Lens focus is not adjusted automatically
Unit does not move
Multiple color bands color bars are displayed
More advanced operations
Manual shooting
WwManually adjusting the focus
Manual shooting
WwManually adjusting the iris
When 50 Hz has been set as the unit’s frequency
WwManually adjusting the shutter speed
Qq How to set the shutter speed using the AW‑RP555
When 59.94 Hz has been set as the unit’s frequency
Press the Gain button to turn off its lamp
WwManually adjusting the gain
Press the OFF, LOW or HI button
Preset memories
Hold down the Reset button
Preset memories
Set to the memory recording mode
Set the memory recording mode
When the AW‑RP555 is connected
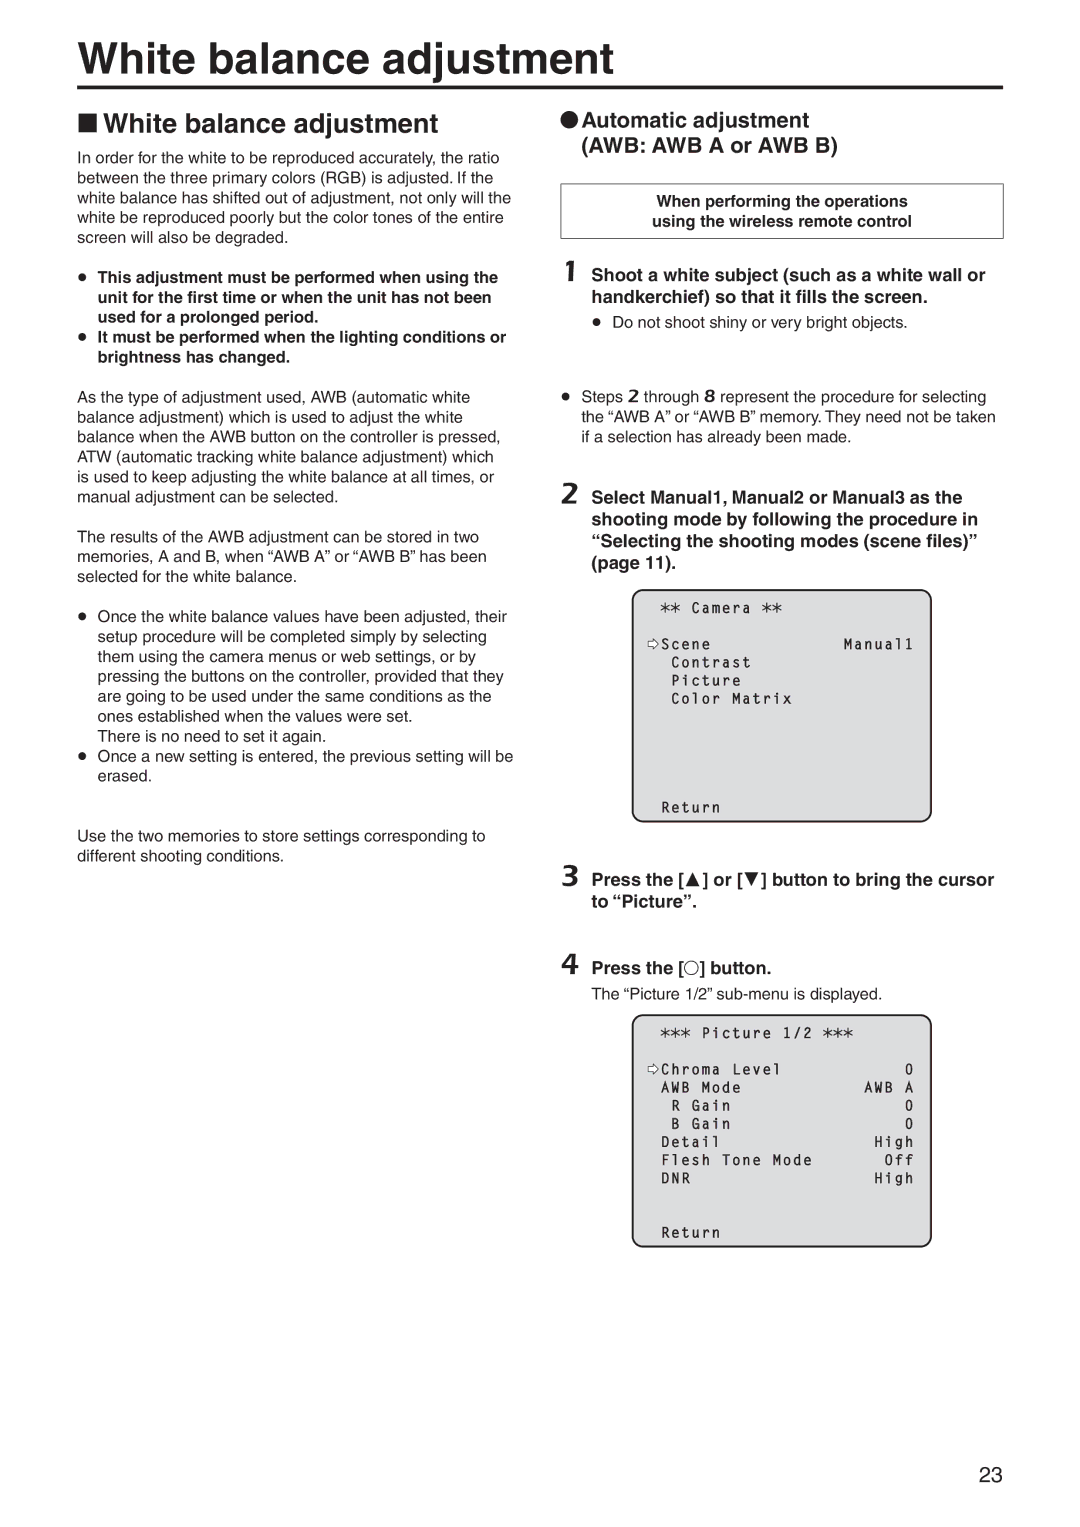
QqAutomatic adjustment AWB AWB A or AWB B
White balance adjustment
WwWhite balance adjustment
Press the AWC button
White balance adjustment
Press the SET button for 2 seconds
QqAuto tracking white adjustment ATW
QqManual adjustment Gain and B gain adjustment
Press the IRIS - button
Black level master pedestal adjustment
WwBlack level master pedestal adjustment
Press the M/IRIS button
Press the Iris button several times to turn off its lamp
Black level master pedestal adjustment
QqHorizontal phase adjustment
Genlock adjustment AW‑HE60S only
WwGenlock adjustment
Press the Mode button
Genlock adjustment AW‑HE60S only
QqColor phase adjustment
Genlock adjustment AW‑HE60S only
Table of operations
Basic operations
Previous menu
Basic operations
Press the or button to change the setting
Jog dial R
Jog dial main
Jog dial L
Press the Menu button to exit the camera menu
QqProcedure for camera menu operation AW‑RP655
Mode button lights up at the BAR setting
Press the Menu button for 2 seconds to exit the camera menu
QqProcedure for camera menu operation AW‑RP555
Perform one of the following steps to select the menu item
Press the Item button
Camera OSD
QqProcedure for camera menu operation AW‑RP50
WwTop Menu screen
WwSetting the camera menu items
Camera menu items
Camera menu items
WwCamera screen When FullAuto is selected
WwCamera screen When Manual1 to 3 is selected
WwContrast screen
WwPicture 1/2 screen
WwPicture 2/2 screen
Ww16-axis color matrix
WwGenlock screen AW‑HE60S only
WwSystem screen
SideCut
Down CONV. Mode Squeeze, SideCut, LetterBox
WwOutput screen
Squeeze
Format unchanged screen
QqChanging the format
Format change check screen
Format Set screen
WwOther 1/2 screen
WwOther 2/2 screen
WwFirmware Version screen
WwMaintenance screen
IP Address
Default Gateway
WwIP Network screen
QqConcerning initialization
Camera menu item table
Factory setting Menu Selection items FullAuto Manual1
RGB‑NOR, RGB‑ENH
Camera menu item table
Controls and settings from web screen
Start the web browser of the personal computer
Controls and settings from web screen
WwDisplaying the web screen using a personal computer
Operating system installed Web browser
Controls and settings from web screen
Compression button Compression
WwLive screen Single display mode
Multi-Screen list box Multi-screen
Image Capture Size button Image Capture Size
Operation lock button Op.Lock
Power ON button / Standby button
OSD Menu Operation
Camera button / Color bar button CAM/BAR
Main area IP video display area
Control pad and its buttons
Preset
Zoom
Focus
Full-screen display
SnapShot
WwLive screen Multi display mode
QqBasic screen
WwSetup screen
Camera title display area
Automatic installation of viewer software On, Off
Basic button
Camera title 0 to 20 half-size characters
16 9 resize
IP video settings Video over IP
Video over IP Monitoring mode
QqImage screen
Transmission On, Off
Jpeg image settings
Image settings
Image capture size QVGA, VGA
Refresh interval
Image capture size QVGA, VGA Initial setting VGA
Multicast TTL/HOPLimit 1 to
Multicast address Setting range 224.0.0.0 to
Multicast port 1024 to 50000 Only even numbers can be set
Preset position
Image Image Image adjust
仕向地による違い
Image adjust screen
Scene FullAuto, Manual1, Manual2, Manual3
Contrast Contrast Mode Auto, Manual
AWB
Picture Chroma Level -3 to +3
Color Matrix Normal, EBU, NTSC, User
User Color Matrix Setup screen
Preset position setting screen Preset Zoom
Focus ADJ With PTZ
Speed With Zoom POS
Limitation Setting
Preset Setting Preset Speed 1 to
System screen
Genlock AW‑HE60S only Horizontal Phase -206 to +49
Frequency 59.94Hz, 50Hz
Output
Other
Images for which this setting is established
Camera title To 20 half-size characters
Multi-screen setup IP address To 128 half-size characters
QqMulti-screen
QqUser mng
Host check
Host auth. screen Host auth Access level
Stream type
Priority stream
Priority stream Activation
QqServer
Network screen IP network
QqNetwork
Port numbers already used 20, 21, 23, 25, 42, 53, 67, 68
DNS
Location 0 to 32 half-size characters
Snmp screen
Community 0 to 32 half-size characters
System name 0 to 32 half-size characters
Time & date
QqMaintenance
Error description
System log screen
Serial no
Product info. screen
Model no
MAC address
Status
Viewer software installation counter
Reboot
Default reset screen
Reset to the default Except the network settings
Upload
Back up screen
Download
Pan/Tilt
WpDisplaying the web screen using a mobile terminal
Resolution switching
Iris
Tally lamp lighting status displays
Camera menu OSD menu operation
System log displays
NTP-related error displays
Login-related displays
Category Display Description of error
Limiters
Press the Menu button
Setting/releasing the limiters
WwSetting the limiters
WwBasic limiter operations
Pp Releasing the upper limit position of the movement range
Setting/releasing the limiters
WwResetting the limiters
WwReleasing the limiters
Trouble-triggered safe mode
Safe mode
WwConcerning the safe mode
WwTrademarks and Registered Trademarks
WwSystem requirements for a personal computer
Solution
WwPrecautions when using Windows
Symptom
英語版必要
108
QqRestrictions
109
Restriction 2 When using Windows 7 with some products
Restriction 1 On the setup pages for some products
XxA XxF
Index
XxN XxT
Index
Memo
Web Site http//panasonic.net Panasonic Corporation