Screenshot 2
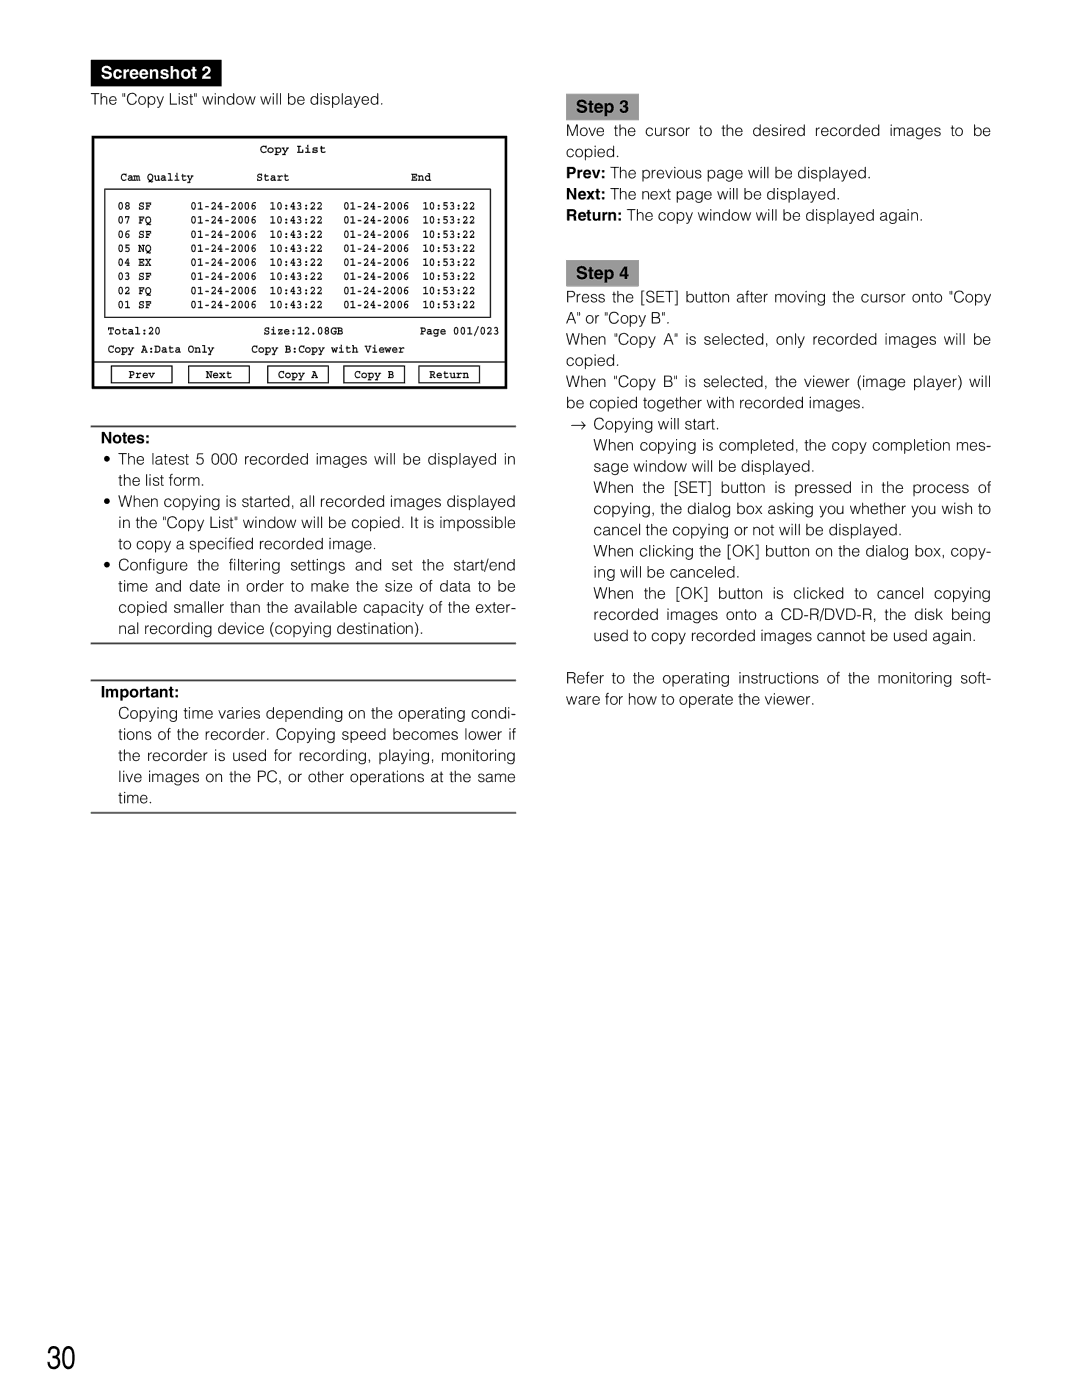
The "Copy List" window will be displayed.
|
|
|
|
|
|
| Copy List |
|
|
|
|
|
|
| |
|
| Cam Quality | Start |
|
|
| End | ||||||||
|
|
|
|
|
|
|
|
|
|
|
|
|
|
| |
| 08 | SF | 10:53:22 |
|
| ||||||||||
| 07 | FQ | 10:53:22 |
|
| ||||||||||
| 06 | SF | 10:53:22 |
|
| ||||||||||
| 05 | NQ | 10:53:22 |
|
| ||||||||||
| 04 | EX | 10:53:22 |
|
| ||||||||||
| 03 | SF | 10:43:22 | 10:53:22 |
|
| |||||||||
| 02 | FQ | 10:43:22 | 10:53:22 |
|
| |||||||||
| 01 | SF | 10:43:22 | 10:53:22 |
|
| |||||||||
|
|
|
|
|
|
|
|
|
|
|
|
|
|
| |
| Total:20 |
|
|
| Size:12.08GB |
| Page 001/023 | ||||||||
| Copy A:Data Only | Copy B:Copy with Viewer |
|
|
|
| |||||||||
|
|
|
|
|
|
|
|
|
|
|
|
|
| ||
|
|
|
|
|
|
|
|
|
|
|
|
|
|
|
|
|
| Prev |
| Next |
|
| Copy A |
| Copy B |
|
| Return |
| ||
|
|
|
|
|
|
|
|
|
|
|
|
|
|
|
|
Notes:
•The latest 5 000 recorded images will be displayed in the list form.
•When copying is started, all recorded images displayed in the "Copy List" window will be copied. It is impossible to copy a specified recorded image.
•Configure the filtering settings and set the start/end time and date in order to make the size of data to be copied smaller than the available capacity of the exter- nal recording device (copying destination).
Important:
Copying time varies depending on the operating condi- tions of the recorder. Copying speed becomes lower if the recorder is used for recording, playing, monitoring live images on the PC, or other operations at the same time.
Step 3
Move the cursor to the desired recorded images to be copied.
Prev: The previous page will be displayed.
Next: The next page will be displayed.
Return: The copy window will be displayed again.
Step 4
Press the [SET] button after moving the cursor onto "Copy A" or "Copy B".
When "Copy A" is selected, only recorded images will be copied.
When "Copy B" is selected, the viewer (image player) will be copied together with recorded images.
→Copying will start.
When copying is completed, the copy completion mes- sage window will be displayed.
When the [SET] button is pressed in the process of copying, the dialog box asking you whether you wish to cancel the copying or not will be displayed.
When clicking the [OK] button on the dialog box, copy- ing will be canceled.
When the [OK] button is clicked to cancel copying recorded images onto a
Refer to the operating instructions of the monitoring soft- ware for how to operate the viewer.
30
