JetFusion
Document No -A2-GB20-10
Copyright 2004 Paradyne Corporation All rights reserved
Preface
Introduction
Quick Start Guide
Chapter Administration
Chapter WAN Configuration
Router Configuration
Bridge Configuration
Voice Path Configuration
Firewall Configuration
Dhcp Server Configuration
Multicast Configuration
NAT Configuration
Command Line Interface
IAD Reports
2000-A2-GB20-10 Viii February
Chapter Troubleshooting and Diagnostics
Appendix C JetFusion IAD Specifications
Chapter Verification
Menu Map
Appendix D Connector Pinouts
Appendix E Glossary
Audience Contents
3UHIDFH
2000-A2-GB20-10 Xii February
Product Warranty
Conventions
Regulatory Notices
FCC Notice
IAD
Industry Canada Notice
Underwriters’ Laboratories’ Statement
CE Mark
Declaration of Conformity
Konformitetserklæring Konformitätserklärung
2000-A2-GB20-10 Xvii February
8-Port IAD
16/24-Port IAD
Features
Data Interfaces
JetFusion 2/4/8-Port IAD Family
Front Panel Power and Status Indicators
Description
Rear Panel Connectors
JetFusion 16/24-Port IAD Family
24-Port IAD Front Panel
AC Power
Front Panel LEDs
Universal Serial Interface USI Port
4XLFN6WDUW*XLGH
Installing the IAD
AC Power and Uninterruptible Power Supply
Unpacking the IAD
IAD Package Components
Wiring Requirements
Power Up the IAD
Connect via Terminal Emulator
Connect the IAD to a PC
Log in via a Terminal Emulation Program
Setting the Ethernet Port IP Address
Main Menu
Router Configuration Menu
Resetting the IAD
Connecting via Telnet
Running Telnet
Using Menu Interface
Type your password and press Enter to display the Main menu
Main Menu for Supervisor
Entering Settings and Values
Using Default or Current Values
Navigating the IAD Menu Interface
Basic IAD Configur- ation Connecting
USI Telephones
Ethernet LAN Connection
WAN Connections
USI Connection 16/24-Port
Telephone Connections
Confirming Proper Setup
Reset the IAD
Verify Normal Power Up and Operation
Making RJ21X Connections 16/24-Port
$GPLQLVWUDWLRQ
IAD Security
Security Level Privileges Security level
Privileges
Changing a Password
Default User IDs and Passwords Security Level
Including User ID and Passwords in Config Files
Changing the User Level User ID
Server Settings
Changing the Radius Server Address
Changing the Radius Encryption Secret
Displaying the Radius Configuration
Setting Up
Using the Snmp Configuration Menu
Configuring the System Contact
Enabling and Disabling Snmp via IP
Enabling and Disabling Snmp via EOC
Enabling Snmp via IP and EOC
Configuring the System Name
Configuring the System Location
Configuring the System Community
Configuring the Snmp Trap Host IP Address
Configuring Restart Trap Maximum Delay
Enabling or Disabling Snmp Traps via EOC
Using Tftp Servers via LAN or WAN
Upgrading the System
Copying the Source Files
Upgrading via Tftp
Verifying the Upgrade
File Transfer Menu
Setting up Your LAN Connection
Establishing LAN Speed and Duplex Mode
Selecting the Connection
Using System Utilities
Pinging Network Devices
Using Trace Route
Setting up the USI Port
Configuring the Console Baud Rate
Configuring the Console Timeout Period
Managing Configuration Files
Performing a Hard Reset
Setting System Defaults
Saving System Settings
Clearing the Last Reset Reason
Displaying the Event Log
Using the File System
Displaying the IAD File Directory
Copying Files
Renaming Files
Deleting Files
Formatting the File System
Using Debug Menu
Setting the Ethernet MAC Address
Enabling and Disabling PPP Debug Mode
Enabling and Disabling STP Debug Mode
Enabling and Disabling Dhcp Client Debug Mode
Displaying Error Dumps
Loading a Boot ROM File
Performing File Transfers
Using File Transfer Utilities
Updating Acos
Updating the System
Using the Tftp Server Menu
12. Tftp Server Menu
Setting Derived Timing Options
Enabling and Disabling Derived Timing
Enabling and Disabling Derived Timing Debug Messages
Verifying An IP Address
Verifying an IP Address for Windows Systems
Verifying the IAD IP Addresses
Basic WAN Setup Tasks
$1&RQILJXUDWLRQ
XDSL WAN Configuration Flowchart
T1/E1 WAN Configuration Flowchart
Identifying your WAN Interface and Datalink Protocol
Using the WAN Con- figuration Menu
Sdsl with Frame Relay
Sdsl with ATM
Shdsl with ATM
Selecting the Datalink Protocol
Selecting ATM or Frame Relay
WAN Configuration Menu Frame Relay
Physi- cal Inter- face
Configur- ing Shdsl Interface
Selecting the xDSL Interface Type
10. G2237 xDSL Configuration Menu
Selecting CPE or CO Mode
Enabling and Disabling Adaptive Rate Mode
Selecting the Line Rate
Enabling and Disabling xDSL Debug Messages
Configur- ing the Sdsl Inter- face- JF2100
13. G2237 xDSL Configuration Menu
Configur- ing the Sdsl Inter- face
Configuring the Adaptive Rate Mode
Setting Auto Cycle-Nokia Dslam
Setting Auto Sense-Coppermountain Dslam
Enabling Autobaud Mode-Conexant Dslam
Setting Sync Delay-Lucent Dslam
Setting AccessLan CPE Mode-AccessLan Dslam
Setting Sdsl Speed for Imas DSLAM-Nortel Dslam
Setting Sdsl Speed Manually
Setting Sdsl Interface Mode
Configuring the Sdsl Auto Cycle Speed Table
Configur- ing the Adsl Inter- face
Using the Debug Menu
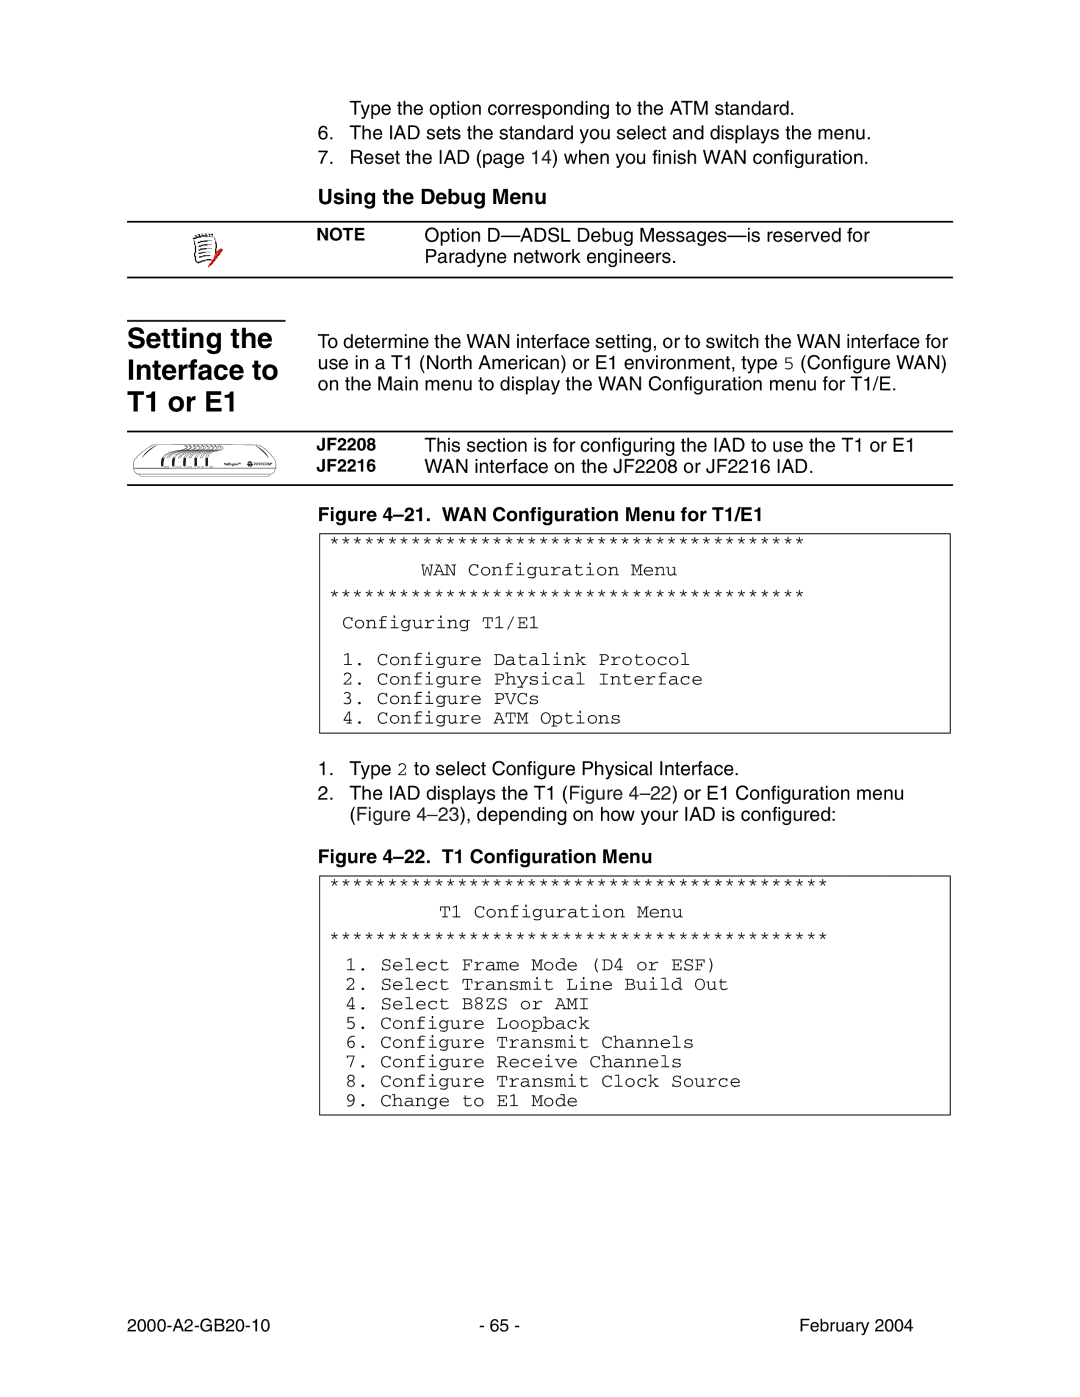
Setting the Interface to T1 or E1
21. WAN Configuration Menu for T1/E1
Configur- ing the T1 Interface
Switching from T1 to E1
Switching from E1 to T1
Selecting Frame Mode
24. T1 Configuration Menu
Setting Line Build Out
Configuring Loopback
Selecting B8ZS or AMI
Configuring the Transmit and Receive Channels
Enabling or Disabling All Channels
Configuring Transmit Clock Source
Enabling or Disabling Specific Channels
Selecting a Channel Range
Configur- ing the E1 Interface
Displaying Physical Layer Stats and Alarm Log
Selecting Frame/CRC4 Mode
Configuring S-Bits
31. E1 Configuration menu
33. Configure S-Bits Menu
Configuring the Transmit Clock Source
35. Select Tx Clock Source menu
Configuring
ATM PVCs
Adding a PVC
Enter Virtual Port Identifier VPI
37. ATM Encapsulation Configuration Menu
Setting up AAL5 or AAL0 Encapsulation
Modifying a PVC
Setting up Proprietary Voice Encapsulation
Setting up RFC 1483 VC Muxing or RFC 1483 LLC Encapsulation
44. ATM PCR Configuration Menu
46. ATM Encapsulation Configuration Menu
Setting up AAL1/CES
48. AAL2 Audio Profile Format Menu
Setting up AAL2/LES
Deleting a PVC
Configuring Payload Scrambling
Showing Current PVCs
Configuring the F4 OAM VPI
Configuring the F4 OAM Type
Displaying F4 OAM Configuration
Configuring EmptyCells
Frame Relay DLCIs
Sending OAM Loopback
Modifying a Dlci
Configuring Transmit CIR
Adding a Dlci
Configuring Receive CIR
Configuring FRF.12 Fragmentation
Frame Relay Options
Deleting a Dlci
Displaying Current DLCIs
Setting FRF.12 Configuration
Selecting Fragmentation Types
Enabling or Disabling FRF.12
Setting the Fragment Size Manually
CopperMountain Fragmentation Configuration
Setting Real Time Dlci
Enabling Automatic Fragment Sizing
Configuring the Maintenance Protocol
Configuring the Congestion Parameters
Enabling or Disabling Coppermountain Cmcp
Toggling Cmcp Debugging
66. WAN Configuration Menu
Quick Con- figuration
5RXWHU&RQILJXUDWLRQ
Basic Router Setup Tasks
Router Configuration Task Flowchart
Router Configura- tion Menu
Port IP Address
PCR
Unconfig- uring a Port IP Address
Enabling and Disabling RIP Poisoned Reverse by Port
Enabling RIP Globally
Setting the RIP Version
Managing Static Default Routes
Adding a Static Route
2000-A2-GB20-10 104 February
Setting Default Route
Adding or Changing the Default Route
Removing the Default Route
Removing a Static Route
Configur- ing DNS Client
Setting the DNS Server IP Address
Setting the DNS Server Timeout
Configur- ing Dhcp Client
Displaying the DNS Cache and Statistics
Configur- ing Dhcp Relay
Configuring the Dhcp Server IP Address
Enabling and Disabling Dhcp Relay
Displaying Dhcp Relay Statistics
IP Filtering Configuration Menu
Choosing a Port for IP Filtering
Globally Enabling and Disabling Filters
Toggling Between Input and Output Filters
Displaying Filters
Inserting, Appending and Editing Filters
Filter Parameters
Description
Copying Filters for Editing
Copying a Filter
Displaying a Filter in the Buffer
Editing a Filter in the Buffer
Deleting a Filter from the Buffer
Filter Details Parameter Description
Deleting an IP Filter
Deleting All Filters of the Chosen Type
Showing IP Filtering Statistics
Clearing IP Filtering Statistics
IP Header Compression for SDSL, Port 1 is currently
Route Table Parameters
ULGJH&RQILJXUDWLRQ
Basic Bridge Setup Tasks
Bridge Configuration Task Flowchart
Bridge Configura- tion Menu
Enabling and Dis- abling Bridging
Enabling or Disabling Bridging Globally
Enabling or Disabling Bridging by Port
Setting Bridge Aging Timer
Enabling and Dis- abling STP
Enabling or Disabling STP Globally
Enabling or Disabling STP by Port
Type the number of the port IAD displays a prompt
Enter Bridge Hello Time1..10
Deleting a Bridge For- warding Database Entry
Basic Voice Path Setup Tasks
Rqiljxudwlrq
Voice Path Configura- tion Menu
Setting the Voice Gate- way
Voice Configuration Menu Pots Telephone Interface
Start Mode Selection Menu
Setting All Ports to Loop Start
Setting All Ports to Ground Start
Displaying Start Mode
Configuring Start Mode on an Individual Port
Setting Slic Con- trol Mode
Setting Com- pander Mode
Set On Hook Transmis- sion Mode Setting Idle Voltage
Displaying Idle High Voltage Settings
Enabling and DIsabling Idle High Voltage Globally
Setting Debug Mode Configur- ing Echo Cancella- tion
Reset the IAD
Enabling and DIsabling Echo Cancellation Globally
Displaying Echo Cancellation Settings
Setting Loop Gain
Setting Loop Gain for All Ports
Enabling and DIsabling Echo Cancellation for all Ports
Enter Transmit Loop Gain for all ports range -9dB/ 3dB -2dB
Setting Country Mode
Displaying Loop Gain Settings
Configuring Loop Gain Setting by Port
11. Country Mode Selection Menu
Embedded Client
Configuring Mgcp Parameters
12. MGCP/NCS Management Menu
Port Administration
Displaying Mgcp Statistics
Debugging Mgcp
Removing a Connection
Configuring Admin State per port
Configuring Default Packet Size
Setting Admin State Globally
Displaying the Current Admin State
CopperCom Configuration
Managing Copper Com Call Control
Displaying CopperCom Statistics
Clearing CopperCom Statistics
Displaying CopperCom Configuration
Setting Compression Format
Setting Framing Format
JetStream Call Con- trol Set- tings
CopperCom Debug Control
Displaying Statistics
Performing a Ring Test
Configuring Trace Settings
Configuring the Ring Test
Displaying the IAD State
Displaying Ring Test Parameters
Configur- ing AAL2
Configuring for AAL2/LES CAS
Resetting Statistics
Selecting Insufficient Bandwidth Sound
Configuring the IAD for a Specific AAL2/LES Gateway
Manual Configuration
Enabling and Disabling Ports
Setting the CAS Refresh Rate
Setting the Combined Use Timer
Enabling and Disabling Idle CAS Refreshing
Changing the Maximum CPS-SDU Size
Setting ATM Pace Control Manually
Setting the Audio Bit Rate Margin
Setting the Minimum Signaling Bit Rate
Debugging AAL2/LES Gateways Displaying AAL2/LES Statistics
Configuring for AAL2/LES CCS-ELCP
Displaying Audio/CAS/Alarm Statistics
Clearing Statistics
Configuring Variant/Interface Management
Setting Debugging Options
Debugging for AAL2/LES CCS-ELCP
Viewing AAL2/LES Statistics
Displaying V5 FSM States
Displaying AAL2 Channel Statistics
Clearing AAL2 Channel Statistics
LUHZDOO&RQILJXUDWLRQ
Creating a Firewall via IP Filtering
Server Setup Tasks
Basic
Dhcp Server Configur- ation Menu
Using
Debugging Messages
Enabling and Dis- abling
If Dhcp Relay is not enabled, the IAD displays this prompt
Dhcp Address Range Pool Configur- ing a Dhcp Client Entry
Current Subnet Mask = 0.0.0.0 Enter new Subnet Mask
Server Details
Dhcp Server Details Field
Displaying Dhcp Server Sta- tistics
Server Assigned and Unas- signed Addresses
Dhcp Server Statistics
Dhcp Server Assigned Addresses Field Description
Entry Details
Deleting a Dhcp Cli- ent Entry
Assign- ment Entry
Dhcp Entry Details Value Description
Configur- ing Multi- cast
Multicast Configuration Menu
2000-A2-GB20-10 164 February
Managing Multicast Route Source Adding a Routing
Multicast Routing Source Menu
Network Address Netmask Incoming Interface
Multicast Routing Table Fields Description
Displaying PIM Neighbor
Multicast Routing Table Fields
$7&RQILJXUDWLRQ
NAT Default Parameter Settings
Range Default
NAT
Enabling
Translation
NAT Local Server Protocol Configuration Menu
NAT Local Server
NAT Timeouts
Updating NAT Local Server entry 1, Translated IP address
NAT Port Range
NAT Alias Entry
NAT Statistics
NAT Statistics Report Entry
Connection
Connection Details
NAT Connection Table Report Entry
NAT Connection Details Report Entry
NAT Alias Table
Deleting IP Addresses from NAT Tables
NAT Local Server Table Report Report Entry
NAT Alias Table Report Entry Description
Deleting a NAT Local Server Entry NAT Alias
Report Menu
Reports Menu
Current Configur- ation Report
Current Configuration Report Parameter
T1/E1 Only
Network Statistics Reports
Port #
Icmp Statistics Report
Icmp Statistics Report Parameter Description
Igmp Statistics Report
Icmp Statistics Report Parameter
Igmp Statistics Report Parameter Description
Queries, Reports and Messages Received
IP Statistics Report
Igmp Statistics Report Parameter
IP Statistics Report Parameter Description
PIM Statistics Report
IP Statistics Report Parameter
PIM Statistics Report Parameter Description
TCP Statistics Report
TCP Statistics Report Parameter Description
TCP Statistics Report Parameter
UDP Statistics Report
Clearing Network Statistics
UDP Statistics Report Parameter Description
Interface Statistics Reports
Clear Network Statistics Menu
ARP Statistics Report
ARP Statistics Report Parameter Description
Interface Statistics Report
ARP Statistics Report Parameter
Interface Statistics Report Parameter Description
Interface Statistics Report Parameter
Bridge Statistics Report
Dlci Statistics Report
10.Bridge Statistics Report Parameter Description
11.DLCI Statistics Parameter
Received Frame Information
ATM PVC Statistics Report
AAL1 Cpcs Statistics Report
12.AAL1 Cpcs Statistics Report Parameter
AAL2 Statistics Report
13.Common CPCS-2 Statistics Report Parameter
Cumulative CPCS-2 Statistics Report
Common AAL Statistics Report
15.Common AAL Statistics Report Parameter
15.Common AAL Statistics Report Parameter
IP Header Compression Statistics Report
16.IP Header Compression Statistics Report Parameter
PPP Statistics Report
Clearing Interface Statistics
17.PPP Statistics Report Parameter Description
Media Sta- tistics Reports
Media Statistics Menu Sample
Frame Relay Statistics Report
18.Frame Relay Statistics Report
Serial USI Statistics Report
19.Serial Statistics Report Parameter
ATM Statistics Report
19.Serial Statistics Report Parameter Description
20.ATM Statistics Report Field
20.ATM Statistics Report Field
G2237 xDSL Statistics Report
21.G2237 xDSL Statistics Report Parameter
21.G2237 xDSL Statistics Report Parameter
Ethernet Statistics Report
22.Ethernet Statistics Report Parameter Description
22.Ethernet Statistics Report Parameter
G7070 Adsl Statistics Report
23.G7070 Adsl Statistics Report Parameter
Pots Statistics Report
24.POTS Statistics Report Parameter
BRI Statistics Report
Clearing Media Statistics
25.BRI Statistics Report Parameter
ARP Table Report
Bridge For- warding Database Report
26.Route Table Report Parameter
27.ARP Table Report Parameter
Bridge Sta- tus Report
PPP Autho Rization Entries Report
28.Bridge Forwarding Database Report Parameter
29.Bridge Status Report Parameter
30.PPP Authorization Report Parameter
System Uptime Report Memory Statistics Reports
System Memory Statistics Report
Zero All Statistics
Kernel Tasks Memory Statistics Report
Command Line Syntax
Command Example
Intro- duction Set wan stp bridge
CLI Help
2000-A2-GB20-10 222 February
Command Line Interface Reference
Exit Ping Quit Rename file
Reset system
Remove lan ip address Set bridge global
Set dhcp server netbios Set dhcp server domain
Set bridge stp global
Set dns server address Set ip default route Set ip route
Set dhcp server range
Set lan bridge Set lan ip address
Set lan rip on off version 1 2Bcst 2Mlti slot interface port
Set mgcp signaling connection slot interface port connection
Set mgcp voice tos Set nat
Set sdsl speed Set system defaults Set wan atm ppp auth
None PAP Chap
Set wan atm vc Set wan bridge
Set wan datalink Set wan framerelay
Set wan ip address Set wan stp bridge
Description. Displays the Dhcp server configuration
7URXEOHVKRRWLQJDQG Ldjqrvwlfv
Diagnostics
Performing a Dialup Test
Performing a Hotline Test
Performing a Power Supply Test
Performing a Phone Detect Test
2000-A2-GB20-10 240 February
Performing an On/Off Hook Test
Sdsl
BRI Diagnostics Menu
Troubleshooting-Symptoms and Causes
Trouble- shooting the IAD
Probable Cause
Corrective Action
If IAD is configured as router
Probable Cause Corrective Action
IAD Provisioning Parameters
Power-up Test Opera- tional Test
Testing the IAD
Mainte- nance Displaying the Current Configura- tion
2000-A2-GB20-10 249 February
$0HQX0DS
2000-A2-GB20-10 251 February
Australia1 Australia2
Germany
France
United Kingdom
Belgium2
Denmark
Italy
Equipment List
Table C-1. JetFusion IAD Part Numbers 1 Model Description
Part Number
Table C-2 /4/8-Port Analog Voice Features
8-Port
Table C-1. JetFusion IAD Part Numbers 2 Model Description
Table C-3. JF2004i and JF2104i Isdn Voice Features
Table C-4 /4/8-Port Digital Voice Features
Table C-5 /4/8-Port Data Features
Table C-6 /4/8-Port WAN Interface Features 1 Description
Adsl G.lite, G.dmt-JF2004
Adsl Annex A, B-JF2004i
SHDSL-TCPAM, SDSL-JF2104i, JF2104, JF2108
Table C-6 /4/8-Port WAN Interface Features 2
Table C-7 /4/8-Port Transport Protocol Features Description
Table C-8 /4/8-Port Configuration and Management Features
Frame Relay
Table C-9 /4/8-Port Security Features
Table C-11 /4/8-Port Network Interfaces 1
Table C-12 /24-Port Voice Features
16/24-Port
Table C-11 /4/8-Port Network Interfaces 2
Analog
Table C-13 /24-Port Data Features
Table C-14 /24-Port WAN Features 1
Interface
Table C-14 /24-Port WAN Features 2
Table D-1. RS-232 DB-9 Console Port Pin Assignments Signal
RQQHFWRU3LQRXWV
Table D-4 BaseT Connector Pin Assignments Signal
Table D-5 BaseT Connector Pin Assignments RJ48 Signal
Table D-6. ADSL/SDSL Connector Pin Assignments RJ45 Signal
Table D-7. G.SHDSL Port Pin Assignments RJ11 Line Tip Ring
Table D-8. T1/E1 Connector Pin Assignments Signal
Pin Signal
Table D-9. USI Port for RS-530, V.35 and RS-449 Signal
RS-530 RS-449
ORVVDU\
2000-A2-GB20-10 269 February
2000-A2-GB20-10 270 February
2000-A2-GB20-10 271 February
QGH
2000-A2-GB20-10 273 February
2000-A2-GB20-10 274 February
2000-A2-GB20-10 275 February
2000-A2-GB20-10 276 February
2000-A2-GB20-10 277 February
2000-A2-GB20-10 278 February