DM800i Series
DM800i Series Mailing System
Page
SV61162 Rev. D
Alerting Messages
FCC Compliance
FCC Compliance of Modem
Page
Table of Contents
Page
Our Help Desk
Pitney Bowes Contact Information List
PB Web Sites
Postage By Phone System Pitney Bowes Supplies
Page
Read This First
What’s in this Guide Other Information
Read This First
What You Need to Know
Safety Requirements
Requirements
Read This First
Power Stacker
DJPS/DMPS
If your stacker has an AC adapter to power the stacker
Contents Introducing the DM Series Mailing System
Meet the DM800i Series Digitial Mailing System
Energy Star Rating Postage Meter
Meet the DM800i Series Digital Series Mailing System
Easy-to-Use IntelliLink Control Center
Ability to Use Other Pitney Bowes Equip- ment
DJPS/DMPS Power Stacker
Variety of Communications Options
Mail Machine Interface
Budget Manager
Inview Accounting
Business Manager
Advertisements and Inscriptions
Shape Based Rating
Mailing System Exterior
Parts of the Mailing System
Quick Reference Card Set These
Left Side View of the DM800i Series System
DM800i Series System with Optional WOW Module
Connectors on the Back of the Mailing System Base
Top release jam lever Seal bottle
Under the DM800i Series Print Cover
Function Keys
DM800i Series Digital Mailing System Operating Guide
Main Screen
Connectors on the Back of the IntelliLink Control Center
Analog Phone Line Connector
Meet the DM800i Series Digital Series Mailing System
Mail in a Minute
Mail in a Minute Preparing Your Mail
Running the Mail
Select Key In Postage
Printing Postage Tapes
Running Mail
Select Mode
Navigating Hints
Applying Postage Running Mail
Chart a Printing on Mail
Determining the Correct Postage Mode
Feeding Mail or Printing Tape?
Chart B Postage Tape Mode
Chart C Mail Modes with no Postage
Preparing Your Mail
About Running Mail
Adding Postage in this guide
Tips on Feeding
Mail
About Printing Postage Tapes
Mode Selection Reduced Speed
Selecting the Postage Mode and Running the Mail
While your mailing system processes the mail, the screen
Mode Selection Key in Postage WOW Weigh On-The-Way
Select WOW Weigh on the Way
To use differential weighing
Mode Selection Weigh First Piece Differential Weighing
Select Weigh First Piece
Select Differential Weighing
Mode Selection Manual Weight Entry
Select Manual Weight Entry
Before using this weighing option
Mode Selection Attached Scale AutoTape
Select Attached Scale AutoTape
Mode Selection Print Permit Mode Selection Seal Only
To select a Print Permit
Mode Selection Time and Date Stamping
Selecting an Account
Selecting or Deselecting an Account
Selecting an Account Manually
Selecting an Account by Name
Deselecting an Account
Selecting an Account by Speed Code
Selecting the Class, Carrier, Special Services or Options
Selecting ZIP Codes and Zones
Selecting a Country Selecting a Smart Class
Meter Stamp Options Advertisement
Selecting the Meter Stamp Options
Meter Stamp Options Date
Meter Stamp Options
Select Meter Stamp Options, then select Text Entries
Overview
Postage Calculation for Confirmation Services
Discounts for Confirmation Services
Sending Your Records to Pitney Bowes
Using Confirmation Services Before Printing Postage
Adding Services or Making Changes
Adding Confirmation Services After Printing Postage
Running Mail
Press Existing Features Press Confirmation Services
Installation/Setup
Confirmation Services
Processing Electronic Return Receipt
Setup Options
Select Confirmation Services
Select E-Ret Receipt
Enter the Usps tracking barcode number
Using ERR with a Customer Reference Number
Processing ERR with a Customer Reference Number
Select 1stCl Letter
Off-Line Electronic Return Receipt ERR
Select Certified Select Offline eRR
To add more postage
ClearingBatch the Count
To change the date
Running Mail
Mailing System Setup
Contents
Mailing System Setup
Overview Mailing System Set Up
Setting the Display Language Adjusting Display Contrast
Setting the Date and Time of Day
Creating a Supervisor Password
Setting Up a Supervisor Password
Setting Up a Lock Code
Password Protecting an Operation
Scale/Rates Set Up
Setting Up the Scale and Selecting Rates
Scale/Rates
Select WOW Weight Limit
Scale/Rates WOW Weight Limit WOW Start Key Autoscale
Select WOW Start Key
Select Carrier/Class Disp
Select Class if new Piece
Scale/Rates Autoclear Destination Value
Scale/Rates Destination if New Piece
Scale/Rates ZIP/Zone Prompt
Select Add ZIPs to Zone
Scale/Rates Add ZIPs to Zone
Select BMC Intra ZIP
Select Discount Code
Scale/Rates Smart Classes
Creating a Smart Class with an Auto Inscription
To set the next weight break point, select Add Another Class
Setting Up a Smart Class with an Auto Inscription
Select View Detail Select Modify Auto Ad/Inscription
Scale/Rates Auto Rate Large Envelope
Modifying a Smart Class with an Auto Inscription
Yes, Post as Flat
Phone/Network Set Up
Setting Up Postage By Phone Meter Payment System
Select Dialing Prefix
Select My Phone #
Select Dialing Type
Phone/Network Set Up Use LAN Firewall Settings
Phone/Network Set Up Network Settings
Phone/Network Set Up Remote PC Refill
Configuring High/Low Funds Warning
Configuring Low Ink Warning
Setting the Low Funds Warning Value
Standby Mode Least Power Usage
Timeouts Display Sleep Energy Star
Timeouts
Select Basic Settings and then Timeouts Select System Sleep
DM800iSeries Digital Mailing System Operating Guide
Defining Presets
Timeouts Transaction
Press the Custom Presets key
Defining Normal Preset Values
Press the screen key for Store Current Setting to Preset
Defining Custom Preset Values
Select Store Current Setting to Preset
Store Advance Date in a Custom Preset
Editing Custom Preset Values
Viewing, Renaming, or Deleting Presets
Specifications
Sample
Creating a Custom Message for the First Time
Select Set Up, then select Text Entry Set Up
Postal Rules and Guidance
Adding Additional Custom Messages
Select Meter Stamp Option, then select Text Entries
Editing a Custom Message
Deleting a Custom Message
Envelope Guidance Drop Shipment Endorsement
Taking the Meter Out of Service
Adding an Optional Printer
Configuring the Optional Barcode Scanner
Setting Default Scan Type
Adding Barcode Prefixes
Combining Barcodes Setting Auto-Enter
Adding Postage
Postage By Phone Meter Payment System
Your Postage Meter
Usps Rekey Requirements
Connection Alternatives Review
LAN
Managing Your Postage Funds
Connecting Your Control Center to a Remote Analog Line
CheckingAvailable Funds in Your Postage Meter
Postage meter, follow these steps
Adding
Postage Pass Automated Postage Refill
Select Quick Refill, or Other Refill Amount
Recommended Minimum Default $2000 $8000 $1000 $5000
Setting an Account Period
Standard Accounting
Set Up Account
Select Account
Using Account Setup Procedures
Overview of Accounting
Select View Accounts
Before Using Setup Procedures
CreatingAccounts
Select Create Account/Sub
DM800i Series Digital Mailing System Operating Guide
Accounts
Setting an Account Period
Editing
Select Edit Account
DeletingAccounts
Delete
TurningReset Individual Accounts On or Off
Funds
Transferring
Select Transfer Entire Amount, or
Standard
Selecting an Accounting Type
AccuTrac
Your Accounting System Features
Account Structure Hierarchy
Examples
Engineering
Standard Accounting
Reports
Introduction Viewing a Report Printing a Report
Introduction Viewing a Report Printing a Report
Screen Display
Single Account Report
Report Print Queue
Printed Report
Multi-Account Summary Report
Internal Printer Version
External Printer Version
Last Five Refills Report
Printed Report System Printer
Confirmation Services Report System Printer Required
Printed Report Attached Printer
Account List Report External Printer Required Funds Report
System Set Up Report
Error Report
Job Report
DDDDDGGGGG1245
Last Rates Downloaded Report
Installed Pending Rates Report
View Download Log Report
Reports
Contents Items to Keep On Hand
Maintaining and Updating
Maintaining and Updating
Tape is still on roll in this section
Select Maintenance Select Load Tape Select Unload Tape
Tape is still on roll
Seal Sealing Solution Maintenance
Moistener Maintenance
Priming the Moistener
Moistener brush button Moistener brush assembly
Cleaning or Replacing the Wick
Printer Maintenance
Adjusting Wetness
No, clean the print nozzle screen key. Go to step
Select Maintenance Select Print Test Pattern
Select Maintenance
Replacing the Ink Cartridge
Maintaining and Updating
Changing the Printhead
Printhead cover
Proceed to Changing the Wiper Blade Assembly section
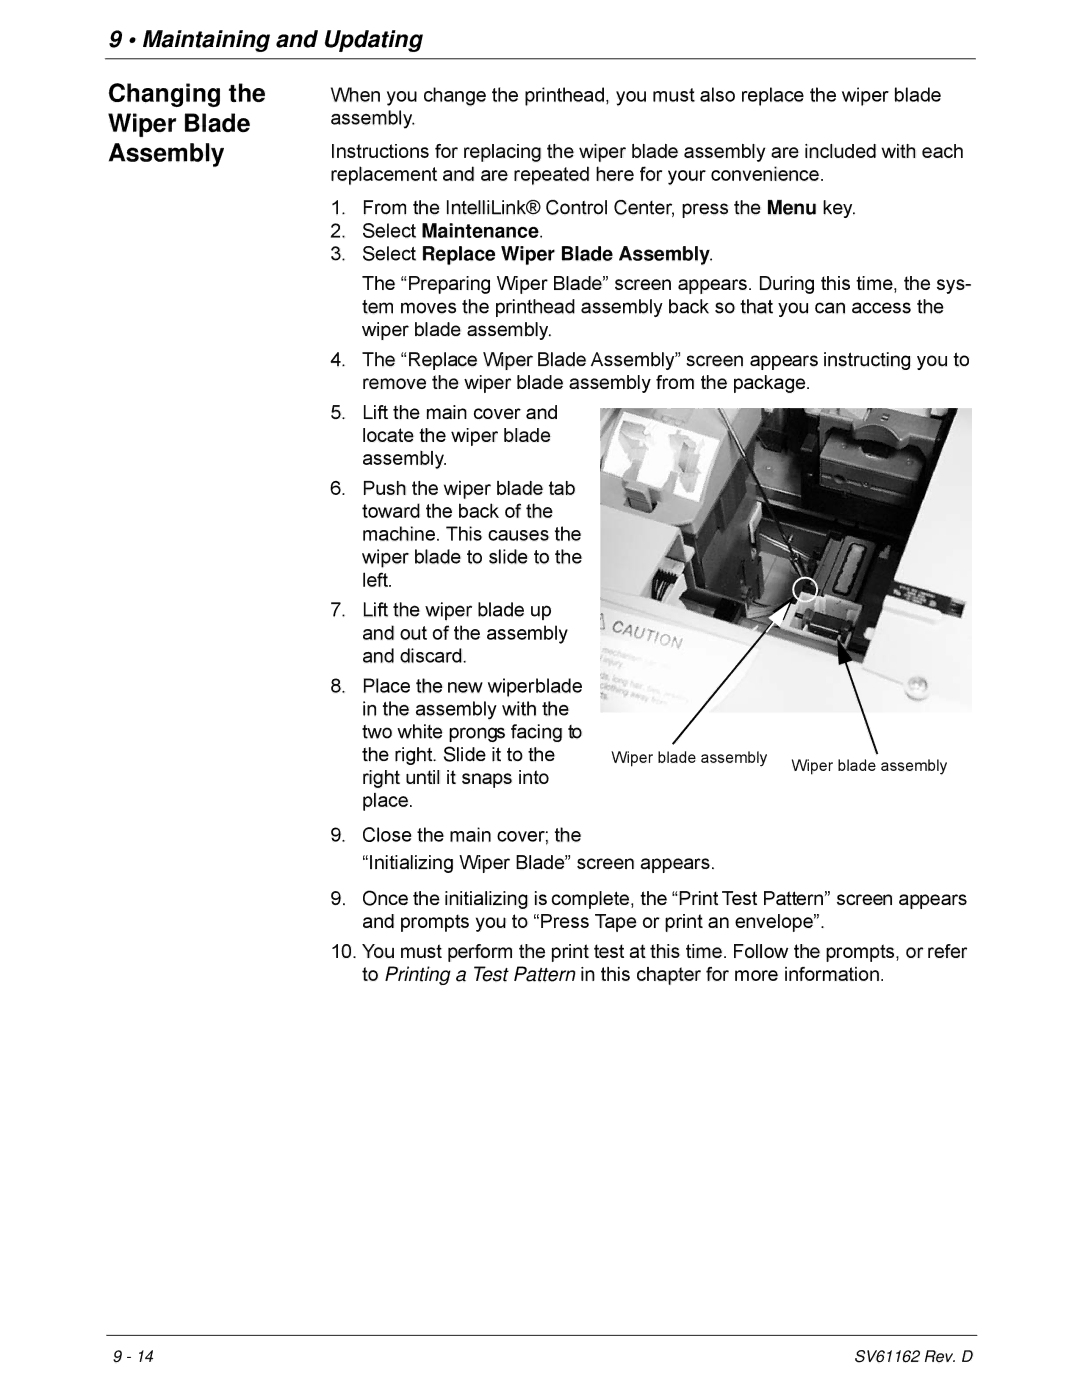
Changing Wiper Blade Assembly
Select Maintenance Select Replace Wiper Blade Assembly
Performing Updates or Adding Features
Maintaining and Updating
Troubleshooting
How to Troubleshoot your Mailing System
Ink Waste Full Tray Warning
Envelope Sealing Problems
Description Possible Causes Solution
Envelope Feeding Problems
Select Sealer off
To clear a jam in the WOW deck
To clear a jam from the transport deck
Tape Feeding Problems
Printing Problems
Refer to the Changing the Printhead
Postage Refill Problems
Display Problems
Weighing Problems
Scale
To test the scale
Supplies and Options
Comsumables You Can Order
Confirmation Services Labels
Supplies and Options
Self-Adhesive Tape
Specifications
Dimensions and Weight
Specifications
Specifications
Electrical and Operating Conditions
Capacities and Features
Tisements see , Meter Stamp Options section
Specifications Accounting Features
Mailing Materials
Maximum
Minimum
This page intentionally left blank
Glossary
Glossary
PSD
Device PSD
Usps
Glossary
Catalog
Date
Help
Features
10-5,10-6,10-7
Password
Rates
Add 7-4,7-5Subsubaccount
Updates
Using 4-11,4-12WEIGH-ON-THE-WAY Module 2-5Weight
Tape
Page
SV61162revd