ENGLISH |
|
Basic Recording | Grabación básica |
ESPAÑOL
Making your First Recording | Primera grabación |
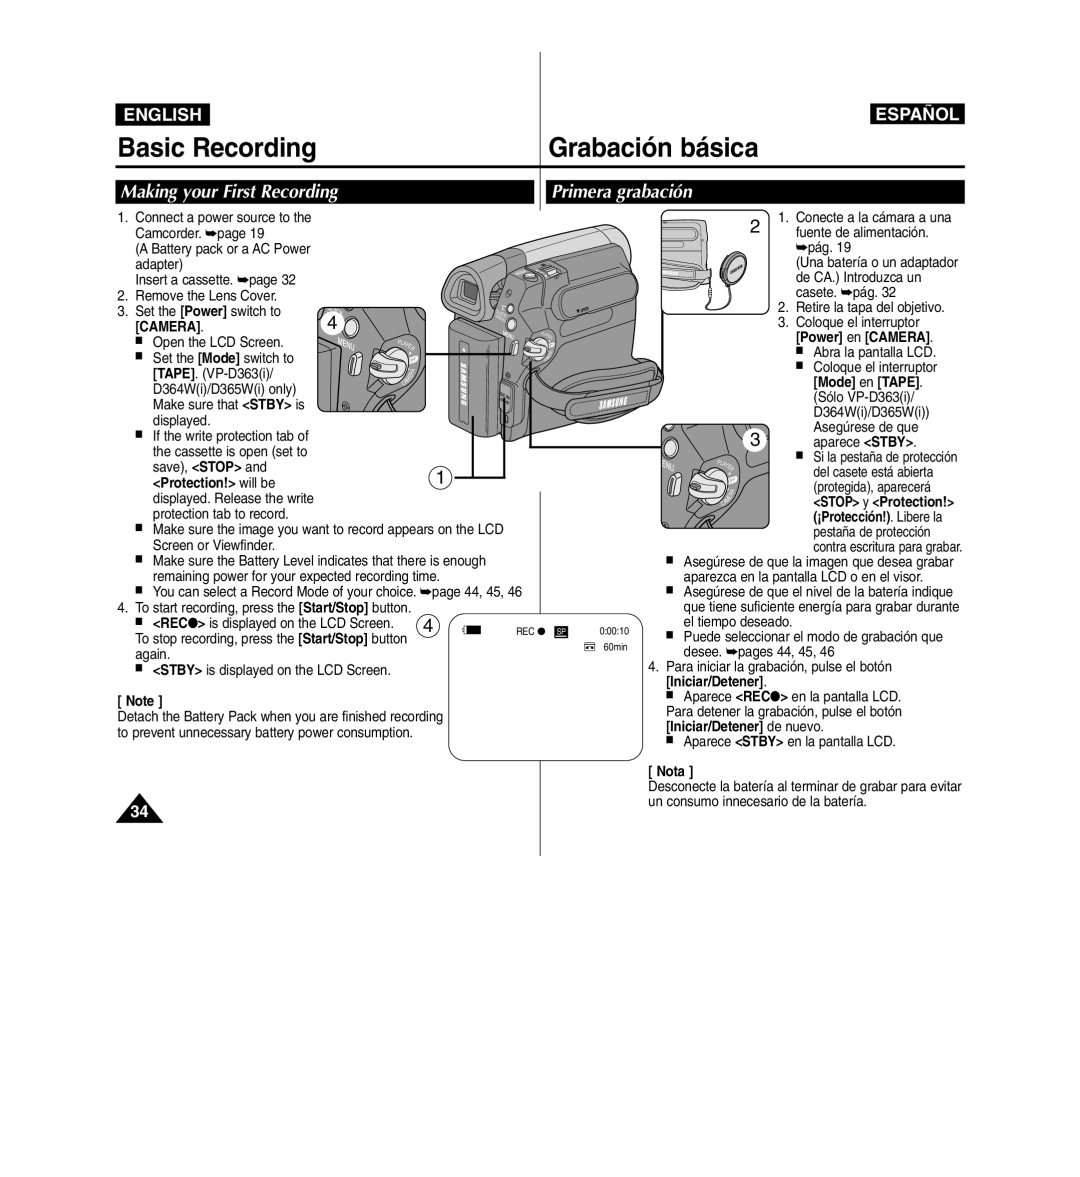
1.Connect a power source to the Camcorder. ➥page 19
(A Battery pack or a AC Power adapter)
Insert a cassette. ➥page 32
2. Remove the Lens Cover.
3. Set the [Power] switch to | QUICK |
| Q |
|
| |
| MUICK |
|
| |||
[CAMERA]. | MENU |
| ENU |
|
| |
4 | √ | PLA |
|
| ||
■ | Open the LCD Screen. |
| YER | |||
| PLA |
|
| |||
|
| YE |
|
| ||
|
| R |
|
| ||
■ | Set the [Mode] switch to |
|
|
| A | |
| CAM | E | R | |||
|
|
|
| |||
| [TAPE]. |
|
| A |
|
|
|
|
| R |
|
| |
|
|
| AM E |
|
| |
| D364W(i)/D365W(i) only) |
|
| C |
|
|
|
|
|
|
|
| |
| Make sure that <STBY> is |
|
|
|
|
|
| displayed. |
|
|
|
|
|
■ | If the write protection tab of |
|
|
|
|
|
| the cassette is open (set to |
|
|
|
|
|
| save), <STOP> and |
|
| 1 |
|
|
| <Protection!> will be |
|
|
|
| |
displayed. Release the write protection tab to record.
■Make sure the image you want to record appears on the LCD Screen or Viewfinder.
■Make sure the Battery Level indicates that there is enough remaining power for your expected recording time.
■You can select a Record Mode of your choice. ➥page 44, 45, 46
4.To start recording, press the [Start/Stop] button.
■ <REC●> is displayed on the LCD Screen. | 4 |
| REC ● |
|
|
To stop recording, press the [Start/Stop] button |
| SP |
| ||
|
| ||||
|
|
|
|
| |
again. |
|
| √ | ||
■<STBY> is displayed on the LCD Screen.
[ Note ]
Detach the Battery Pack when you are finished recording to prevent unnecessary battery power consumption.
34
|
|
| 2 | 1. Conecte a la cámara a una | |||
|
|
|
| fuente de alimentación. | |||
|
|
|
|
| ➥pág. 19 | ||
|
|
|
|
| (Una batería o un adaptador | ||
|
|
|
|
| de CA.) Introduzca un | ||
|
|
|
|
| casete. ➥pág. 32 | ||
|
|
|
| 2. Retire la tapa del objetivo. | |||
|
|
|
| 3. | Coloque el interruptor | ||
|
|
|
|
| [Power] en [CAMERA]. | ||
|
|
|
|
| ■ | Abra la pantalla LCD. | |
|
|
|
|
| ■ | Coloque el interruptor | |
|
|
|
|
|
| [Mode] en [TAPE]. | |
|
|
|
|
|
| (Sólo | |
|
|
|
|
|
| D364W(i)/D365W(i)) | |
| K |
| 3 |
|
| Asegúrese de que | |
|
|
|
|
| aparece <STBY>. | ||
|
| PLA |
|
| ■ | Si la pestaña de protección | |
|
| YE |
|
| del casete está abierta | ||
|
|
| R |
|
| ||
|
|
| √ |
|
| ||
|
|
| A |
|
| (protegida), aparecerá | |
|
|
| R |
|
| <STOP> y <Protection!> | |
|
| AM | E |
|
| ||
|
| C |
|
|
| ||
|
|
|
|
|
| (¡Protección!). Libere la | |
|
|
|
|
|
| pestaña de protección | |
|
|
|
|
|
| contra escritura para grabar. | |
| ■ | Asegúrese de que la imagen que desea grabar | |||||
|
| aparezca en la pantalla LCD o en el visor. | |||||
| ■ | Asegúrese de que el nivel de la batería indique | |||||
|
| que tiene suficiente energía para grabar durante | |||||
0:00:10 |
| el tiempo deseado. |
|
| |||
■ | Puede seleccionar el modo de grabación que | ||||||
60min | |||||||
| desee. ➥pages 44, 45, 46 | ||||||
|
| ||||||
| 4. Para iniciar la grabación, pulse el botón | ||||||
| [Iniciar/Detener]. |
|
|
| |||
| ■ | Aparece <REC●> en la pantalla LCD. | |||||
| Para detener la grabación, pulse el botón | ||||||
| [Iniciar/Detener] de nuevo. | ||||||
| ■ | Aparece <STBY> en la pantalla LCD. | |||||
[ Nota ]
Desconecte la batería al terminar de grabar para evitar un consumo innecesario de la batería.
