VA-SW8000 VA-SW8000LITE
Table of Contents
Introduction
Features of the DVR Utility Software
DVR Utility Software in Two Editions
Network Configuration
Network Device Configuration
Supported DVR Models
Network Scalability
Hardware and Software Requirements
Network Configuration
CPU
Configuring the Computers
Configuring the DVRs
Network Connection Requirements
Configuring the TCP/IP Settings
Network Connection Requirements
Installing the Software
Click Next on the Welcome screen
Location or specify another location, and click Next
Window
Installing the Software
Start the Installation Process
Reboot the computer
How to uninstall the software
Setting Up the System
Setting Up Slave Computers
Setting Up the System
Disabling the Firewall Protection
Menus and User Access Levels
User name default
Password default 1111 2222 3333 4444
ID1 ID2 ID3 ID4
Window Navigation
Starting and Ending a Monitoring Session
Starting the Software
Starting the software without the hardware key
Plug in the hardware key
Logging Into the System
Starting and Ending a Monitoring Session
Logging Out of the System
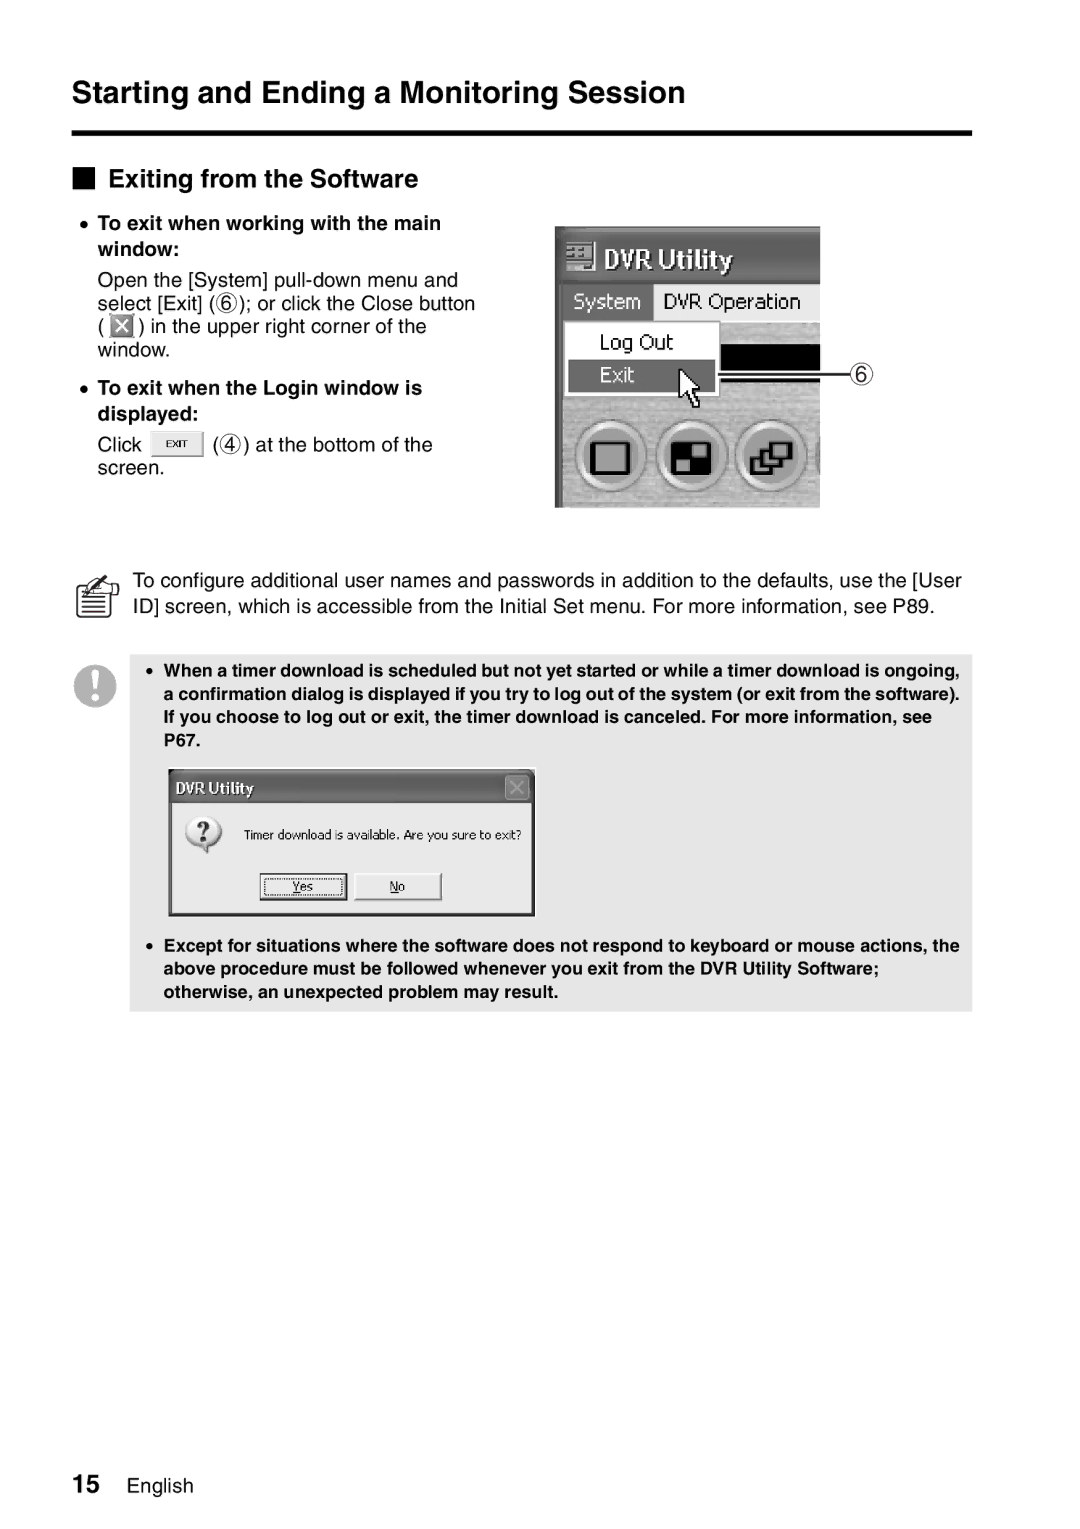
To exit when working with the main window
To exit when the Login window is Displayed
Exiting from the Software
Click 4 at the bottom of the screen
Window Elements
Main Window Elements and Their Functions
Menu Bar
System Update
4Tool Timer Download
DVR Info
DVR Set
Operating mode indicator for timer download
Control Panel
Layout selector buttons ID1/2/3/4
Channel selector buttons ID1/2/3/4
Playback control buttons ID2/3/4
Sound playback panel ID1/2/3/4
Search buttons Save button ID2/3/4
Record/cut-off buttons
Time Scale Panel
Start Point
END Point
Preview
How to Use the Time Scale
How the Time Scale Works
DAY
Hour
Specifying the Target of the Command by a Single-Click
Tree List
To select a camera as the target
To select a group as the target
When a camera title is right-clicked
Directly Running a Command by a Double-Click
Working with the Context Menu
Single-view layout one camera at a time
Viewing Pane Layouts
Four-view layout one DVR at a time
Multi-view 4x4 layout Multiple DVRs at the same time
Specified channels carries no input signal
Video is masked Mask No camera is connected
Switching the Viewing pane Layouts
When you are connected to a 4-channel DVR
CH1 DVR-1 CH2 CH3 CH4
CH1 DVR-1 CH1 CH2 CH3 CH4
DVR-1 CH1 only
When you are connected to a single-channel DVR
CH1 only
Alarm status
Title Bar
Information on the displayed video
Recording status information
Basic Procedures
Watching Live Video
Watching Live Video
Displaying Video in Each Sub-pane in the Multi-view Layout
Click on the control panel
Select one of the four sub-panes by clicking its title bar
Switching from a Sub Window to Live Mode
Switching from Playback Mode to Live Mode
Click the Stop Playback button on the control panel
How to Listen to the Sound Part in the Video
How to Turn Off the Currently Displayed Video
About DVR Reconnect Feature
Turn on/off sound output
Zoom Mode
Are now in zoom-in mode
Zoom factor depends on the current layout
To revert to the original size
Full Screen Mode
To switch to Full Screen mode
How to Enlarge the Displayed Video
Full Screen Operations
Sequential Switching Mode
Mode Click
View the live video as usual
Click
Manual recording required user access level ID3/4
Recording Monitored Video
Basic Operating Steps
Display live video
Recording Video from Multiple DVRs Concurrently
Recording Monitored Video
Live Video Recording Without Viewing It
Timer recording required user access level ID3/4
Set up the timer
To cancel timer recording
Panel
Alarm Recording Required user access level ID4
Playing Back Recorded Video
Switching to Playback Mode
Returning to Live Video
Working in Playback Mode
Playing Back Recorded Video
Recording mode
Search Mode Description
Searching for Recorded Video
Search Modes
Searching for Recorded Video
TIME/DATE Search
Specify the month/year to which your desired date belongs
Specify the desired date
Alarm Search
To preview the video associated with Alarm event, click
To switch the channels displayed on the list
Once you have located the video Interest, click
ALL
Thumbnail view by clicking or
To page up or down the thumbnail view
Back Selected title bar is highlighted Click
Downloading Procedures
Individual download mode
Batch download mode
Downloading Recorded Video
Downloading Recorded Video
Specifying the Video Download Range
Display played back video
Drag the scale 1 to define the start point
Define the end point
Once you have determined the start point, click Start Point
Once you have determined the end point, click END Point
To define the start and end points using the mouse
Point to the target point with the mouse cursor
Click the right mouse button
This menu contains the following options
Download START/END Point
Using the Download Window
Filename
Downloading an Individual Video File Using Basic Controls
Default destination folder path
Default file name
Review the download range
Download an individual video file
Adding Video Files to the Download List for Batch Download
To remove a file from the list
To preview a video file
Example Total Program1 Time0h 9min 248MB / Approx h 3min
Playing Back Downloaded Video Files
Expand
Choose a folder
Waiting list
List column headings To select individual files and add
Them to the play waiting list
Playing Back on MP2 Viewer
To remove a file from the play waiting list
To remove all entries from the play waiting list
To move up or down a file in the play waiting list
Saving or Printing Snapshot Images
Display a still image
View
Choose an image. Click an image
Click the appropriate command
Box
Button
Or print the still image, select either
Timer Download required user access level ID2/3/4
Using the Tool Menu Options
Window Elements and Their Functions
Using the Tool Menu Options
Status
Download log allows you to retry a failed timer download
Changes are Applied to Group
Configuring a Timer Download
Choose a DVR
Define the download range by
Define the download start point
Prev
Appt
Applying Changes to All DVRs in the Same Group
Tips on Defining the Download Range
How the Timer Download Mechanism Works
Cancel
Examples of Timer Download Settings
Download Log
Broadcast
Timer Record
Record
System Update
Menu Upload
Tamper Detection required user access level ID2/3/4
Initial Set Menu
Options Window
Initial Set Menu
PC TYPE/MASTER Control PC
Network Extension Mode
Download Authority Auto Clock Adjust Time Sequence
Network Interface Card NIC
USE More than 1001 Dvrs
Window Elements and Their Functions
Camera Title
Open or close a tree
Editing the Tree List
Create a group
Required user access level ID4 Change a title
Move
Required user access level ID4 Duplicate
Delete
Window Elements and Their Functions
IP Addr MAC Addr
Auto configuration mode
Registering New DVRs
Manual configuration mode
Want to register, repeat the same
Select Manual from TCP/IP
Addr
1Install VA-SW8000
Remove the connecting cable
Deregistering a DVR
To deregister a DVR, follow these steps
Creating, Modifying, or Deleting a Group
Change a DVR Title
To create a new group
To rename a group
To delete a group
Choose a group
Enter a new name for the group
Rearranging Groups and DVRs
To move a group
To move a DVR
You can also drag and drop a group to a new position
User ID Window
Password
User ID
Choose a user access level
You are prompted to confirm the password by reentering it
Reenter the password
Registering a New User
Enter the current and new passwords
Changing the Registration Information of an Existing User
Choose a user
Change the registration information
Deregistering an Existing User
To deregister an existing user, follow these steps
DVR Access Limitation
Settings
Configure Broadcast Range
Not allowed Click OK
Clock Set Window
DVR Management Menu
Manual
System Update Window
Wait until the update process completes
DVR Management Menu
Specify the new firmware file
DVR Info Window
Information 1 tab
Choose either of the two tabs
Import the information
Alarm Count
Picture Quality
DISK1
DISK2
Power Loss
Information 2 tab
Used Time
Firmware Version
Basic Configuration Steps
DVR Set Window
To configure settings on other tabs as well
Click when you are done
Choose one of the tabs
Change operating conditions
To save the configuration information
To load a saved menu file
Name, and then click Save
Click Open
Buttons that affect the computer’s edit table
Buttons that control read/write operations
LANGUAGE/D.S.TIME SET Tab
Disable
Enable
No USE
REC Mode SET Tab
Picture Quality default High
Overwrite default on
Audio Recording default on
OFF
Enabled
AL-REC on Timer
AL-REC OFF Timer
OLY AL-REC on TMR
Alarm or Sensor
Alarm and Sensor
Timer REC SET Tab
ON/OFF default OFF
Week
START/STOP
Timer schedule
To schedule a timer recording that spans two days
To activate a timer recording schedule
Click Over 24H
Last two rows seventh and eighth
To exit from the special format, click
Holiday SET Tab
DISPLAY/BUZZER SET Tab
Display
Alarm on default on
Disk Full default on
KEY in default OFF
NON REC default OFF
Monitor SET Tab
Alarm Monitor SET
Switch
Monitor SET
Full
TITLE/MOTION SET Tab
Required user access level ID4 Choose a channel
Defaults
Camera title settings for other
Sensor
Main Features
Installation
MP2 Viewer
Starting MP2 Viewer
MP2 Viewer
MP2 Viewer Window Elements and Their Functions
Zoom
Zoom OUT
Toolbar
Search panel
Sound playback panel see P126
Slide bar
Playing Back Particular Image Files
Click on the toolbar
To add all files to the play waiting list
Concerning association of MP2 file and MP2 Viewer
Using the Playback Control Buttons on the Toolbar
Playback Controls
Using Full Screen Mode
Moving the Playback Point with the Slide Bar
Enlarging the Video
Playing Back the Sound Part in the Video
Enable the tamper detection feature
Searching the Video File for a Specific Frame
Checking Video Files for Any Tampering
Specify the date and time
Select the tamper detection mode
Options Simultaneous with playback default
Conduct playback of video files
Blue
Case of Prior to start playing back
If no tampering is detected
Printing a Still Image
Saving a Still Image
You can print a still image through the following steps
1AC6P1P3121-- L9EAR/WA 0706KP