Manuals
/
Sharp
/
Computer Equipment
/
Fax Machine
Sharp
UX-340LM
manual
Table of Contents, Unpacking Checklist Connections Loading the Imaging Film
Models:
UX-340LM
1
7
124
124
Download
124 pages
31 Kb
4
5
6
7
8
9
10
11
Page 7
Image 7
Page 6
Page 8
Page 7
Image 7
Page 6
Page 8
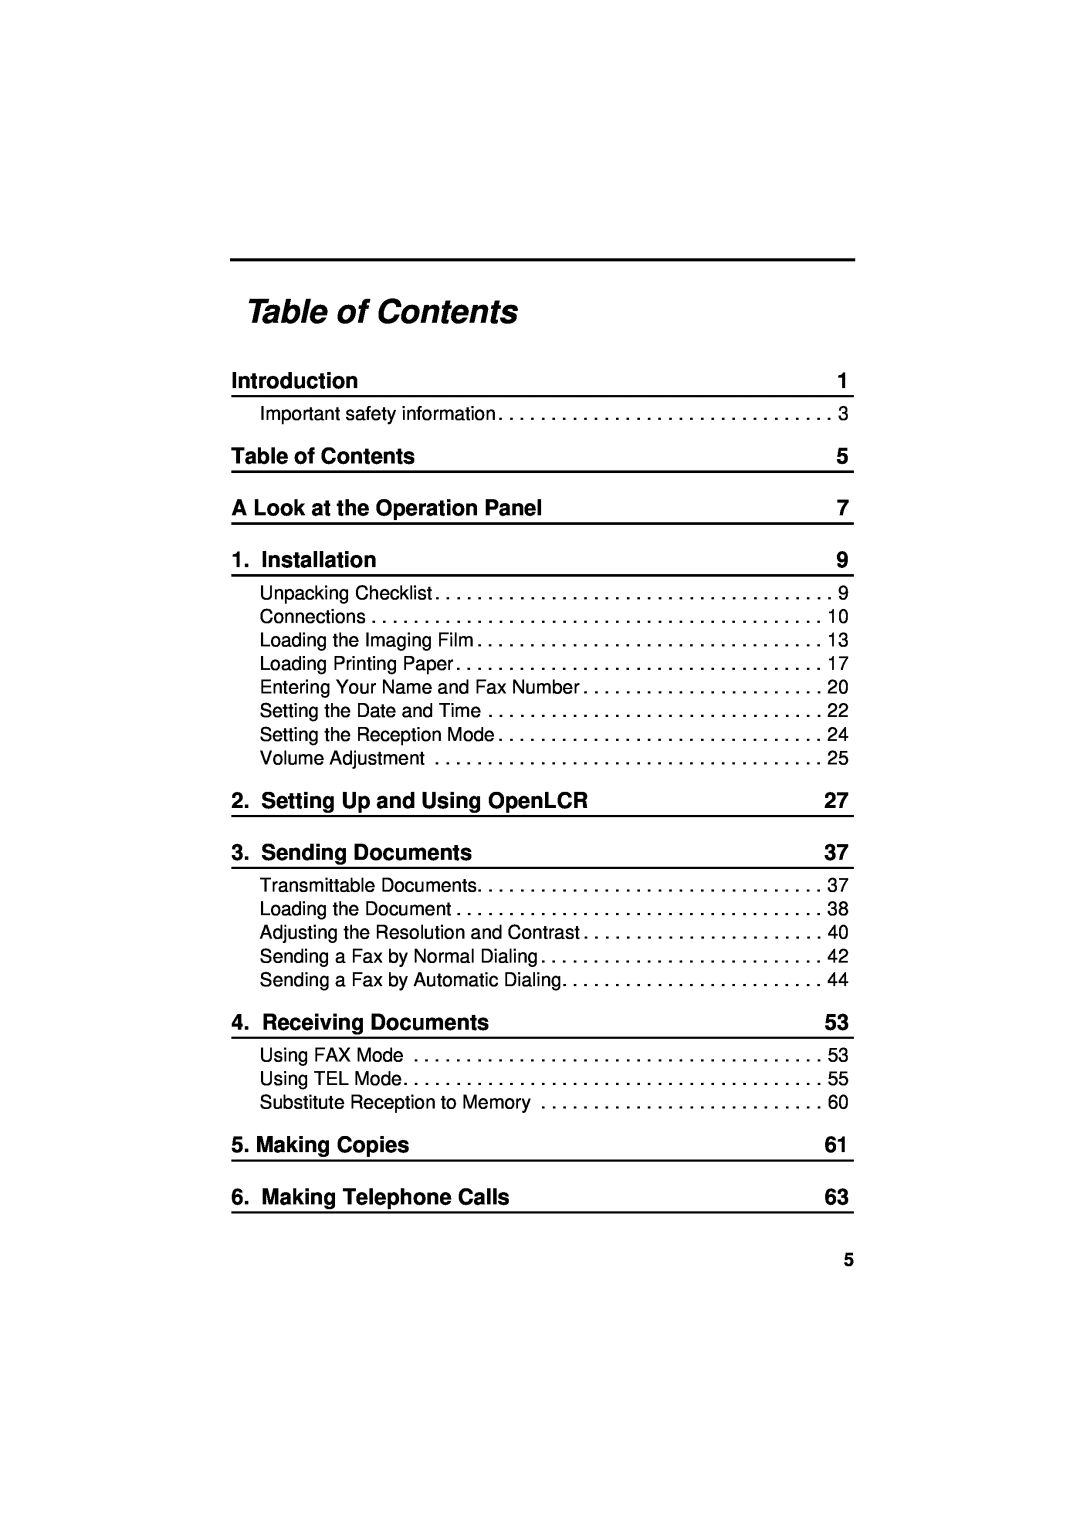
Contents
OPERATION MANUAL
UX-340LM
FACSIMILE
MODEL
Model Number Serial Number Date of Purchase Place of Purchase
FOR YOUR RECORDS
ABOUT THE TELEPHONE CONSUMER PROTECTION ACT OF
Introduction
Halftone grayscale
Dimensions
Important safety information
Weight
Use caution when installing or modifying telephone lines
Volume Adjustment
Table of Contents
Unpacking Checklist Connections Loading the Imaging Film
Setting the Date and Time Setting the Reception Mode
7. Answering Machine Hookup
1 SPEED DIAL key
A Look at the Operation Panel
5 RESOLUTION key
6 VOLUME key
13 OpenLCR key
10 HOLD/SEARCH key
11 SPEAKER key
12 Rapid Dial Keys
1. Installation
1. Installation
Unpacking Checklist
Points to keep in mind when setting up
Connecting the Handset
Connections
Connecting the power cord
Installation
Connecting the telephone line cord
1 or
Extension phone optional
Attaching the tray extension and document support
If you are installing the imaging film for the first time, go to Step
Loading the Imaging Film
Loading the Imaging Film
DO NOT DISCARD THE FOUR GREEN GEARS
8 Insert the large gear into the large
Sharp UX-3CR Imaging Film
When to replace the imaging film
Loading Printing Paper
Loading Printing Paper
4 Push the paper release plate back down
Installation1
STOP key START
Entering Your Name and Fax Number
FUNCTION key
# key
SECURITY SELECT
3 1 4 4 4 4 1
Example
ENTER YOUR NAME
START
Setting the Date and Time
Do not set the date and time if you are using OpenLCR
STOP key
0 9 2
Setting the Date and Time
Daylight Saving Time
2 0 0
Press the RECEPTION MODE key
Setting the Reception Mode
Setting the reception mode
A.M. mode
DOWN key UP key
Volume Adjustment
Speaker
Handset
RINGER HIGH RINGER MIDDLE RINGER LOW RINGER OFF OK?
Ringer
2. Setting Up OpenLCR
2. Setting Up and Using OpenLCR
Transmission Test and OpenLCR
Setting Up and Using OpenLCR
Registering by fax
Registering by phone
Downloading receiving the rate data manually
Registering through OpenLCR’s Web site
Fax transmission test
Using OpenLCR
TEL FAX
Meaning
Mark
Temporarily turning off OpenLCR
To stop using OpenLCR
What to do if “E” appears in the display
Changing your user profile
OpenLCR
What to do if you cannot connect to OpenLCR
Note The following settings are not required as of the printing
Selecting a long or short call
Changing the SHORT TIME and LONG TIME settings
OpenLCR
SHORT TIME ENTER 01-29
START DOWNLOAD STOP CANCEL
LONG TIME ENTER 03-30
Other restrictions
3. Sending Documents
Transmittable Documents
Size and weight
Loading the Document
Loading the Document
3 Close the operation panel, making sure it clicks into place
Removing a document from the feeder
1 Grasp the finger hold and pull up to open the operation panel
2 Remove the document
Resolution settings
Adjusting the Resolution and Contrast
Contrast settings
Changing the default resolution
Sending a Fax by Normal Dialing
Sending a Fax by Normal Dialing
When transmission is completed, the fax will beep once
Using the REDIAL key
Rapid Keys
Sending a Fax by Automatic Dialing
Sending a Fax by Automatic Dialing
SPEED DIAL key
To clear a mistake, press the
Storing fax and telephone numbers for Automatic Dialing
3. Sending
Documents
Clearing auto-dial numbers
Chain Dialing for area and access codes
number, or press the STOP key to return to the date and time display
Making changes
Speed Dialing
Rapid Key Dialing
SPEED DIAL
keys
Direct Keypad Dialing
Sending3
HOLD SEARCH
RECALL TIMES
Automatic redialing
Recall Interval for automatic redialing
Recall times for automatic dialing
ECM MODE
Error Correction Mode
4. Receiving Documents
Using FAX Mode
4. Receiving Documents
Changing the number of rings
Using FAX Mode
Answering with the fax’s handset
Using TEL Mode
4. Receiving Documents
Changing the number for remote fax activation
Answering with an extension phone
Comments
Turning off detection of the Tel/Fax Remote Number
Fax Signal Receive
Reception Ratio
2 in 1 Print
2 Press 1 to turn on automatic reduction, or 2 to turn it off
Substitute Reception to Memory
Substitute Reception to Memory
START/MEMORY key and go to
5. Making Copies
5. Making Copies
START/MEMORY key twice
Making Copies
Copy Cut-off
Rapid Key Dialing Press the appropriate Rapid Key
6. Making Telephone Calls
6. Making Phone Calls
Normal Dialing Enter the full telephone number with the numeric keys
Hold
Chain Dialing
Searching for an auto-dial number
Redial
Answering
Connecting an Answering Machine
7. Answering Machine Hookup
Changing the outgoing message
How the connection operates
Activating the answering machine connection
Quiet Detect Time
Optional A.M. Mode Settings
Fax when Answering machine Fails
8. Special Functions
Caller ID Requires Subscription to Service
8. Special Functions
Display messages
How Caller ID operates
Viewing the Caller ID list
Priority Call
To delete calls from the Caller ID list
PRIORITY CALL #
Blocking voice calls
Distinctive Ring Requires Subscription to Service
4 Set the reception mode to FAX
Broadcasting
Broadcasting
Cover Sheet
8. Special Functions
Selecting a header message optional
PAGE COUNTER SET
Batch Page Numbering
Entering Anti Junk numbers
Blocking Reception of Unwanted Faxes
Blocking Reception of Unwanted Faxes
Sending Documents From Memory
If the memory becomes full
Requesting transmission
Polling Requesting a Fax Transmission
Polling security
Being polled polling standby
PASSCODE # MODE
Storing and clearing fax numbers for polling permission
Setting a timer operation
Timer Operations
To cancel a timer operation
Activity Report
9. Printing Lists
TX/RX TIME
SENDER
RECEIVER
START
Print Setup List
Timer List
Passcode List
Option Setting List
PRINT
Transaction Report
3 SEND
ONLY
Print head
10. Maintenance
10. Maintenance
Maintenance
Scanning glass and rollers
The housing
Problem
11. Troubleshooting
Problems and Solutions
Line error
SPEAKER key
Dialing and transmission problems
the telephone line cord on page
Reception and copying problems
Answering machine connection
Loading Printing Paper in Chapter
General problems
Transmittable Documents on page
section, Clearing Paper Jams
Messages and Signals
explained in Downloading receiving the rate data
Clearing Paper Jams
MEMORY IS FULL
Searching for an auto-dial number on page
Audible signals
paper
Clearing Paper Jams
Clearing a jammed document
Clearing jammed printing
Clearing Paper Jams
11. Trouble- shooting
Part distribution centers
Ordering Parts
FCC Regulatory Information
Storing and Clearing Auto Dial Numbers
Quick Reference Guide
Setting the Date and Time
Entering Your Name and Number
Rapid Key Dialing
Sending Faxes
Receiving Faxes
Normal Dialing
Memorizació n y borrado de nú meros de marcació n automá tica
Guía de referencia rá pida
Introducció n de su nombre y nú mero
Ajuste de la fecha y hora
Marcació n rá pida
Transmisió n de mensajes telefax Recepció n de mensajes telefax
Guía de referencia rápida
Marcació n normal
Section 2. Suppliers Name and Address
S H A R P
MATERIAL SAFETY DATA SHEET 1/2
Section 1. Product Identification
Section 7. Fire and Explosion Data
MATERIAL SAFETY DATA SHEET 2/2
Section 6. Physical Chemical Characteristics
Section 9. Precautions for Safe Handling and Use
Skin?
Section 5.Health Hazard Data
Ingestion?
S H A R P
Index
Index
Page
Page
Page
SHARP DOCUMENT NETWORK SYSTEM OF AMERICA
LIMITED WARRANTY
PRINTED IN THAILAND TINSE4155XHTA
SHARP CORPORATION
SHARP DOCUMENT NETWORK SYSTEM OF AMERICA
Sharp Plaza, Mahwah, New Jersey
Top
Page
Image
Contents