AR-208S AR-208D
For users in the USA
Checks Passports Drivers licenses
Contents
User Settings
20 cm 10 cm
Important points when selecting an installation site
Do not install your machine in areas that are
Trademark acknowledgements
Software License
Environmental Information
For users in the USA
Safety Precautions
For users in Canada
Introduction
Using the manual
Online Manual on the accessory CD-ROM
Conventions used in this manual and online manual
High-speed laser copying
Main Features
Enhanced copying features
High-quality digital image
Color scanner function
LCD panel displays messages
Laser printer function
Preparations
Part Names
Operation panel
AR-208S
Display
100% 5x11
Power on and OFF
Power on
Preheat mode
Power off
Power save modes
Auto power shut-off mode
Paper
For best results, use only Sharp recommended paper
Special papers
Follow these guidelines when using special papers
Loading the Paper Tray
Gently push the paper tray back into the machine
Envelopes
Important points when inserting paper in the bypass tray
Bypass Feed including special paper
Press the Tray Select key to select the bypass tray
Loading paper in the bypass tray
Open the bypass tray and extend the tray
Print face
Select the tray, and then press
Changing a Trays Paper Size Setting
Follow these steps to change a trays paper size setting
Press the Menu key
Copying books or originals with folds or creases
Using the document glass
Normal Copying
This chapter explains basic copying functions
Document feeder tray without trying
Using the Rspf
Select the number of copies and any other copy settings,
To force them
Capacity of paper output tray
Originals that cannot be used in the Rspf
Original output tray extension
Paper output tray extension
Press the Tray Select key
Setting the number of copies
Selecting the Tray
Press the numeric keys to set the number of copies
Making a Copy Darker or Lighter
REDUCTION/ENLARGEMENT/ZOOM
Selecting a preset ratio
Fine adjustment of the ratio
Copy will be delivered to the paper output tray
Automatic TWO-SIDED Copying
AR-208D only
Using the document glass AR-208D only
Place the originals in the RSPF. p.21
Press the Enter key
Sort appears and then press
When all originals have been scanned, press the key
Sort Copy
Offset function during sort copy
Place the originals. p.21
If the memory becomes full
2IN1 appears and then press
Copying Multiple Originals Onto a Single Sheet of Paper
1 copy
ORIG. Size Enter
Place the originals. p.21 Press the E-SORT/SP.FUN key until
Copy is delivered to the paper output tray
Place the originals Press the E-SORT/SP.FUN key until
Creating Margins When Copying
Margin shift
Margin Shift appears and then press
Margin Shift on OFF
Sharpdesk
Software
MFP driver
Button Manager
Windows 98, Windows Me, Windows 2000 Professional*5
Before Installation
Hardware and software requirements
Windows XP*5, Windows Vista*5
Installing the Software
Double-click the setup icon
Select Connected to this computer and click the Next button
Follow the on-screen instructions
Installing the Software
When installing is finished, click the Close button
This completes the installation of the software
Connecting a USB cable
Using the machine as a shared printer
Select Connected via the network and click the Next button
Windows Vista, the Add Network Port button does not appear
Click the Add Network Port button
You will return to the window of . Click the Close button
Windows Vista, select Properties from the Organize menu
Setting UP Button Manager
Windows XP/Vista
Installing the Software
Windows 98/Me/2000
Select Sharp AR-XXXX and click the Properties button
Select Sharp Button Manager T Send to this application
System requirements for USB 2.0 Hi-Speed mode
User programs p.58
Canceling a print job
Using the Printer Mode
Basic Procedure for Printing
Make sure that paper is loaded in the tray
Scanning from the operation panel of the machine
Using the Scanner Mode
Scanning Using the Keys on the Machine
Button Manager scan menu
Scanning from Your Computer
Operation in COPY, PRINTER, and Scanner Modes
Click to read the online manual
HOW to USE the Online Manual
Viewing the online manual
Copy mode
User Programs
Layout patterns When enabled, this function
Power shut-off mode, no keys
Except the Start key Can be used Use this setting to select
Job in printer mode
You can prevent settings from
Use this setting to set
Or increase when held down
This sets the volume of beep
Factory default setting
This is used to adjust
Be adjusted separately for
To the factory default settings
Print mode
OFF
Press the Menu key and then press the Enter key
Selecting a Setting for a User Program
Change the setting of the selected item
One beep
Base settings
Base setting beep
Invalid key beep
Indication Cause and remedy Lamp indicator Display
Display Messages
Indicator Steadily
Toner cartridge is not installed
Error
Service by an authorized Sharp
Troubleshooting the Machine
Paper
Paper is not loaded properly
Problem Cause and solution Misfeed occur
Paper is outside of the specified Size and weight range
Paper misfeed
Machine is in auto power shut-off
Memory FULL, Press Start to
Click Performance and Maintenance, and then click System
Problems During Setup of the Software
MFP driver cannot be installed Windows 2000/XP
Click the start button and then click Control Panel
Plug and play screen does not appear
Click the icon beside Universal Serial Bus controllers
Click the icon beside Other
Install the software as explained in Installing
Removing the software
Devices
Misfeed Removal
Misfeed in the fusing area
Misfeed in the paper feed area
Misfeed in the transport area
Lower the fusing unit release lever
See B Misfeed in the fusing area p.71
Open the front cover
Misfeed in the Rspf
Document feeder cover Rspf jam release lever
Toner Cartridge Replacement
Toner cartridge lock release lever
Gently pull the toner
Cartridge out while pressing the lock release lever
Or 5 times Shutter Toner seal
Scan Head Locking Switch
LockUnlock
Press the key or key to display the count of each function
Maintenance Required
Checking the Total Count
Cabinet
Cleaning the Machine
Wipe the cabinet with a soft, clean cloth
Document glass and the back side of the Rspf
Transfer charger
Network Expansion KIT AR-NB2 a
System Configuration
Facsimile Expansion KIT AR-FX13
PS3 Expansion KIT AR-PK1N
USB interface cable
Using the AR-D33 with the printer function
Interface cable
Please purchase the appropriate cable for your computer
Specifications
Power supply
Fusing system
Resolution
Power consumption
Printer Function
Scanner Function
Sheet paper feed unit AR-D33
Paper weight
Weight
Paper size
Material Safety Data Sheet
Hazards Identification
Exposure Controls / Personal Protection
Transport Information
Msds No. F-31601
Not toxic to aquatic organisms
Dust explosion, like most finely divided organic powders
Date Issued Nov.01 Msds No. F-31601
Symbols
Index
Misfeed removal
Power switch
Problems during setup
Normal copying
Removing the software Roller rotating knob
Ready indicator
System configuration System requirements for USB
Tray Select key
Troubleshooting and maintenance
Using convenient copy functions
Connecting the computer
Preparations
Memo
Memo
For users in the USA
Sharp Electronics Corporation
AR-FX13
For users in the USA
Important safety instructions
Introduction
FCC Notice to users
Sharp Electronics Corporation
Table of Contents
Appendix
Direct transmission mode
Memory transmission mode
Using the Rspf p.52
Using the document glass p.53
Dialing methods
Sending a fax
Storing a fax job while another job is in progress
Selecting the reception mode p.63
Sending a fax to multiple destinations Broadcasting p.71
List of FAX Functions
RX Data Transfer
Never Prints
Middle
OFF Memory Poll Mode
Select a setting or enter information
Selecting Settings for the Function
Press the Mode Select key to select fax mode
Press the Menu key
Online Manual on the CD-ROM
Connecting the Telephone Line Cord
Connections
Comments
Connecting Other Devices
Final Preparations
Initial Settings
Part Names
Look AT the FAX Operation Panel
Initial Settings
Using the Arrow Keys
Adjusting the Beep Volume
Press the key or key to set the ringer volume
Adjusting the Ringing Volume
18RINGER Volume
4USER Program
Setting the Length of Alarm Beeps
17BEEP Length
19BEEPER Volume
Press the key or key to set the alarm volume
FAX Setup
HOW to Enter Characters
3OWN Passcode SET
2ENTRY Mode
Entering Your Name and FAX Number
2DATE&TIME SET
Setting the Date and Time
Press the Enter key Press the Menu key
Press the key or key to select 112HOUR or 224HOUR
23DATE&TIME Format
1TIME Format
2DATE Format
Press the key or key to select the display order
Press the key or key to select 1ON or 2OFF
Daylight Saving Time Setting
5DAY Light Saving
Direct transmission the Memory indicator is off
Selecting the Transmission Mode
Memory transmission the Memory indicator is lit
Selecting the Reception Mode
# of Rings Auto
Press a numeric key to select the number of rings
Selecting the Reception Paper Size
# of Rings Manual
Press the key or key to select the tray selection
Setting the Tray Selection
25TRAY Selection
Press the key or key to select the dial mode
Setting the Dial Mode
20DIAL Mode
8RECALL Times Busy
Setting the Number of Recall Times
When the line is busy
When a communication error occurs
9RECALL Times ERR
Press the numeric keys to select the recall interval
Setting the Recall Interval
10RECALL INT. Busy
11RECALL INT. ERR
Setting the Index Function
22INDEX Print
3RESO. Priority
Setting Resolution Priority
Press the key or key to select the transmission resolution
Setting UP the Machine for USE with a PC Modem
15FAX Signal RCV
Using the Remote Reception Function
14REMOTE Reception
Press the Menu key
13FAX Remote Number
Press a numeric key to enter the Fax Remote Number
Press the key or key to select a ringing pattern
Distinctive Ringing
21DISTINCTIVE Ring
Enter the fax number with the numeric keys
Storing Numbers for Automatic Dialing
Storing numbers
1FAX Number
To select the communication speed
Press the key or key to select a Chain Dial setting
Enter the name of the destination with the numeric keys
2CLEAR
Press the Menu key a number of times until you exit
Storing Numbers Under Group Keys
3GROUP KEY
Enter a name for the Group Key with the numeric keys
Enter Characters
1FAX # Enter the numbers that you wish to delete
2END
Quiet Detect Time
Using the Machine with AN Answering Machine
6A.M. Mode
1QUIET Detect Time
2AUTO Receive
Answering Machine Backup
If Quiet Detect Time is not working properly
When using the document glass
Size and Weight
When using the Rspf
Originals Suitable for Faxing
Unsuitable Originals
Sending Originals
Setting the Original
Adjust the original guides to the width of your originals
There are two ways to send the fax
Press the Start key
Mark
Gently close the Rspf
Press the # key
1DOC. Glass Size
Optional Transmission Settings
Original Size
Press the key or key to select the original size
Resolution
Contrast
Cover Sheet
1COVER Sheet SET
Press the key or key to select a message
Message Function
2TX Message SET
TWO-SIDED Original Transmission Function
Place the originals in the Rspf
Rapid KEY Dialing
Dialing and Transmitting
Direct Keypad Dialing
Speed Dialing
Dial the fax number of the receiving machine
Normal Dialing Using the Speaker KEY
Chain Dialing
Press the REDIAL/PAUSE key Press the Start key
Using the Search KEY
Redialing
3MEMORY Status
Canceling Deleting a Stored FAX JOB
If the Memory Becomes Full While Scanning AN Original
Using A.M. Mode
Using Auto Mode
Using MAN. Mode
Receiving Faxes
Optional Reception Settings
Sided RX Press the key or key to select 1ON or 2OFF
Receive Reduce
16RCV Reduce
When Using Manual Sending and Receiving
Memory
Substitute Reception into Memory
2FAX Number
Data Transfer
0RX Data Transfer
1DATA Transfer
1YES
Transmission Reservation
Broadcasting
Press the Broadcast key
Broadcasting using a Group key
Press the appropriate Group key
Polling
8POLLING Mode
Polling
Press the Menu key Press the Enter key
9SERIAL Poll Mode
Serial Polling
Polling Transmission Memory Polling
Setting up polling transmission
7MEMORY Poll Mode
Adding a original to polling memory
Deleting originals from polling memory
1ON
Restricting Polling Machines Polling Security
Press the Menu key Press the key or Key To select 1ON
12SECURITY Select
4PASSCODE # Mode
Press the key or key to select 1SET and press the Enter key
Press the key or key to select 1SET
Timer Operations
1TIMER Mode
Enter the time at which transmission
Canceling a Timer Transmission JOB
1ANTI Junk Select
Anti Junk FAX
5ANTI Junk FAX
To store junk fax numbers, use the following procedure
To clear junk fax numbers, use the following procedure
Operation in COPY, PRINTER, SCANNER, and FAX Modes
Troubleshooting
Printing OUT Reports
Passcode List
User Program List
Press the key or key to select 1ON and press the Enter key
Activity Report Auto Listing
6AUTO Listing
Printing Transaction Reports
7PRINT Selection
Troubleshooting
→ Replace the TD cartridge
Display Messages
Messages and Signals
Audible Signals
Specifications
Appendix
Index
Rspf
Faxes, sending and receiving
Fax setup
Storing/settings
Special functions
Memo
Memo
Memo
Canada
Avis Pour NOS
AR-FX13
AR-NB2 a
Network Expansion KIT
Safety Standards
Introduction
Trademark acknowledgments
Contents
PS printer driver
Software CD-ROM Disc
PCL6 and PCL5e printer driver
PPD driver
\Sadmin\Documents\EnglishA
Sharpdesk CD-ROMs for Windows
Mac OS 9.0 to
Windows Macintosh
Operating system
PPD driver
Connecting to a Network
Status button
Explanation
Additional user programs for Print mode
Program Settings factory Program name
Number
Setup in a Windows Environment
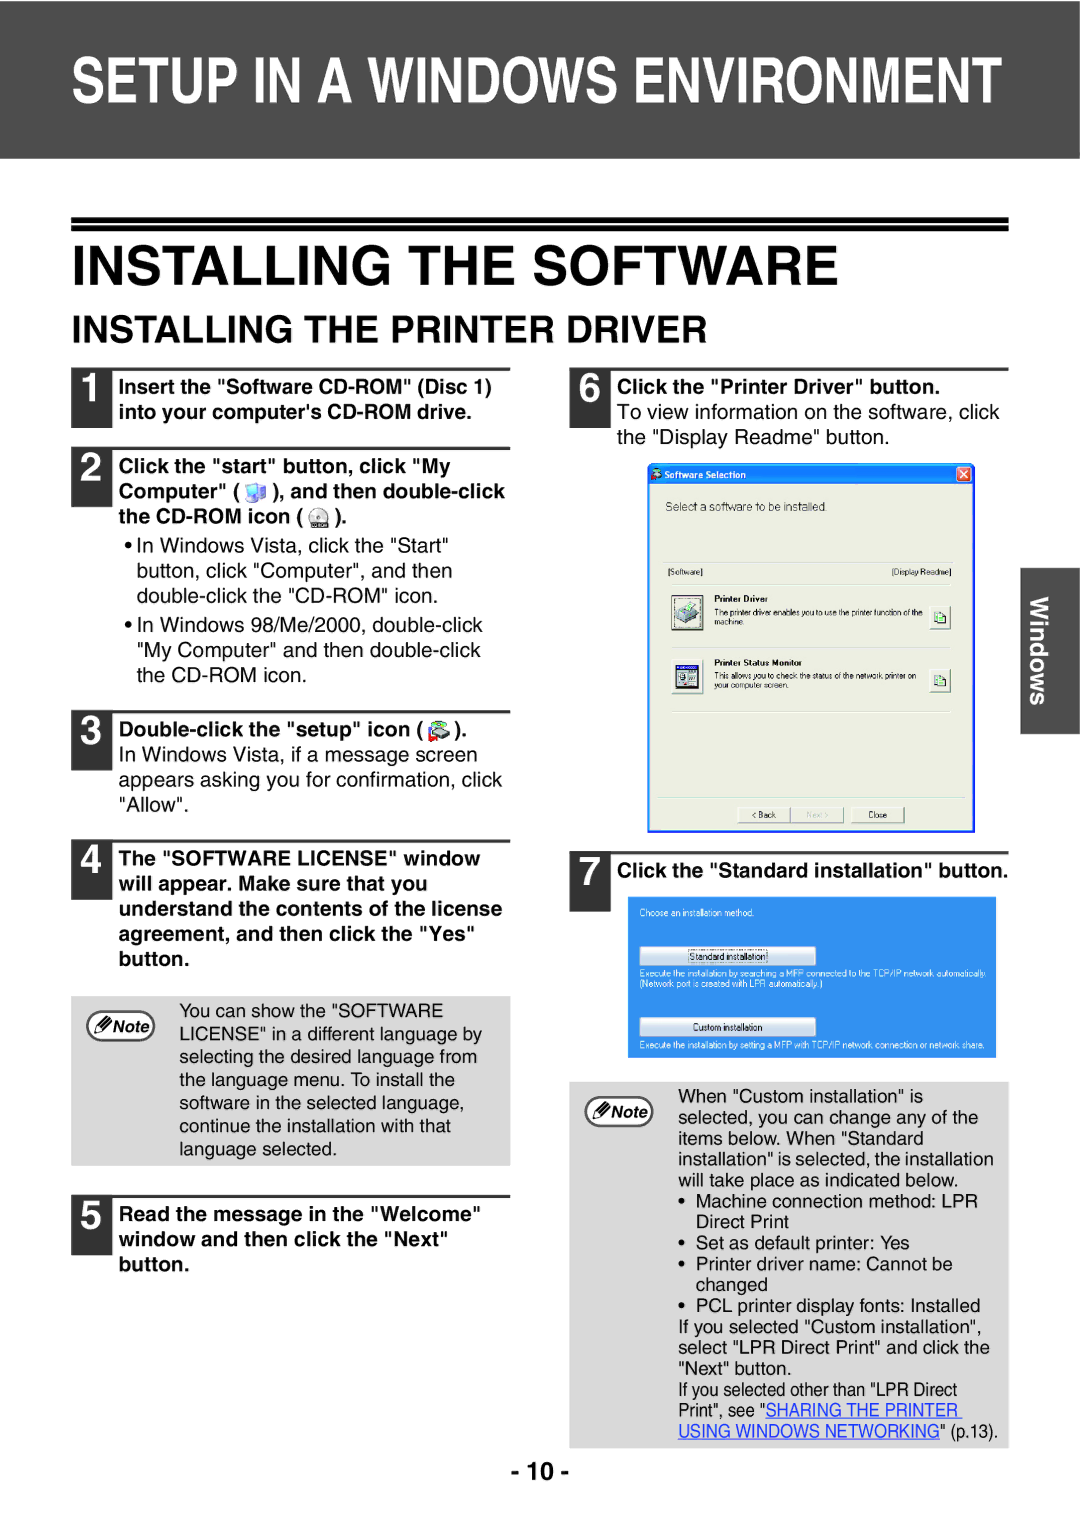
Click the Printer Driver button
Follow the on-screen instructions
Window confirming installation of the display fonts
If you are using Windows
Printer name window
Installing the Printer Status Monitor p.15
Click the Close button
Sharing the Printer Using Windows Networking
Your operating system
Step
If you are using Windows Vista
Click the Close button in the window
If the shared printer does not appear
Click the Printer Status Monitor button
Click the Close button in the window of step
Installing the PS Display Fonts
Using the PPD File
Operating system PPD file path
Configuring the Printer Driver
Status, click the Auto Configuration button
Click the Continue button
V10.1.5 V10.2.8 V10.3.9 V10.4
Click Add
Click the Install button
Double-click the Printer Setup Utility icon
Configure the printer driver
Select AppleTalk
Select the machine configuration
MAC OS 9.0
If the above dialog box does not
Click the Setup button followed
PPD file is installed
Appear and you return to
AR-NB2 a
AR-NB2 a
Warranty Trademark Acknowledgments
Introduction
Contents
Before Using the Network Scanner Function
Close the Web
Open the Web browser on your computer
Click Help under the menu frame
System Information
Admin Mode
Menu frame
Scan Management
Description Default setting
Scan Mode settings
When you have finished selecting the settings, click Submit
Click Add below the scan list
Storing destinations for Scan to E-mail
Description
FTP destination information
Storing destinations for Scan to FTP
Scan to Desktop destination information
Storing destinations for Scan to Desktop
Storing a group of destinations
For the settings, see the following table
Storing Groups Scan to E-mail
Editing and deleting programmed transmission destinations
Click Destination in the menu frame of the Web
Quick Setup p.15
Passwords p.16
Clock Adjust
Services p.15
Select the transmission methods that you wish to use
Configure the Advanced Setup settings
Click Network Scanning in the menu frame
Set a limit for the size of image files
Configure the required parameters for that server
Configuring SMTP, DNS and Ldap server settings
Configuring Smtp and DNS server settings
Enter the required information in SMTP, DNS and Ldap
Enter passwords in User Password and Admin Password
When you have completed all entries Click Submit
Press the Start key to begin scanning
Clear key
Select Input Address and press the Enter key
Press the Mode Select key to select scanner mode
Sending an image by entering an e-mail address manually
Enter search characters and press the Enter key
Search characters will
Image Orientation and Standard Original Loading Orientation
Scanning result
Format of the received image data
Problem Cause and solution
Viewer program used by the recipient does not support
Destination was selected
Resolution
Error Code Solution
Important Points When Using Scan to E-MAIL
Text original a Photo original B
Checking the IP Address
Status button
Sharpdesk CD-ROM for Windows
Network Scanner Tool Sharp Twain AR/DM Twain driver
Users Guides for Software Programs
Follow the instructions on the screen
Click the start button and then click My Computer
Double click the CD-ROM icon
Sharpdesk CD-ROM for Windows
Click Control Panel in the start menu
Double click Add or Remove Programs
Specifications
AR-NB2 a for network scanner
Network expansion kit Online Manual
Introduction
Trademark Acknowledgments
Using Bookmarks
How to use the online manual
How to Control the Online Manual
How to Print Out This Manual
Contents
Troubleshooting
Printer. If you need to change any print
Basic printing
Wish to print
If the tray runs out of paper during printing
When Paper Source is set to Auto Select
Cancel a print job
Panel
Click the Start button, select Settings
On Windows 98/Me, click the Setup tab
Click Printers and Other Hardware, and then
Printer driver settings
Machine image
Two-sided printing
Print data Printing result Sided Book Sided Tablet
Pamphlet style
Printing result Print data Right Turning Pamphlet
Printing multiple pages on one
Fitting the printed image to the paper
Rotating the print image 180 degrees
Print sample
How to Print a Watermark
Printing a watermark
Printing lines and vector graphics in black
Printing text and lines/graphics in black
Printing text in black
Before using the Printer Status Monitor
Printer utilities
Starting up the printer utilities
Using the printer utilities
Using the printer utilities
Right-click the Printer Status Monitor icon
Changing the Printer Status Monitor settings
Change the Printer Status Monitor settings as desired
On the task bar, and select Preferences from
Status from the pop-up menu
Checking the printer status
On the task bar, and select Sharp
Click the Detail button
Click the Print button
Configure print settings That you wish to print
Make sure that the correct printer is selected
When Paper Feed is set to Auto Select
How to access the Web page and view help
About the Web pages
About the Web pages for users
2System Information
Advanced job settings
Directly printing a file in a computer
Configuring the printer condition settings
How to configure the settings
3Settings
Printer condition setting menu
Condition Settings Default Settings
Printer condition settings
Default Settings
PCL Settings
PostScript Settings
About the Web pages for the administrator
Password
Click Passwords in the menu frame
Admin Password
Submit
Click Print Port in the menu frame
Setting up the E-mail print function
Mail print function
Two-sided print
Using the E-mail print function
Copies
File type
Configuring a setting in the key operator programs
Key operator programs
Interface settings
Key operator programs
Click Services in the menu frame
Information setup
Smtp setup
Click Information in the menu frame
Click Submit to store the entered information
Status message setup
Click Status Message in the menu frame
Destination addresses and time schedule
Enter the destination addresses
Alerts message setup
Click Alerts Message in the menu frame
Troubleshooting
Check the connections
Macintosh Mac OS 9.0 to
Removing the software
Windows
Printer specifications
Network expansion kit memory*2
Printer driver specifications
PPD
Printer driver specifications
Ropm
Index
Numerics

 ).
).