Operator’s Manual for FAX Unit
Page
Preface
Preface
For U.S.A. only
Toshiba America Business SOLUTIONS, INC
For Canada only
Toshiba Australia PTY Limited
Toshiba of Canada Limited
Before Reading This Manual
„ How to read this manual ‰ Symbols in this manual
‰ Model and series names in this manual
‰ Explanation for control panel and touch panel
„ Accessories
‰ Description of original/paper direction
‰ Trademarks
General Precautions
„ When power failure occurs
„ Disclaimer notice
Page
Contents
112
101
114
115
Description of Each Component
Connecting Cables
Description of Each Component
„ Control panel
STUDIO6530C Series GD-1270
Memory RX
FAX button
Header area
„ Touch panel
FAX Unit
„ Options
Connecting Cables
Line
STUDIO855 Series GD-1250
Page
Receiving a Fax
Sending a Fax
Sending a Fax
„ Basic procedures
Place the originals
Press the FAX button on the control panel
Press Send
Specify the recipient
Redial function
Batch transmission function
Sending the next original
‰ Original scanning range
„ Handling an original ‰ Originals that can be sent
Lower the Original Cover or Radf slowly
‰ Placing the originals on the original glass
‰ Placing the originals on the Radf
Sending different width originals
Precautions for using the Radf
‰ Making settings
„ Setting the transmission conditions
Resolution
ECM
‰ Changing the settings for each
‰ Direct entry with digital keys
„ Specifying the recipient
‰ Specifying the recipient in the address book
‰ Group entry
Press Known ID
‰ Searching for by ID number
Then press OK
Entered ID number is displayed. Press FAX icon
Press Search
‰ Searching for the recipients fax number
Search
‰ Confirming the recipients
Specify the recipients
„ Other transmissions ‰ On-hook transmission
‰ Off-hook transmission
Pick up the handset of the external telephone
Replace the handset of the external telephone
Receiving a Fax
„ Reception mode
‰ Auto reception
‰ Manual reception
‰ Memory reception
„ Originals and paper ‰ Acceptable size of paper
‰ Default setting for RX printing
North American format
‰ Paper priority when there is no same size paper
A3 B4
Format
Checking Communications
Canceling the Transmission
Checking Communications
„ Checking reserved transmissions
Press JOB Status Select FAX
„ Checking communication status log
Registering recipients’ fax numbers to the address book
List of the communication status is displayed
„ Canceling the memory transmission
Canceling the Transmission
‰ When using the original glass
Press JOB Cancel
‰ When using the Radf Reversing Automatic Document Feeder
„ Canceling direct transmissions
Press JOB STATUS, and then select the FAX tab
„ Canceling reserved transmissions
Mailbox Transmission
Advanced Functions
Place the originals on the Radf
Transmitting 2-Sided Originals
Press Send
Priority Transmission
„ Polling transmission
Polling Communication
Press the Start button on the control panel
„ Polling reception
Press the Advanced tab, and then press Polling
Specify the sender’s fax number
Confidential mailbox
Mailbox Transmission
Bulletin board mailbox
Relay station mailbox
‰ Registering an original
„ Registering/printing/deleting an original
Press the Start button on the control panel
‰ Printing an original
‰ Deleting an original
‰ Sending an original
„ Sending/retrieving an original
Specify the recipient’s fax number
Specify the recipients fax number Press Send
‰ Retrieving an original
‰ Creating the confidential or bulletin board mailbox
„ Creating/modifying/deleting a mailbox
Mailbox Transmission
MODIFY, and then OK
‰ Creating/modifying a relay station mailbox
Mailbox Transmission
Mailbox Transmission
‰ Deleting a mailbox
Confirmation screen for the deletion is displayed. Press YES
Chain Dial Communication
Delayed Transmission Reservation
Recovery Transmission
Studio
Onramp Gateway
Setting up the Smtp server
Offramp Gateway
Specifying an E-mail address
Save as File
Press Send
Page
Printing Lists & Reports Automatically Lists/Reports Samples
Printing Lists & Reports Manually
„ Journal transmission journal/reception journal
Printing Lists & Reports Manually
Press Journal
„ Reservation list
Press the Advanced tab, and then press ITU Mailbox List
„ Mailbox/relay box report
Transmission Journal
Printing Lists & Reports Automatically
„ Transmission journal
Lists/Reports Samples
„ Reception journal
PGS
„ Memory transmission report
„ Multi transmission report
„ Transmission report
„ Relay TX orig. terminal report
„ Multi polling report
„ Relay TX end terminal report
„ Relay TX relay station report
„ Mailbox reception report
„ Relay station report
„ Power failure list
Administrator Settings 101
Setting Items
„ Fax settings
User Settings
Set each setting item, and then press OK
Resolution
Original
Exposure
TX Type
TTI
RTI
Administrator Settings
FAX menu is displayed Following section describes each menu
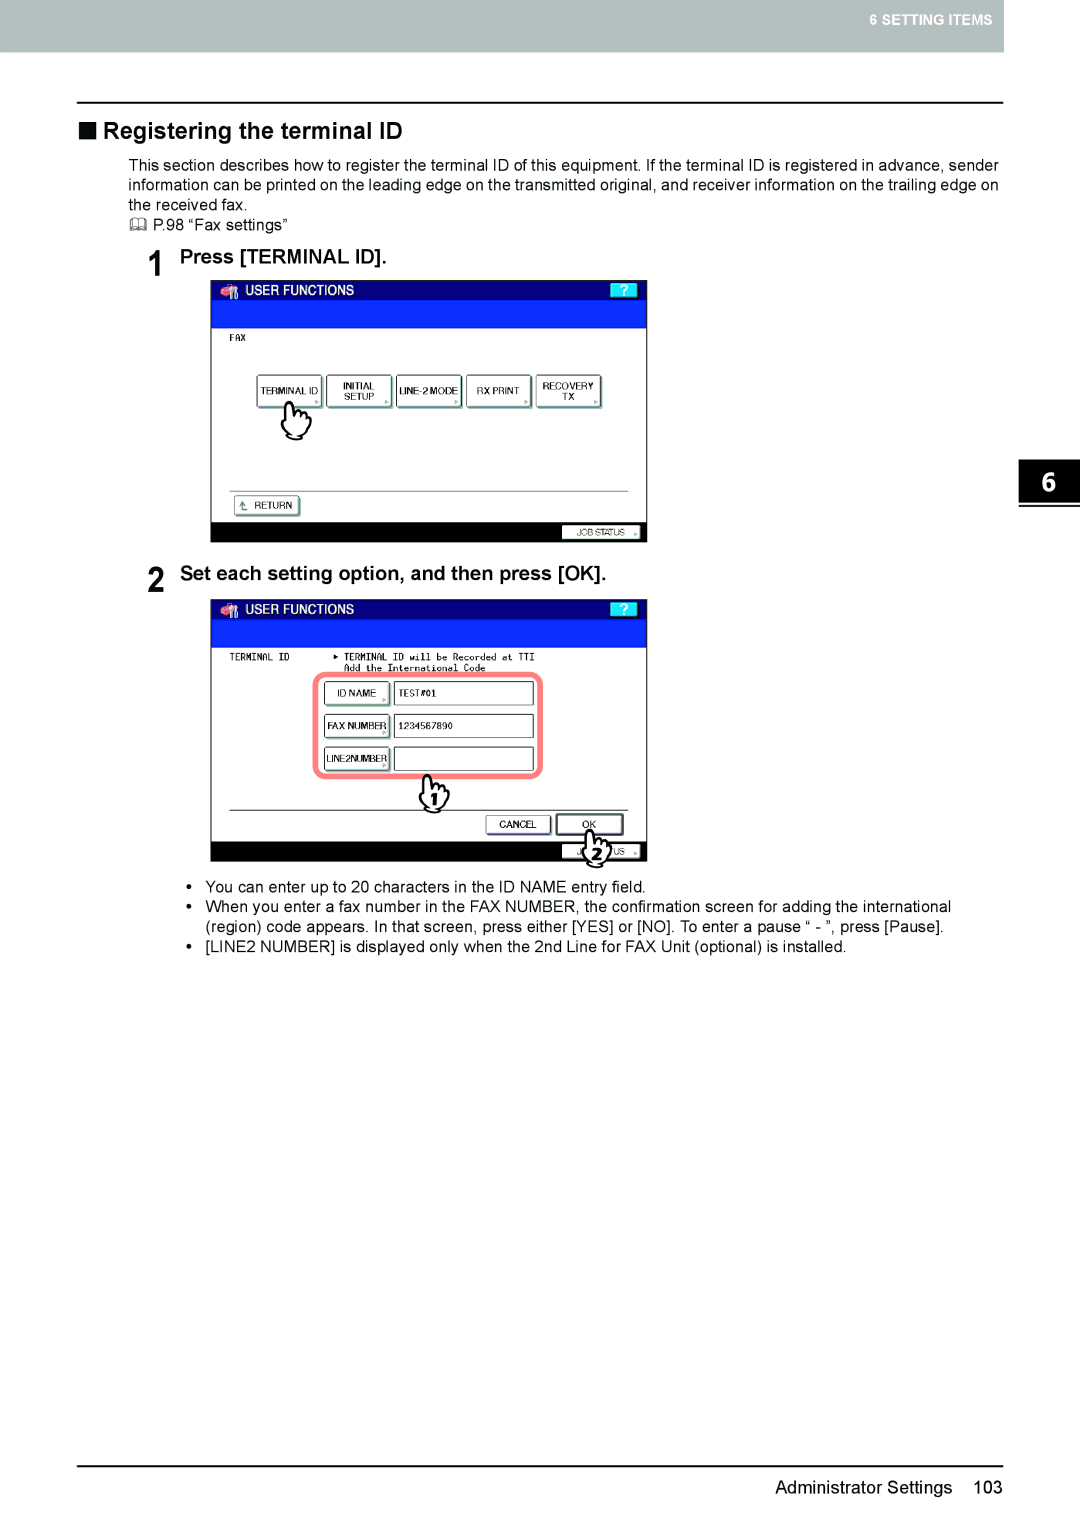
„ Registering the terminal ID
Press Terminal ID Set each setting option, and then press OK
„ Setting the initial setup
Press Initial Setup
Example of how sender information is printed on paper
Monitor Volume / Completion Tone Volume
RX Mode
Set each option, and then press OK
Dial Type / Dial Type LINE2
Press RX Print Set each option, and then press OK
„ Setting RX printing
Discard
Reduction
Rotate Sort
Duplex Print
„ Setting recovery transmission
RX only Timer
„ Setting 2nd Line for FAX Unit
TX/RX
RX only 24HR
Page
Specifications of GD-1250/GD-1270 114
Troubleshooting 112
Troubleshooting
„ Error codes
„ Error messages
„ Transmission/reception trouble
Transmission troubles
Reception troubles
LD, LG, LT, LT-R, ST, ST-R, Comp
Specifications of GD-1250/GD-1270
Numerics
Index
100
Page
Multifunctional Digital Systems