|
| |
29 | Winding Bolt Rotation | |
| ||
|
| |
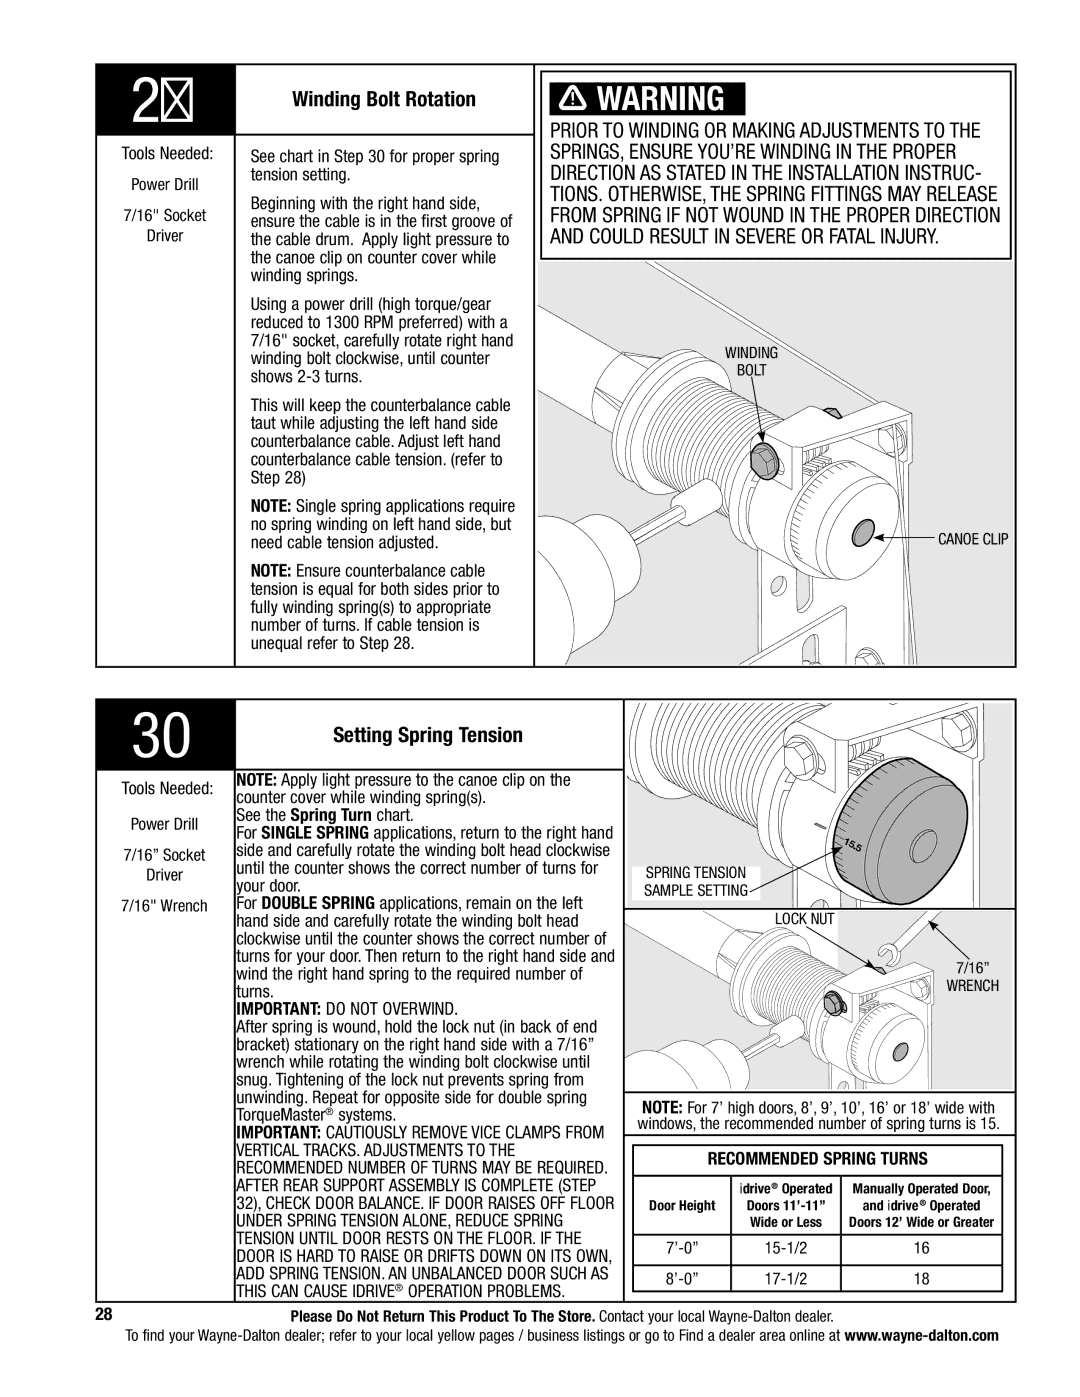
Tools Needed: | See chart in Step 30 for proper spring | |
Power Drill | tension setting. | |
Beginning with the right hand side, | ||
7/16" Socket | ||
ensure the cable is in the first groove of | ||
Driver | ||
the cable drum. Apply light pressure to | ||
| the canoe clip on counter cover while | |
| winding springs. | |
| Using a power drill (high torque/gear | |
| reduced to 1300 RPM preferred) with a | |
| 7/16" socket, carefully rotate right hand | |
| winding bolt clockwise, until counter | |
| shows | |
| This will keep the counterbalance cable | |
| taut while adjusting the left hand side | |
| counterbalance cable. Adjust left hand | |
| counterbalance cable tension. (refer to | |
| Step 28) | |
| NOTE: Single spring applications require | |
| no spring winding on left hand side, but | |
| need cable tension adjusted. | |
| NOTE: Ensure counterbalance cable | |
| tension is equal for both sides prior to | |
| fully winding spring(s) to appropriate | |
| number of turns. If cable tension is | |
| unequal refer to Step 28. | |
|
|
![]() WARNING
WARNING
Prior to winding or making adjustments to the springs, ensure you’re winding in the proper direction as stated in the Installation Instruc- tions. Otherwise, the spring fittings may release from spring if not wound in the proper direction and could result in severe or fatal injury.
Winding
Bolt
![]()
![]() Canoe Clip
Canoe Clip
30 | Setting Spring Tension |
|
|
|
|
|
|
| |
Tools Needed: | NOTE: Apply light pressure to the canoe clip on the |
|
|
|
counter cover while winding spring(s). |
|
|
| |
|
|
|
| |
Power Drill | See the Spring Turn chart. |
|
|
|
For SINGLE SPRING applications, return to the right hand |
|
|
| |
|
|
|
| |
7/16” Socket | side and carefully rotate the winding bolt head clockwise |
|
|
|
Driver | until the counter shows the correct number of turns for | Spring Tension |
| |
your door. |
| |||
| Sample Setting |
| ||
7/16" Wrench | For DOUBLE SPRING applications, remain on the left |
| Lock Nut |
|
| hand side and carefully rotate the winding bolt head |
|
| |
| clockwise until the counter shows the correct number of |
|
|
|
| turns for your door. Then return to the right hand side and |
|
| 7/16” |
| wind the right hand spring to the required number of |
|
| |
|
|
| Wrench | |
| turns. |
|
| |
|
|
|
| |
| IMPORTANT: Do Not Overwind. |
|
|
|
| After spring is wound, hold the lock nut (in back of end |
|
|
|
| bracket) stationary on the right hand side with a 7/16” |
|
|
|
| wrench while rotating the winding bolt clockwise until |
|
|
|
| snug. Tightening of the lock nut prevents spring from |
|
|
|
| unwinding. Repeat for opposite side for double spring | NOTE: For 7’ high doors, 8’, 9’, 10’, 16’ or 18’ wide with | ||
| TorqueMaster® systems. | |||
| IMPORTANT: Cautiously remove vice clamps from | windows, the recommended number of spring turns is 15. | ||
| vertical tracks. Adjustments to the | RECOMMENDED SPRING TURNS | ||
| recommended number of turns may be required. | |||
|
|
|
| |
| AFTER REAR SUPPORT ASSEMBLY IS COMPLETE (STEP |
| idrive® Operated | Manually Operated Door, |
| 32), CHECK DOOR BALANCE. If door raises off floor | Door Height | Doors | and idrive® Operated |
| under spring tension alone, Reduce spring |
| Wide or Less | Doors 12’ Wide or Greater |
| tension until door rests on the floor. If the | 16 | ||
| door is hard to raise or drifts down on its own, | |||
|
|
|
| |
| add spring tension. An unbalanced door such as | 18 | ||
| this can cause idrive® operation problems. |
|
|
|
28 | Please Do Not Return This Product To The Store. Contact your local |
| ||
To find your
