REMOTE CONTROL FEATURES
In addition to controlling this unit, the remote control can also operate other audio and video components made by YAMAHA and other manufacturers. To control these other components, you must set up the remote control with the appropriate remote control codes. This remote control also has a learn feature which allows the remote to acquire functions from other remote controls equipped with an infrared remote control transmitter.
Control area
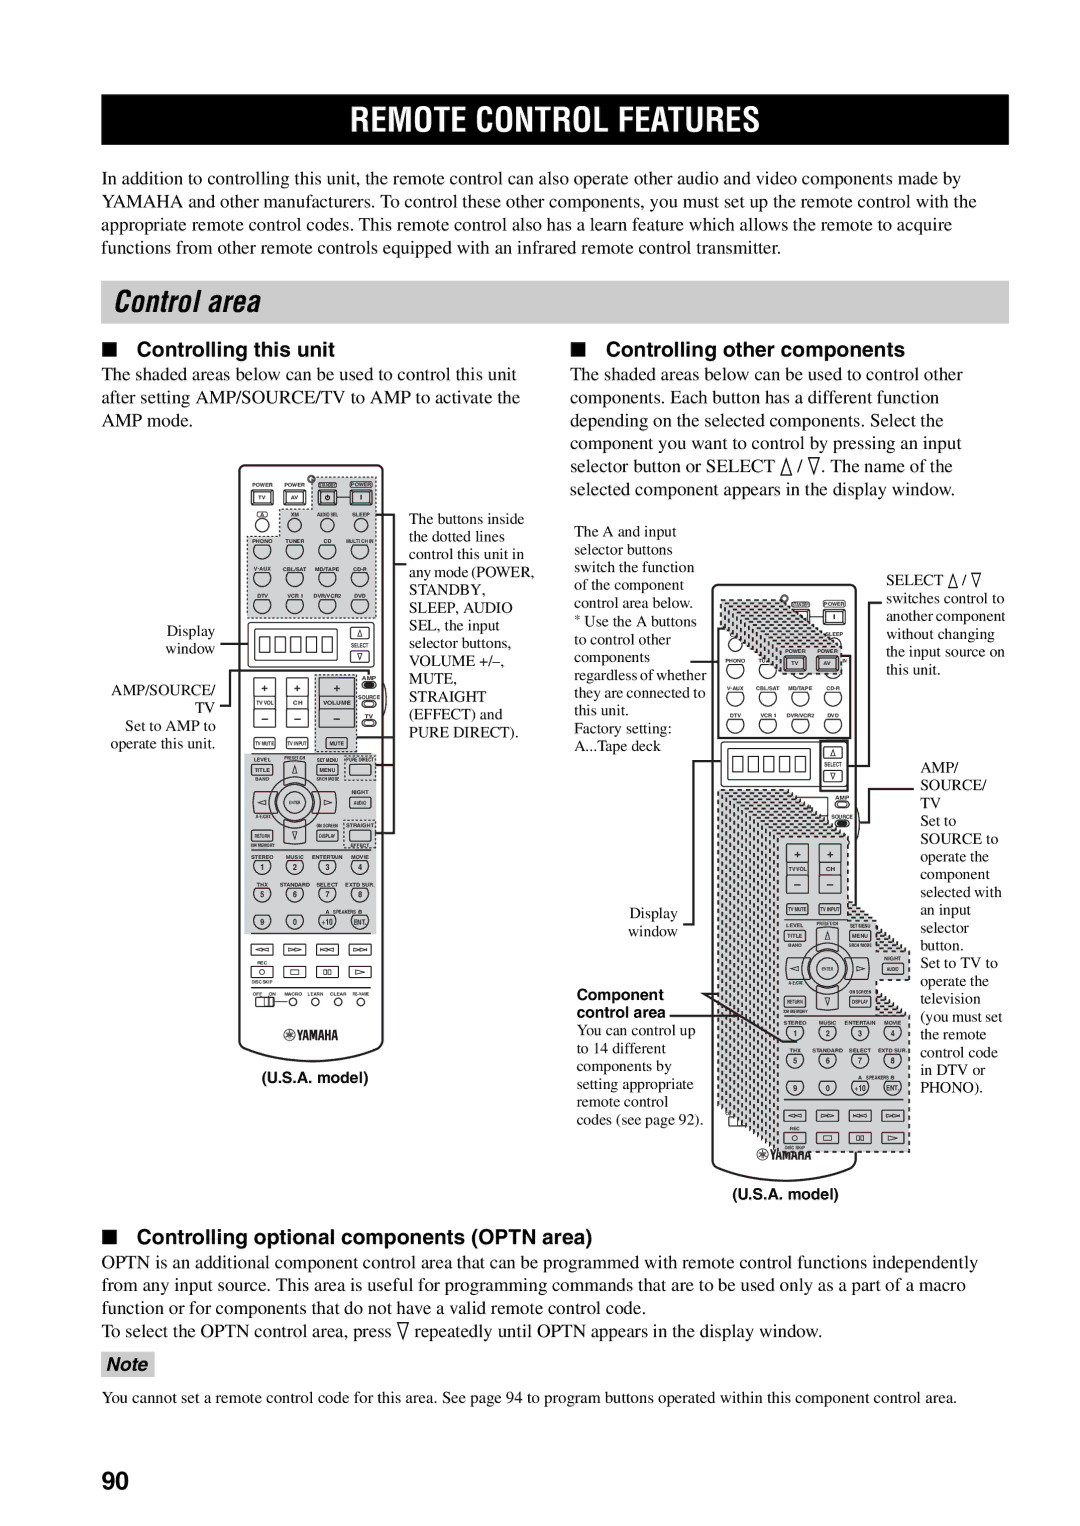
■Controlling this unit
The shaded areas below can be used to control this unit after setting AMP/SOURCE/TV to AMP to activate the AMP mode.
■Controlling other components
The shaded areas below can be used to control other components. Each button has a different function depending on the selected components. Select the component you want to control by pressing an input selector button or SELECT k / n. The name of the
POWER POWER STANDBY POWER
selected component appears in the display window.
Display window
AMP/SOURCE/ TV Set to AMP to
operate this unit.
TV |
| AV |
|
|
A |
| XM | AUDIO SEL | SLEEP |
PHONO | TUNER | CD | MULTI CH IN | |
| CBL/SAT | MD/TAPE | ||
DTV |
| VCR 1 | DVR/VCR2 | DVD |
|
|
|
| SELECT |
+ |
| + | + | AMP |
|
| |||
|
|
|
| SOURCE |
TV VOL | CH | VOLUME | ||
– |
| – | – | TV |
|
| |||
TV MUTE | TV INPUT | MUTE |
| |
LEVEL |
| PRESET/CH | SET MENU | PURE DIRECT |
|
| |||
TITLE |
|
| MENU |
|
BAND |
|
| SRCH MODE |
|
|
|
|
| NIGHT |
|
| ENTER |
| AUDIO |
|
|
| ||
|
|
| ON SCREEN | STRAIGHT |
RETURN |
|
| DISPLAY |
|
XM MEMORY |
|
| EFFECT | |
STEREO | MUSIC | ENTERTAIN | MOVIE | |
1 |
| 2 | 3 | 4 |
THX |
| STANDARD | SELECT | EXTD SUR. |
5 |
| 6 | 7 | 8 |
1 | MEMORY 2 | A SPEAKERS B | ||
9 |
| 0 | +10 | ENT. |
The buttons inside the dotted lines control this unit in any mode (POWER,
STANDBY, SLEEP, AUDIO SEL, the input selector buttons, VOLUME
STRAIGHT (EFFECT) and
PURE DIRECT).
The A and input selector buttons switch the function of the component control area below.
*Use the A buttons to control other components regardless of whether they are connected to this unit.
Factory setting: A...Tape deck
Display window
|
|
|
|
| SELECT k / n |
POWER | POWER | STANDBY | POWER |
| switches control to |
TV | AV |
|
|
| another component |
|
|
|
|
| |
A | B | AUDIO SELECT | SLEEP |
| without changing |
|
|
|
|
| |
|
| POWER | POWER |
| the input source on |
PHONO | TUNER | CD | MULTI CH IN |
| |
|
| ||||
|
| TV | AV |
| this unit. |
|
|
|
|
| |
CBL/SAT | MD/TAPE |
|
| ||
DTV | VCR 1 | DVR/VCR2 | DVD |
|
|
|
|
| SELECT |
| AMP/ |
|
|
|
|
| |
|
|
|
|
| SOURCE/ |
|
|
| AMP |
| TV |
|
|
|
|
| |
|
|
| SOURCE | Set to | |
|
|
|
|
| |
|
| + | + |
| SOURCE to |
|
|
| operate the | ||
|
| TV VOL | CH |
| component |
|
| – | – |
| |
|
|
| selected with | ||
|
|
|
|
| |
|
| TV MUTE | TV INPUT |
| an input |
|
|
|
|
| |
|
| LEVEL | PRESET/CH | SET MENU | selector |
|
| TITLE |
| MENU | |
|
|
|
| ||
FREQ/RDS | EON | MODE PTY SEEK START |
REC
DISC SKIP
OFF ON MACRO LEARN CLEAR
(U.S.A. model)
Component control area
You can control up to 14 different components by setting appropriate remote control codes (see page 92).
BAND |
| SRCH MODE |
| button. | |
|
|
|
|
| |
|
|
|
| NIGHT | Set to TV to |
| ENTER |
|
| AUDIO | |
|
|
|
| operate the | |
|
| ON SCREEN |
| ||
|
|
| television | ||
RETURN |
| DISPLAY |
| ||
XM MEMORY |
|
|
|
| (you must set |
STEREO | MUSIC | ENTERTAIN | MOVIE | ||
1 | 2 | 3 |
| 4 | the remote |
THX | STANDARD | SELECT | EXTD SUR. | control code | |
5 | 6 | 7 |
| 8 | in DTV or |
1 MEMORY 2 | A | SPEAKERS B | |||
9 | 0 | +10 |
| ENT. | PHONO). |
FREQ/RDS | EON | MODE | PTY SEEK START |
| |
REC |
|
|
|
|
|
DISC SKIP
(U.S.A. model)
■Controlling optional components (OPTN area)
OPTN is an additional component control area that can be programmed with remote control functions independently from any input source. This area is useful for programming commands that are to be used only as a part of a macro function or for components that do not have a valid remote control code.
To select the OPTN control area, press n repeatedly until OPTN appears in the display window.
Note
You cannot set a remote control code for this area. See page 94 to program buttons operated within this component control area.
90