Lincoln Electric SVM208-A service manual S28101

Page 101
Mounted toside of engineblock belowrun/stop switch.

TOC

TOC

G-3

ElEcTrical DiaGramS

G-3

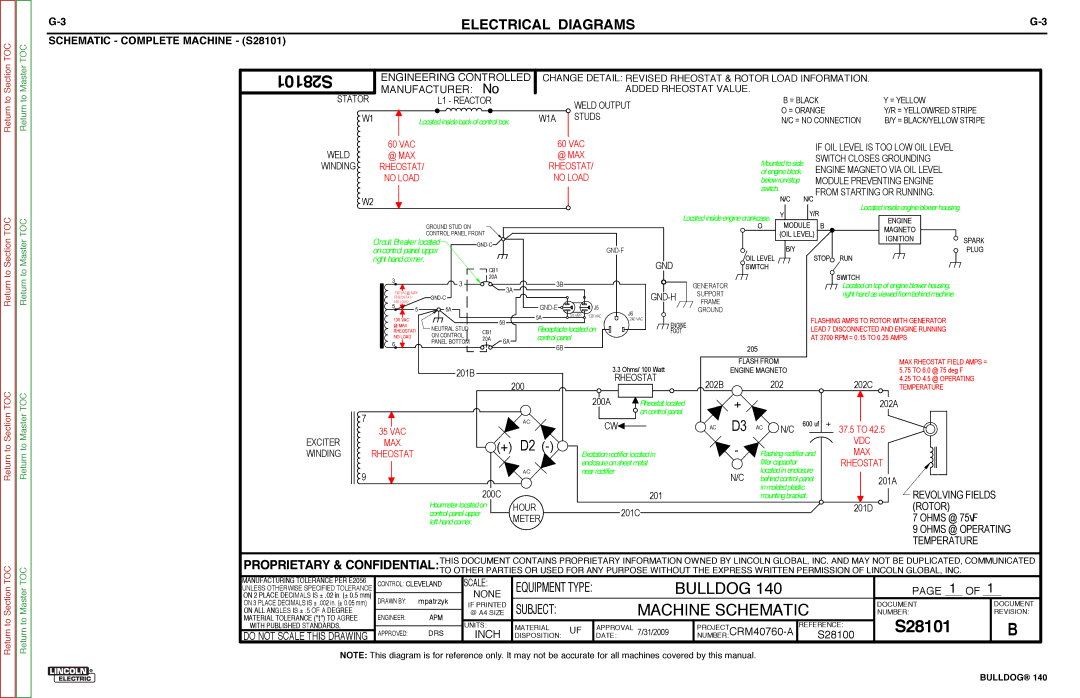
SchEmaTic - cOmplETE machiNE - (S28101)


Section

Master

S28101

ENGINEERING CONTROLLED

MANUFACTURER:

No

CHANGE DETAIL: REVISED RHEOSTAT & ROTOR LOAD INFORMATION. ADDED RHEOSTAT VALUE.

Return to

Return to

STATOR

L1 - REACTOR

W1

Located inside backof control box.


WELD

60 VAC

@ MAX

WINDING

RHEOSTAT/


NO LOAD

W2


WELD OUTPUT

W1A STUDS

60VAC

@MAX

RHEOSTAT/

NO LOAD

B = BLACK


Y = YELLOW

O = ORANGE


Y/R = YELLOW/RED STRIPE

N/C = NO CONNECTION

B/Y = BLACK/YELLOW STRIPE


IF OIL LEVEL IS TOO LOW OIL LEVEL


SWITCH CLOSES GROUNDING


ENGINE MAGNETO VIA OIL LEVEL


MODULE PREVENTING ENGINE

N/C

N/C FROM STARTING OR RUNNING.

Y

Y/R

Locatedinsideengine blower housing.

to Section TOC

to Master TOC

GROUND STUD ON


CONTROL PANEL FRONT

Circuit Breaker located


GND-C


oncontrol panel upper


right handcorner.


CB1


20A

GND-F

Located insideenginecrankcase.

O

OIL LEVEL

GNDSWITCH

MODULE

B

ENGINE


MAGNETO


(OIL LEVEL)


IGNITION

SPARK

B/Y


STOP RUN


PLUG


SWITCH

Return

3

3


3A

130 VAC@ MAX

GND-C


RHEOSTAT/


5NO LOAD

5A


5


130 VAC


5B

@ MAX

NEUTRAL STUD


RHEOSTAT/

CB1


ON CONTROL


NO LOAD

20A

6A

6

PANEL BOTTOM


3B

GND-E J5

5A SILVER 120 VAC

Receptaclelocatedon control panel

6B

J6

240 VAC

GENERATOR

GND-HSUPPORT

FRAME

GROUND

ENGINE

FOOT

205

Locatedon topof engineblower housing, right hand as viewedfrombehindmachine

FLASHING AMPS TO ROTOR WITH GENERATOR LEAD 7 DISCONNECTED AND ENGINE RUNNING AT 3700 RPM = 0.15 TO 0.25 AMPS

Return to Section TOC

Return to Master TOC

EXCITER WINDING

7

35 VAC

MAX

RHEOSTAT

201B


200


AC


(+)

D2

(-)

3.3 Ohms/ 100 Watt

RHEOSTAT

200A

Rheostat located


oncontrol panel.

CW

Excitationrectifier locatedin enclosure on sheet metal

FLASH FROM

ENGINE MAGNETO

202B 202


+


AC

D3

AC

N/C 600 uf


-

Flashing rectifier and


filter capacitor


locatedin enclosure

202C

202A

+37.5 TO 42.5

VDC MAX

RHEOSTAT

MAX RHEOSTAT FIELD AMPS =

5.75TO 6.0 @ 75 deg F

4.25TO 4.5 @ OPERATING TEMPERATURE

9


AC

200C


Hourmeter locatedon

HOUR

control panel upper

METER

left hand corner.

near rectifier

201

201C

N/C

behindcontrol panel

in moldedplastic mountingbracket.


201A


REVOLVING FIELDS

201D

(ROTOR)


7 OHMS @ 75vF


9 OHMS @ OPERATING


TEMPERATURE

Return to Section TOC

Return to Master TOC

PROPRIETARY & CONFIDENTIAL:THIS DOCUMENT CONTAINS PROPRIETARY INFORMATION OWNED BY LINCOLN GLOBAL, INC. AND MAY NOT BE DUPLICATED, COMMUNICATED TO OTHER PARTIES OR USED FOR ANY PURPOSE WITHOUT THE EXPRESS WRITTEN PERMISSION OF LINCOLN GLOBAL, INC.

MANUFACTURING TOLERANCE PER E2056

CONTROL: CLEVELAND

SCALE:

EQUIPMENT TYPE:


BULLDOG 140


UNLESS OTHERWISE SPECIFIED TOLERANCE:


PAGE ___ OF ___

ON 2 PLACE DECIMALS IS ± .02 in. (± 0.5 mm)


NONE


1

1

ON 3 PLACE DECIMALS IS ± .002 in. (± 0.05 mm)

DRAWN BY:

mpatrzyk


IF PRINTED

SUBJECT:


MACHINE SCHEMATIC

DOCUMENT


DOCUMENT

MATERIAL TOLERANCE ("t") TO AGREE

ENGINEER:

APM

@ A4 SIZE


NUMBER:


REVISION:

ON ALL ANGLES IS ± .5 OF A DEGREE


S28101


B

WITH PUBLISHED STANDARDS.


UNITS:

MATERIAL

UF

APPROVAL


PROJECT

REFERENCE:


DO NOT SCALE THIS DRAWING

APPROVED:

DRS

INCH

DISPOSITION:

DATE:

7/31/2009


NUMBER:CRM40760-A

S28100


NOTE: This diagram is for reference only. It may not be accurate for all machines covered by this manual.
BullDOG® 140

Image 101
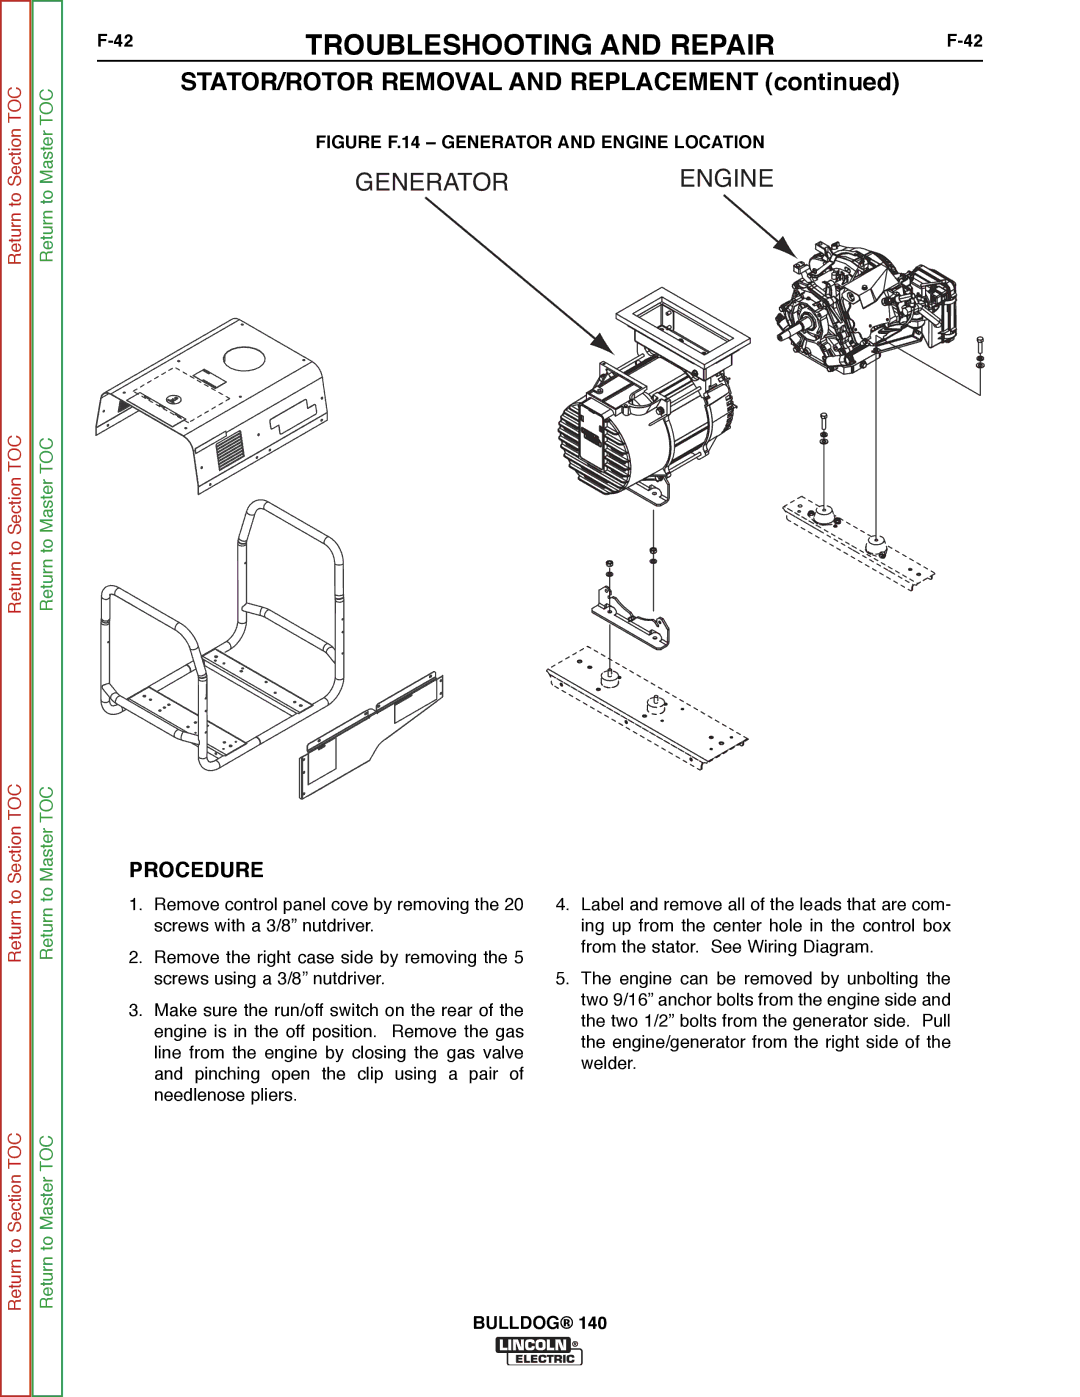
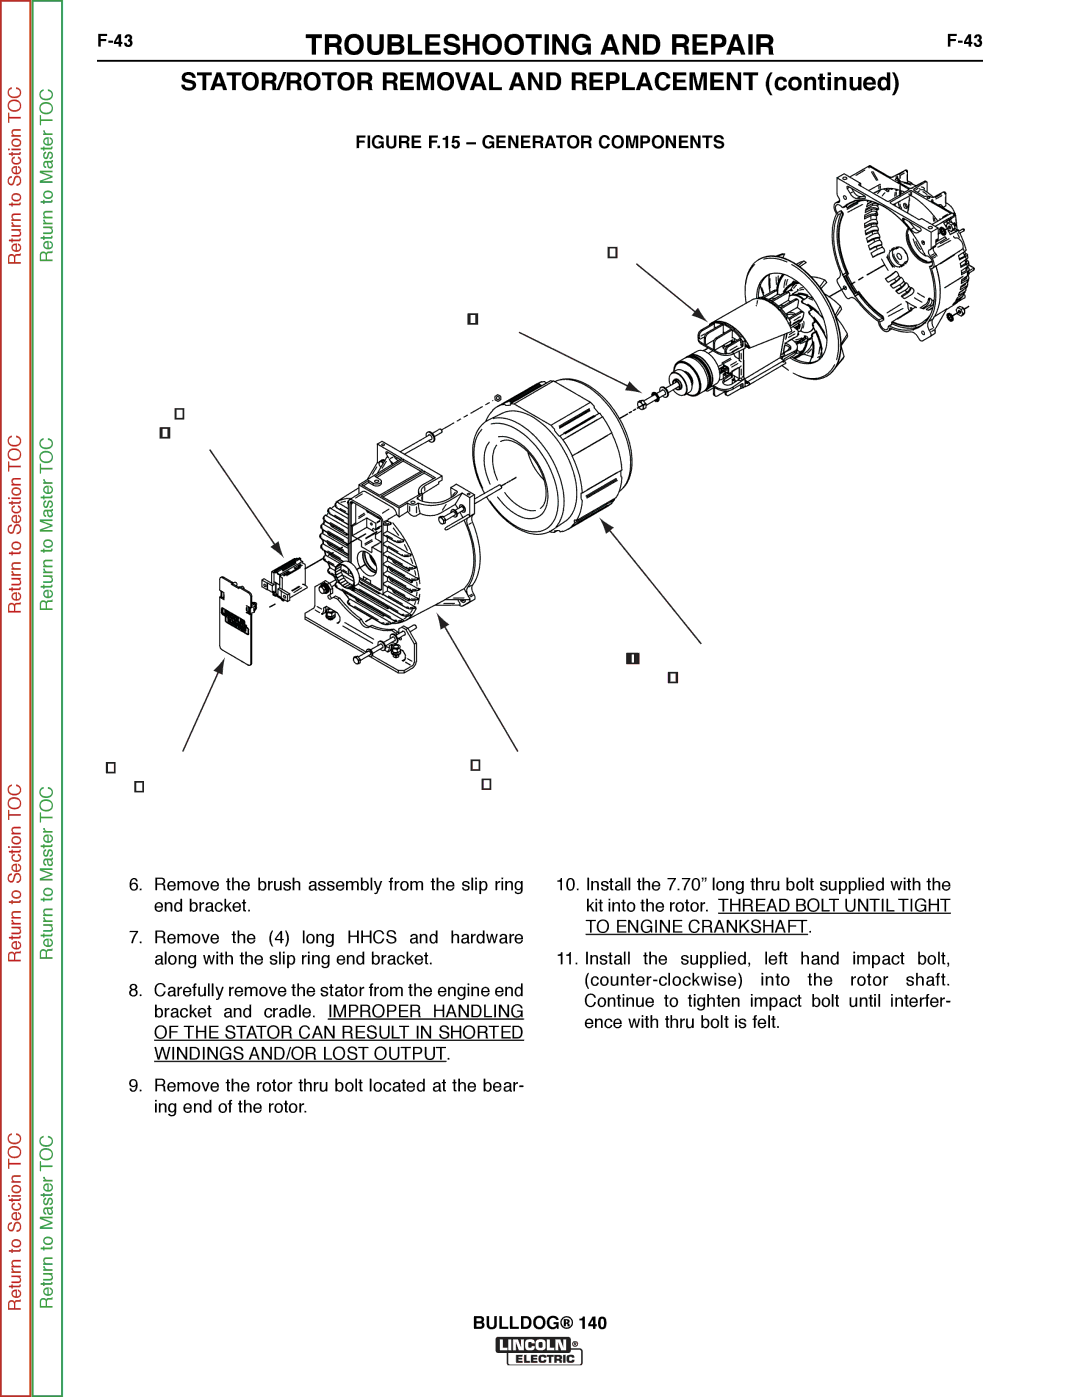
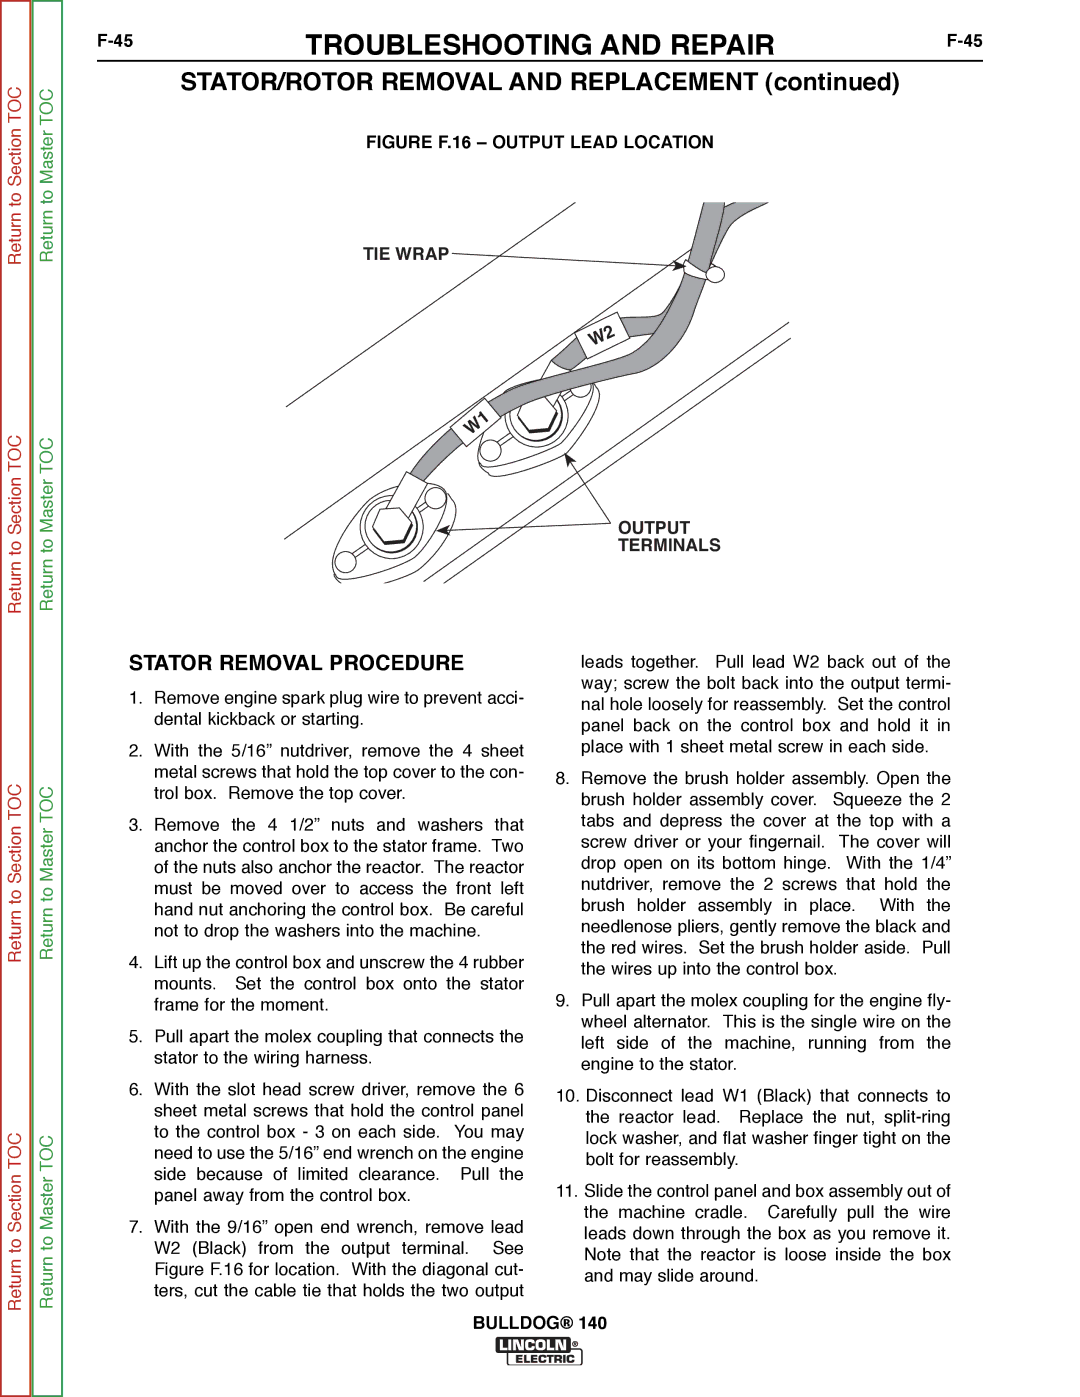
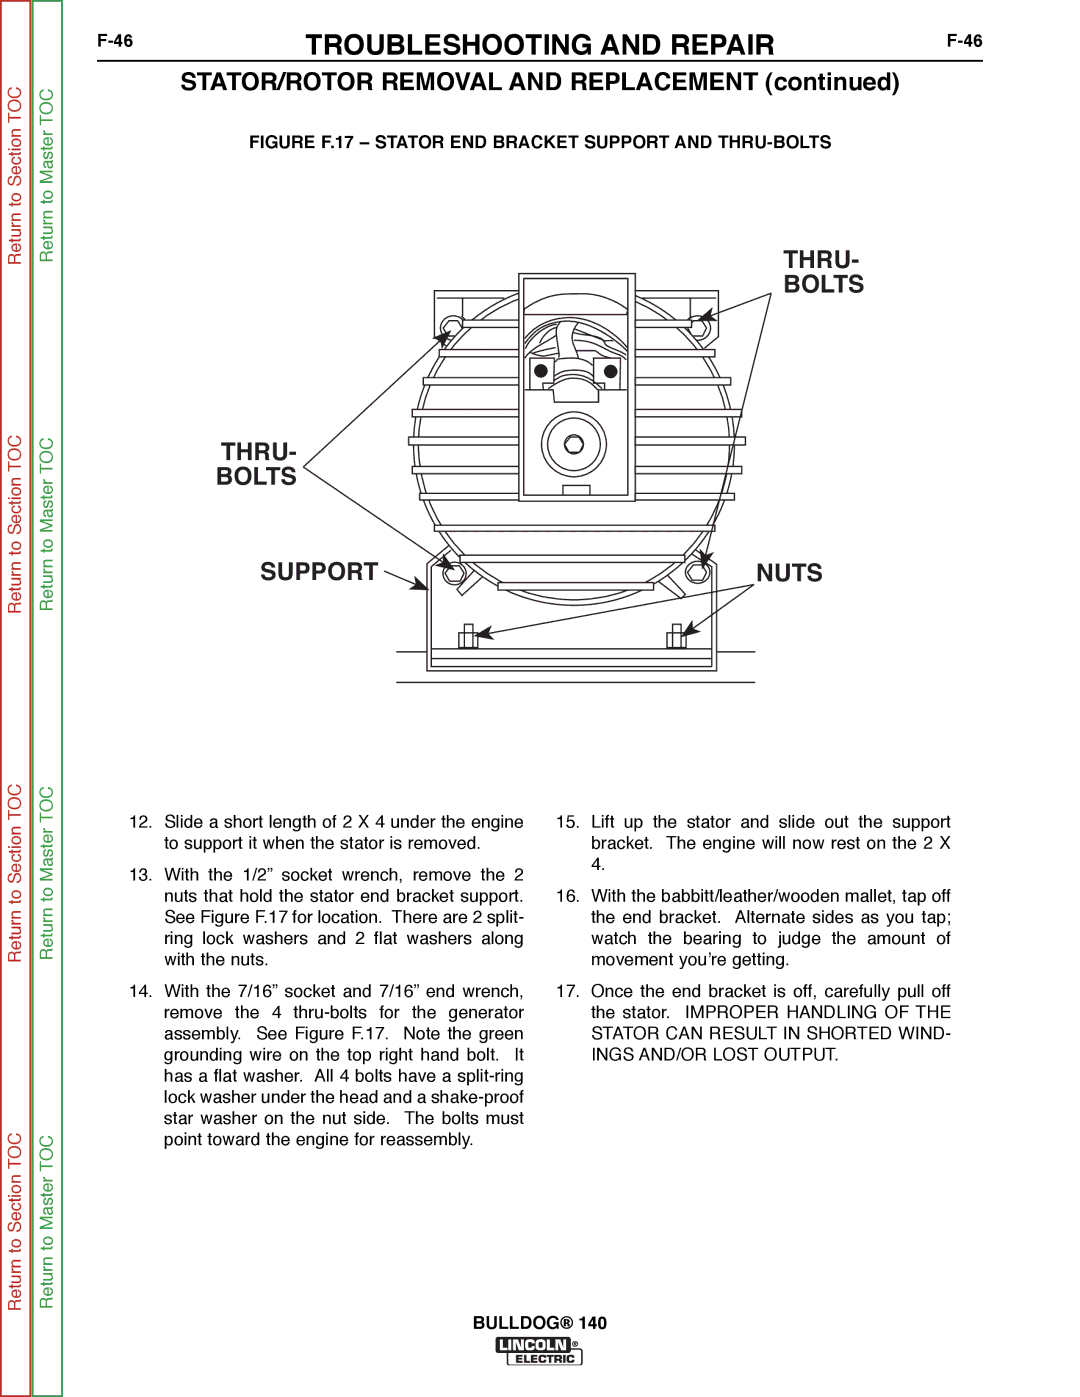
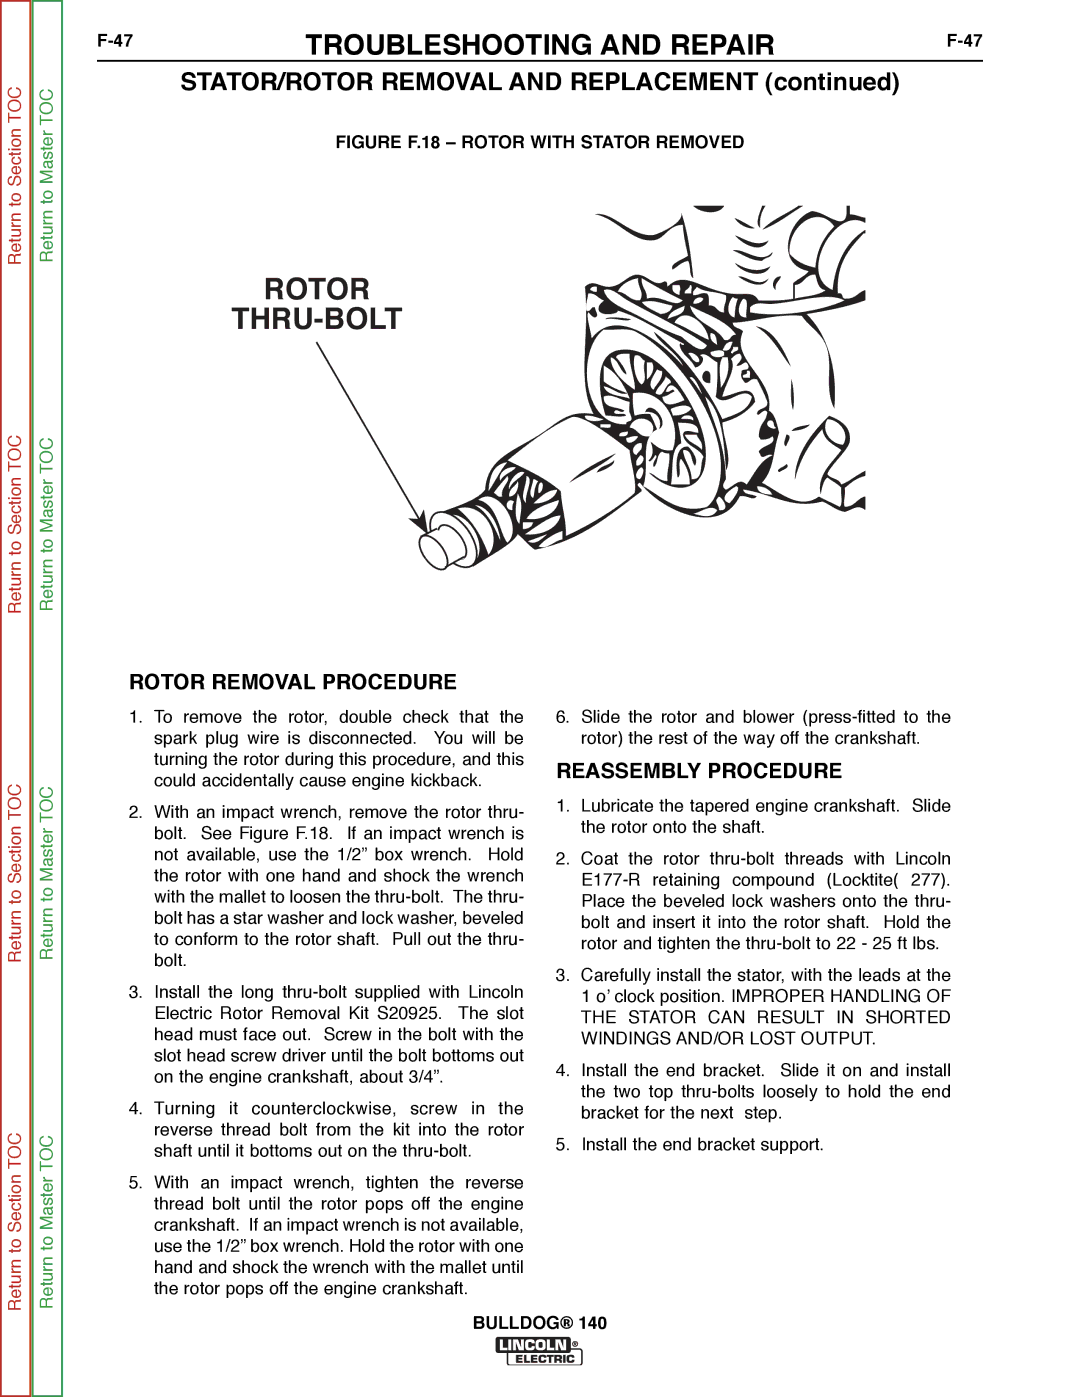
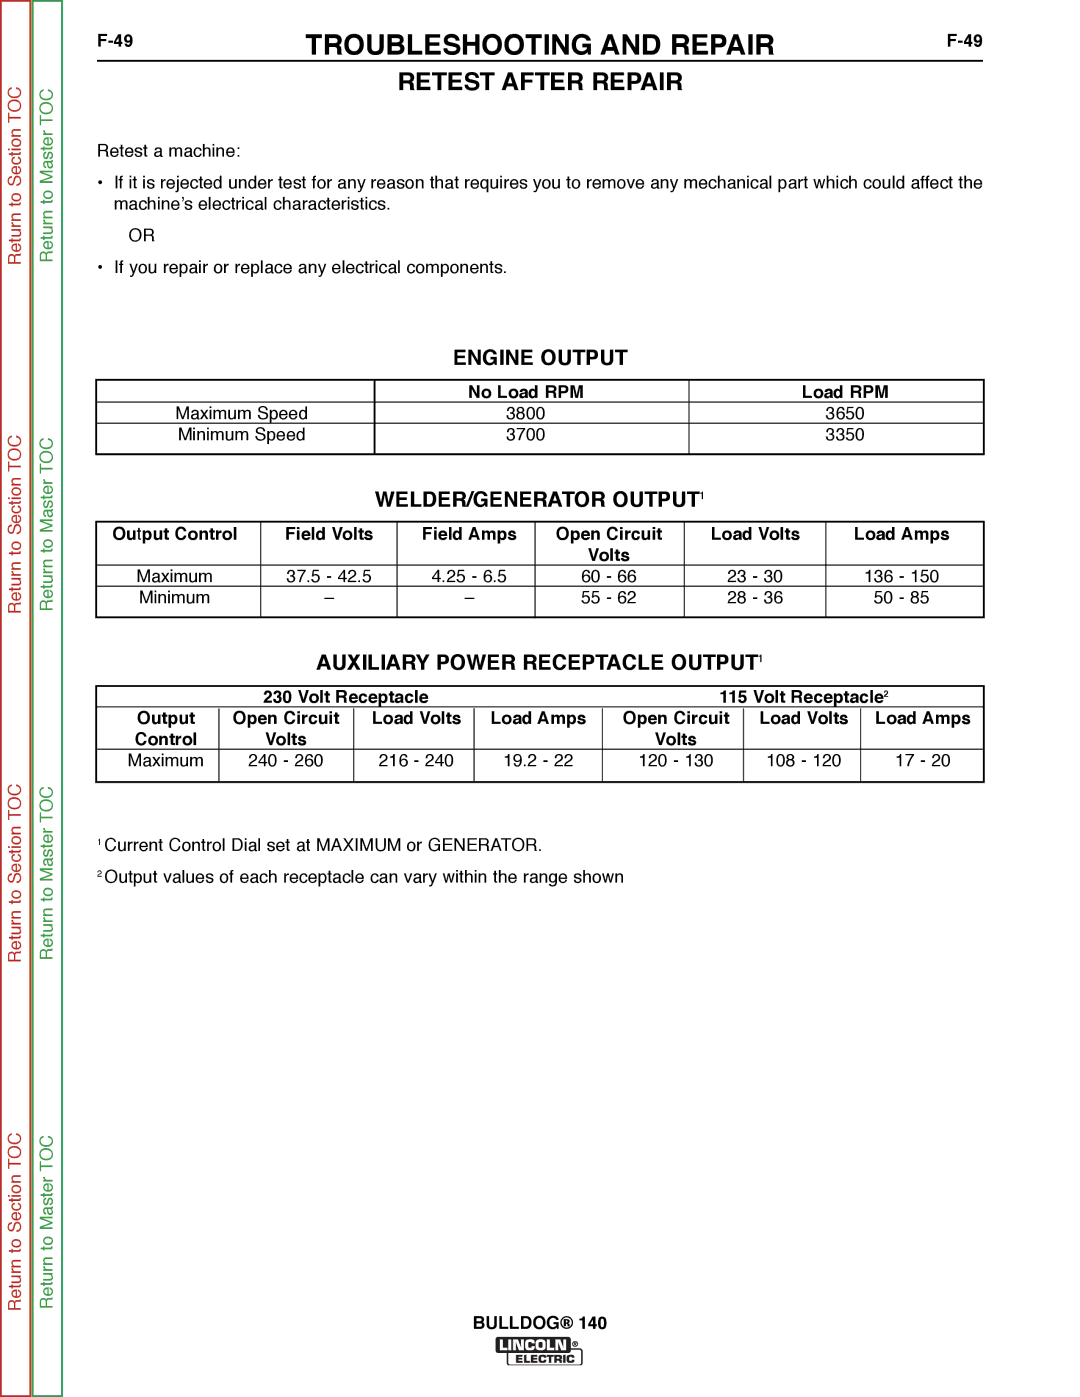
Contents Bulldog California Proposition 65 Warnings SafetyCan be dangerous Electric Shock can kill ARC Rays can burnIii Welding and Cutting Sparks can cause fire or explosionCylinder may explode if damaged Sûreté Pour Soudage a L’Arc Précautions DE SûretéSafety Methods of Reducing Emissions Mains Supply Master Table of Contents for ALL Sections Table of Contents Installation Section Technical Specifications Bulldog 140 K2708-1 InstallationLocation and Ventilation Safety PrecautionsStoring Engine Exhaust can killStacking PRE-OPERATION Engine ServiceTilting OILTable A.1 Recommended Welding Cable Size and Length Electrical Output CONNEC- TionsWelding Cable Connections Cable Installation Auxiliary Power ReceptaclesElectrical Connections Plugs and HAND-HELD EquipmentCircuit Breakers Premises WiringBulldog Ation. do not RUN TheseTable of Contents Operation Section Operation Output Panel Controls LimitationsWELDER/GENERATOR Controls Gasoline Engine Controls Engine OperationStarting the Engine Before Starting the EngineGenerator Operation Table B.1 Generator Power Applications Control Function / Operation Welding OperationWelding Guidelines Material Thickness Electrode Type Size SettingStick Welding Learning To Stick WeldWhat Happens in the Arc? Side view Correct Welding PositionUse the following PracticeDo the following Butt JointsPenetration Fillet JointsVertical-Down Welding Vertical-Up WeldingOverhead Welding How to Hardface the Sharp Edge Metal to Ground WearWelding Sheet Metal Hardfacing To Reduce WearCast Iron Plate Preparation Welding Cast IronOut-of-Position Group AWS E6011 High-Speed Group AWS E6013Low Hydrogen Group AWS E7018 Bulldog Table of Contents Accessories Section Lincoln Electric Accessories AccessoriesOPTIONS/ACCESSORIES Table of Contents Maintenance Section Maintenance Location Routine and Periodic MaintenanceEngine Maintenance Return to Section TOC To Section TOC Engine AdjustmentsOperational Clearance Table D.1 Engine Maintenance PartsSpark Plug Service Screws Brushes GENERATOR/WELDER MaintenanceFigure D.7. Major Component Locations Bulldog 1TABLE of CONTENTS-THEORY of Operation Section E-1 ENGINE, EXCITATION, Rotor Stator Theory of OperationFigure E.3 Rotor Field Feedback and Auxiliary Power Rotor Field Feedback Auxiliary PowerWeld Winding and Reactor Auxiliary Power Overcurrent Protection1TABLE of Contents Troubleshooting and Repair F-1 HOW to USE Troubleshooting Guide Troubleshooting and RepairPC Board Troubleshooting Procedures Output Problems Perform the Rotor Voltage Test Electric Authorized Field Ser vice FacilityProblems Symptoms Troubleshooting and Repair Perform Field Diode Test Engine Problems Troubleshooting and Repair Engine Throttle Adjustment Test Bulldog Materials Needed Rotor Voltage TestTest Description Lead 200A Connection Ground Stud ProcedureRotor Voltage Test Field Diode Bridge Test + ~ Field Diode Bridge TestRotor Flashing Circuit Test Figure F.3 Brush Holder Leads 201- and 202B + Rotor Flashing Circuit TestMoving Parts can injure Bulldog Rotor Resistance Test Rotor Resistance Test Figure F.6 Brushes Retained with Cable TIE Cable TIE BrushesBulldog Engine Throttle Adjustment Test ROBIN/SUBARU Engine ROBIN/SUBARU Engine Engine Throttle Adjustment TestStrobe-tach Method Frequency Counter MethodHigh Speed Stop Screw Scope Settings High Idle no Load Normal Open Circuit Voltage Waveform 115VAC SupplyMachine Loaded to 125 Amps AT 23 VAC Typical Weld Output WaveformMachine Loaded Brush Removal and Replacement Cable TIE Brushes Brush Removal and ReplacementReturn to Section Return to Section TOC Bulldog Rheostat Removal and Replacement Figure F.11 Rheostat Removal Rheostat Removal and ReplacementCapacitor AND/OR Diode Bridge Removal and Replacement Capacitor AND/OR Diode Bridge Removal and ReplacementProcedure Capacitor Removal and Replacement Figure F.13 Field Diode Bridge Location Procedure Field Diode Bridge Removal and ReplacementBulldog Instructions STATOR/ROTOR Removal and ReplacementGeneratorengine STATOR/ROTOR Removal and ReplacementFigure F.15 Generator Components Troubleshooting and Repair Figure F.16 Output Lead Location TIE Wrap Terminals Stator Removal ProcedureNuts Thru Bolts SupportReassembly Procedure Rotor Removal ProcedureFigure F.19 Checking ROTOR-STATOR AIR GAP Retest After Repair Auxiliary Power Receptacle OUTPUT1Engine Output WELDER/GENERATOR OUTPUT1Bulldog Table of Contents Diagram Section Wiring Diagram Bulldog S28101