Bontrager Speed LimitTM manual Adjustment instructions, To adjust the brakes

Page 9

Adjustment instructions

Brake pad holders have a front and rear. If the holder is facing the wrong direction, the pad could slide from the holder when the brake is applied. Make sure the Bontrager logo on the brake shoe holder is facing up and that the open end of the holder faces the rear of the bicycle.

To adjust the brakes

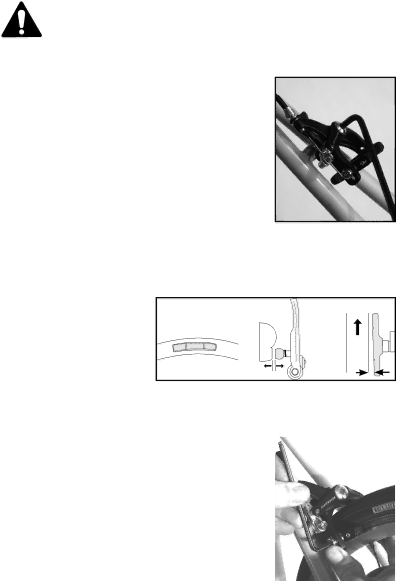
1. Center the brake. Loosen the brake attachment bolt, move the brake until both pads are the same distance from the rim, and retighten the attach- ment bolt to 70-85 lb•in (7.9-9.6 Nm).

Small centering adjustments can be made by simply rotating the center bolt with a 6 mm allen wrench (Figure 8).

2. Loosen the brake pad attachment bolt.

3. Align the pad, and squeeze the brake (or the

brake lever) to hold the pad aligned against the Figure 8 Center the brake rim (Figure 9).

Toe-in prevents squealing, and is usually only needed


with new brake pads. To achieve correct toe-in, you can put a business


card between the rim and the trailing edge of the brake pad prior to


holding the pad against


C

the rim.

B


4. Tighten the pad attach-

A


ment bolt (Figure 10)


to 40-60 lb•in (4.5-6.8


0.5-1.0 mm

Nm).


5. Repeat for the other pad. Figure 9- Brake pad alignment

With new cables or

A: Brake pad aligned with rim surface

B: Brake pad and rim parallel

housing, ‘stretch’ the

C: Brake pad toe-in

cables (compress the


housing). Apply the brake fully while you ‘stroke’


the housing. Use your fingers to create a tighter-


radius curve in the housing, then move the curve


back and forth along the entire length of each piece


of housing.


Figure 10 Pad attach- ment bolt

Image 9
Contents Part Number Speed Limit Road Brakeset Read this manual before you ride ContentsUse Condition Bontrager part Conditions for UseBefore every ride Checklist Your dealer for serviceManual or take your bicycle to Be careful when riding in wet conditions Use your brakes carefullyDo not overuse the front-wheel brake Remove the old brakes, cables, and housings Installation instructionsIncluded items Tools requiredTo prepare the brake housing Check the length of the housingsTo install the brake cables To adjust the brakes Adjustment instructionsTighten the pad attach Ment bolt Figure To 40-60 lbin Repeat for the other pad. Brake pad alignmentTo function check the brakes Tape the handlebarCarbon crash replacement policy Bontrager Limited warrantyThis warranty does not cover For five yearsPage Manuel du propriétaire d’étriers de frein Speed Limit Lisez ce manuel avant d’utiliser votre vÉloCondition d’utilisation Pièce Bontrager Conditions d’utilisationAvant chaque sortie liste des ÉlÉments À contrÔler AvertissementPrécautions particulières par temps humide Utilisation des freins avec prÉcautionPour installer les freins Instructions d’installationÉléments fournis Outils requisPour préparer la gaine de frein Pour installer les câbles de freinVérifiez la longueur des gaines Passez le câble à travers les butées, les anneauxPour régler les freins Instructions de rÉglageSerrez le boulon de fixation Du patin à 4,5 Répétez l’opération pour ’autre patinEnroulez la guidoline sur le guidon Pour régler les freins suiteGarantie limitÉe Bontrager Politique de remplacement du carbone en cas daccidentPendant cinq ans Pendant un anPage Manual del propietario de freno de calibre Speed limit LEA Este Manual Antes DE Montar EN LA BicicletaCondiciones de uso Condición de uso Parte BontragerSE Excluyen los saltos Antes de usar Lista de comprobaciones AdvertenciaUso prudente de los frenos Control FiguraConducción prudente en terrenos húmedos Elementos incluidos Instrucciones de instalaciónHerramientas necesarias Quite los frenos antiguos, los cables y los revestimientosPara instalar los cables de los frenos Para preparar el revestimiento del frenoPara ajustar los frenos Instrucciones de ajusteApriete el perno de Sujeción de la zapata Repita la operación conAjuste el manillar Para ajustar los frenos continuaciónDurante cinco años Garantía limitada de BontragerDurante un año Esta Garantía no cubrePage Lesen sie dIESES HANDBUCH, bevor sie losfahren InhaltBenutzerhandbuch für Speed Limit-Rennbrems Einsatzbedingung Bontrager Komponente EinsatzbedingungenWichtiger Warnhinweis Checkliste vor jeder Fahrt ChecklisteUmsichtiger Einsatz der Bremsen Warnung vor zu starkem Gebrauch der VorderbremseVorsicht beim Fahren auf feuchtem Untergrund Im Lieferumfang enthalten MontagehinweiseBenötigte Werkzeuge Entfernen Sie die alten Bremsen, Kabel und HüllenSo bereiten Sie die Kabelhüllen vor Überprüfen Sie die Länge der HüllenSo bringen Sie die Bremszüge an So stellen Sie die Bremsen ein EinstellungshinweiseSo testen Sie die Funktionstüchtigkeit der Bremsen Umwickeln Sie den Lenker mit LenkerbandDie Gewährleistung gilt für einen Zeitraum von fünf Jahren Bontrager Eingeschränkte GewährleistungFür eine Dauer von einem Jahr Von der Gewährleistung ausgeschlossen sind