User’s Guide
Preface
Trademarks
Copyright
Set-Up Sheet
How to use the documentation provided
Machine
Type conventions
Machine safely, always pay attention to these warnings
Contents
Troubleshooting
Maintenance
Machine settings
Fax Model Receiving faxes
Location
Safety information
Viii
Power Supply
Fire
Handling
Maintenance
Power requirements
Pre-installation requirements for Canon facsimile equipment
Users in the U.S.A
Location
Case of equipment malfunction
Connection of the equipment
Rights of the telephone company
FCC Notice
Xiii
Users in Canada
XIV
Canon Canada INC
XVI
What your machine can do
Introduction
Multi-purpose tray
Unpacking your machine
Quick Reference Guide
Black, cyan, magenta, yellow
Main components of the machine
Operation panel of the machine
5Photo Print key
4Scan key
6Numeric keys
@2Fax Model Redial/Pause key
Introduction
Document requirements
Document handling
Fax Model Using the ADF
Using the platen glass
Loading documents
Lift the document cover Place your document face down on
Recommended print media and requirements
Print media handling
Plain Paper
Envelopes
Glossy Photo Paper GP-301/GP-301N
High Resolution Paper HR-101N
Matte Photo Paper MP-101
Photo Paper Plus Glossy PP-101
Transparencies CF-102
Photo Paper Pro PR-101
Photo Paper Pro PC-101S
Shirt Transfers TR-201
General print media guidelines
Print media you cannot use
Photo Paper Pro guidelines
Move the paper thickness lever to the appropriate setting
Setting the paper thickness lever
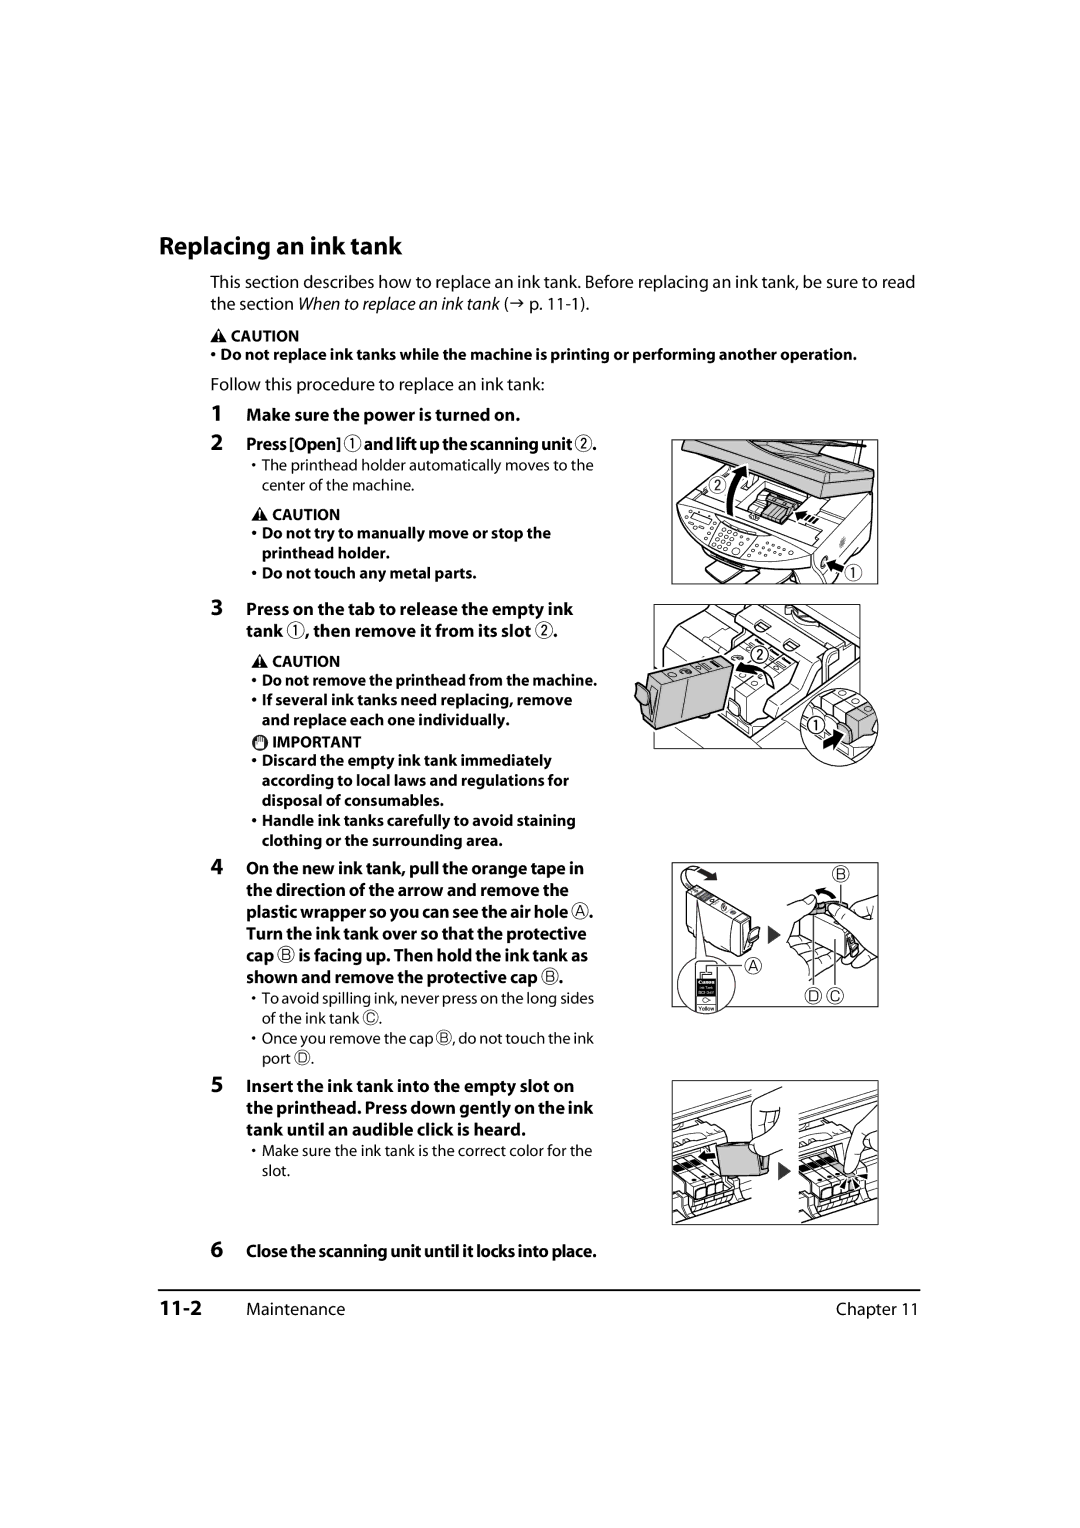
Press Open q and lift up the scanning unit w
Close the scanning unit until it locks into place
Press Copy or Fax Model Fax Press Paper Select
Setting the print media size and type
Use 2 or 3 to select the print media size
Press Set
Loading envelopes
Loading print media
Loading paper
Ensure that no curl or puff exceeds !/8 in mm
Make sure the paper thickness lever is set to Right
Loading banner paper
Set your computer to print on banner Paper
For details, see p
Print media handling
Recommended print media
Photo printing from a memory card
Compatible memory cards
Inserting a memory card
Inserting/removing a memory card
Make sure the machine is on
Insert a memory card into the appropriate slot
Removing a memory card
Select a printing method
Printing methods
Use 2 or 3 to select Index Press Set
Printing an index
Load the correct print media in the multi-purpose tray
Press Start
Printing all frames
Use 2 or 3 to select ALL Frames Press Set
Photo Paper PRO Plain Paper
Use 2 or 3 to select borderless printing
Use the numeric keys to enter the frame number
Printing a single frame
Use 2 or 3 to select Single Frame Press Set
Use 2 or 3 to view your settings in the LCD
Use 2 or 3 to select Frame Range Press Set
Printing a range of frames
Frame Range Photo LTR
Chapter
Plain LTR
Setting date printing
Setting vivid photo printing
Enabling/disabling overwriting memory card data
Reading data from or writing data to a memory card
Card Protect
Copying
Setting color or black & white copying
Documents you can copy
Making copies
Adjusting the exposure density
Adjusting the image quality resolution
Press Image Quality Use 2 or 3 to select the image quality
Press Exposure Use 2 or 3 to select the exposure Press Set
Using custom copy ratios
Using preset copy ratios
Reducing or enlarging a copy
Copying an image to fit
Copying two pages on a single
Advanced copy features
Press Menu Press Set
Borderless copying
Preparing your image to repeat it manually
Repeating an image on a
Press Start If you selected Manual in step Press Set
Copying your image
Use 2 or 3 to select Image Repeat Press Set
Use 2 or 3 to select Mirror IMAGE. Press Set
Creating a mirror image
Use 2 or 3 to select Entire Image Press Set
Shrinking an image to fit
Copying
Press T to switch to letter mode a or number mode
Guidelines for entering numbers, letters, and symbols
Slerexe Company Limited
Registering required sender information
Press Set Press Stop/Reset
Use 2 or 3 to select FAX Settings Press Set three times
Entering the sender information
Press Menu Use 2 or 3 to select User Data Press Set
Use 2 or 3 to select FAX Settings Press Set twice
Setting the telephone line type
Use 2 or 3 to select TEL Line Type Press Set
Use 2 or 3 to select the telephone line type
Use 2 or 3 to select System Settings Press Set
Setting daylight saving
Use 2 or 3 to select the week when daylight saving starts
Use 2 or 3 to select Daylght SAV Time Press Set
Use 2 or 3 to select the week when daylight saving ends
Speed dialing methods
Speed dialing
One-touch speed dialing
Coded speed dialing
Use 2 or 3 to select a one-touch speed dialing key 01 to
Registering one-touch speed dialing
Changing or deleting an entry
Press Menu Use 2 or 3 to select User Data Press Set twice
Registering coded speed dialing
Use 2 or 3 to select Coded Speed Dial Press Set
Use 2 or 3 to select a coded speed dialing code 00 to
Changing or deleting an entry
Use 2 or 3 to select Group Dial Press Set
Registering group dialing
Changing or deleting an entry
Using speed dialing
Use 2 or 3 to select Speed Dial List Press Set
Printing speed dialing lists
Use 2 or 3 to select the list you want to print
Touch List Coded Dial List Group Dial List
Speed dialing
Documents you can fax
Sending faxes
Sending methods
Memory sending
Talk through the handset to the recipient
Manual sending
Press Hook or lift the handset Dial the recipient’s number
Adjusting the image quality fax resolution
Setting color or black & white transmission
Press Image Quality Use 2 or 3 to select the resolution
Improving faxed images
Dialing methods
Adjusting the scan exposure
Regular dialing
PC dialing
Redialing a busy number
Customizing automatic redialing settings
Manual redialing
Automatic redialing
Use 2 or 3 to select Auto Redial Press Set
Load the document on the platen glass or ADF
Printing a list of documents in memory
Documents stored in memory
Printing or deleting a document in memory
Memory Reference
Transaction number TX/RX no
Checking a document’s details
Marks before the transaction number
Displaying details of the transaction
Special dialing
Dialing through a switchboard
Switching temporarily to tone dialing
Use 2 or 3 to select the receive mode
Setting the receive mode
Receiving faxes
Press Fax Press Menu Press Set
Use 2 or 3 to select RX Settings Press Set
Choose this mode if
Customizing FAX/TEL Auto SW
You will need to
Receiving faxes automatically FAX only Mode
Use 2 or 3 to select Drpdselect FAX
Setting the ring pattern
Receiving faxes manually Manual Mode
Adjusting the answering machine
Canceling receiving
Summary of reports and lists
Reports and lists
10-1
Report or List Description Details
10-2
Adjusting the Activity Report setting
Printing the Activity Report
10-3
Adjusting the TX Report setting
Use 2 or 3 to select Report Settings Press Set twice
Use 2 or 3 to select RX Report Press Set
Adjusting the RX Report setting
10-4
Use 2 or 3 to select User Data List Press Set
Printing the USER’S Data List
10-5
10-6
When to replace an ink tank
Maintenance
Replacing ink tanks
Guidelines
11-2
Replacing an ink tank
Maintaining the printhead
Flowchart of printhead maintenance
11-3
Out correctly
Press Menu Use 2 or 3 to select Maintenance Press Set
Cleaning the printhead
Use 2 or 3 to select the cleaning setting you want
Printing the nozzle check pattern
11-5
Aligning the printhead
Use 2 or 3 to select Align Print Head Press Set
Press T
Press Set Repeat steps 12 and 13 for column M
11-6
Cleaning the interior
Cleaning your machine
Cleaning the exterior
11-8
Fax Model Cleaning the ADF area
11-9
Cleaning the roller
Chapter
11-10Maintenance
MP Drivers/MP Toolbox Cannot install the software
Troubleshooting
12-1
Removal of the software was completed, but Canon remains
Device Manager, green mark ? is displayed Windows Me
Cannot use the software after upgrading to Windows XP
Computer will not start
Cannot print at all
Cannot print to a shared printer
12-3
Printing stops in the middle
Paper does not feed properly
Paper curls
Meaningless characters and symbols are printing
White streaks appear on the printout
Printout is rubbed or stained
Paper comes out but there is nothing copied on it
12-5
Is the document loaded correctly?
Print the nozzle check pattern Maintaining the printhead, p
Copy quality is poor or documents are printed with streaks
Are you using a USB 2.0-compatible USB hub?
Cannot scan a document
12-6
Quit other open applications and try again
If an error occurs when scanning an image in Photoshop
Computer has hung up or frozen
White lines appear on the left side of the image
White margins appear around the scanned image
Cannot scan correctly with multi-scan
12-8
Cannot receive a fax, cannot print a fax
See below if you are having problems receiving faxes
12-9
Repeated errors occur when you receive a fax
Cannot receive a fax in ECM mode
12-10Troubleshooting
Cannot receive faxes automatically
Fax sent is dirty or documents are printed with streaks
Cannot send a fax in ECM mode
Cannot send a fax
Cannot dial
Repeated errors occur when you send a fax
Telephone disconnects during a call
Memory card is not recognized
Unplug/Eject icon does not appear Windows
Removable disk does not appear in Windows Explorer
Windows Explorer, you cannot display Thumbnails Windows
If nothing displays in the LCD if there is no power
12-14Troubleshooting
Removing jammed paper
If the power disconnects unexpectedly
Removing jams in the paper output tray
Removing jams from the machine’s interior
Paying attention to the following points, reload the paper
Removing jammed documents
If there are repeated paper jams
Chapter Troubleshooting
If the nozzle check pattern does not print properly
When the Alarm light blinks
Interpreting the messages
If you cannot clear a paper jam
Cause Action Details
LCD messages
Message Error code Cause Action Details
12-20Troubleshooting
Machine in USE
Load Paper
Memory Full
Memory
12-22Troubleshooting
If you cannot solve the problem
12-24Troubleshooting
Printing a list to check the current settings
Machine settings
Accessing the machine settings
13-1
Name Description Setting Details
Settings
Function key Copy
13-2
Date Setup
FAX Settings User Settings Date & Time
TEL Offhook Alarm
Volume Line Monitor
15 SEC
13-4
33600bps
Dimension
Switch
Printer Settings Quiet Mode
Large System Settings
Fax Model Menu Memory Reference Function key Fax
Name Description Setting
Function key Fax
13-6
Menu Photo Print Mode Function key Photo Print
Dpof
13-8
Vivid Photo Print
Print Photo Date
General specifications
Specifications
Envelope printable areas
Printable areas
Paper printable areas
Scanned area
Ink specifications
Banner paper printable areas
Copy specifications
Print specifications
Photo print specifications
Fax Model Fax specifications
Connection
Telephone specifications
Coded Speed Dial List 7-9,10-1
Touch SPD Dial List 7-9,10-1
Activity Report 10-1,10-2
Multi TX/RX Report
DOC. Memory List 8-8,10-1
Group Dial List 7-9,10-1 Memory Clear Report
Problem Reading Card message
4Index
Key Interior 11-7 to On 1 copying Printhead + key Roller
2Index
Problem Reading Card message
TX/RX Cancelled message TX/RX NO. nnnn message