Graphic Color Printer
Copyright 2003 Canon Inc. all rights reserved
Conventions
Notations About Text
Legal Notice
Abbreviations
Location
Safety Warnings and Precautions
Power Supply
An Emergency
Cleaning the Printer
Pacemakers
Printer location
Printhead and Ink Tanks
Moving the Printer
General Caution
Contents
How to Perform Menu Settings
Canceling a Print Job
Menu Settings Summary Tables
Viewing Help
Options
Uninstalling the Software
Page
Before Using the Printer
Printer
Printer Part Names
Tray
Back View Connector cover
Output tray extension
Cassette cover
Parallel port
Power connector
Under the Back Upper Cover Printhead lock lever
Printhead lock cover
Ink tank PM ink tank PC ink tank Bk ink tank
Under the Right Cover
Guide pins
Paper feed unit connector
Paper Feed Unit option
Paper feed unit
Press the Power button
Switching the Printer On and Off
Switching the Printer On
Switching the Printer Off
Press the Online button to switchthe Online lamp on
Setting the Printer Online and Offline
Setting the Printer Online
Press the Online button to switch theOnline lamp off
Setting the Printer Offline
Print Media You Can Use
Types of Print Media
Print Media That Can Be Used
Plain Paper
Coated Paper
Professional Photo Paper
Matte Photo Paper
High Gloss Photo Film
Transparencies OHP Film
Proofing Paper
Quick Dry Transparencies
13x22 Tray Option Cassette
Paper Sizes
Maximum Stack Size
Handling Print Media
Printing Area
Remove the cassette from the printer
Loading Paper Cassettes
Loading the Paper Cassette
Loading Paper Cassettes
Print Media You Can Use
Set the paper cassette in the printer
Install the cassette cover
Print Media You Can Use
Selecting the Print Media Size and Type
Print Media Name Operation Panel Setting Media Type
Press the Set Media button
Press the Online button to switch offthe Online lamp
Press or to select the cassette then press
Select the cassette
Press or to display Media Size and press
Press or to display the media size and press
Press or to display the media type loaded and press
Lamp
From the computer, select Manual for Media Source
Loading the Tray
Print Media You Can Use
44 45 47 A3+/13x19
Print Media You Can Use
Press the Online button
Print Media You Can Use
Printing from Windows
Printing
Print Procedure
Canceling a Print Job
Printer Properties window, click the Help button
Viewing Online Help
Opening Online Help
Printing from a Macintosh
From the Apple menu, select Chooser
Selecting the Printer
Mac OS 8.6/9.x
This completes the selection of the printer
Mac OS
If the name of the printer is in the list, go to Step
Click the Print button
Software application, select Print from the File menu
Canceling a Background Print Job
Select Resume Printing from the File menu
Printer re-enters print mode and is ready for operation
Select the Finder then select Applications from the Go menu
Queue list for the printer is displayed
Print job in progress is canceled
Canceling a Foreground Print Job
Opening Help
Viewing Help
Printing from a Macintosh
UsingPanel the Operation
Reading the Display
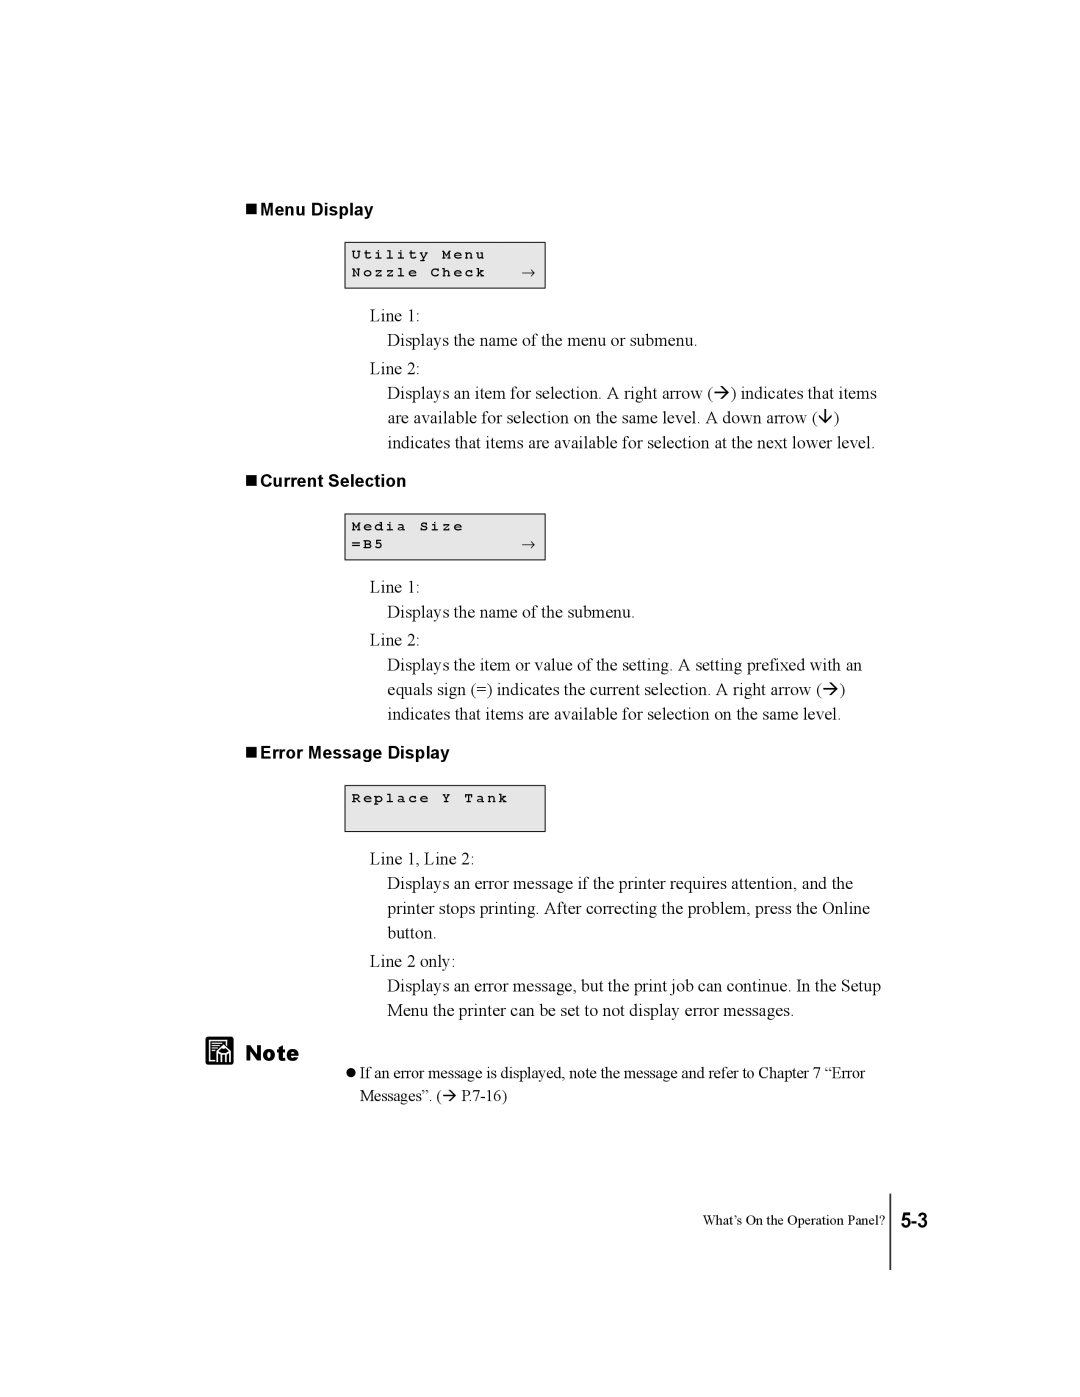
What’s On the Operation Panel?
Standby
Print Job Processing
Current Selection
Error Message Display
Menu Display
Setup button
Using the Operation Panel Buttons
Cancel Job/Utility button
Set Media button
Online button
Reset/Enter button
Power button
Ink Replace button
Reading Operation Panel Lamps
Online lamp
Message lamp
Printer Function Priorities
Function Menus
Types of Menus
Menu Flow Summaries
Setup Menu Flow Utility Menu Flow
Set Media Menu Flow
Set Media
Setting the Printer Online and Offline
How to Perform Menu Settings
Online
Offline
Press the Set Media button b
Press the Online button f to switch the Online lamp on
Press or to display Cassette 1, then press
Press or to display Media Type, then press
Setup Menu
Menu Settings Summary Tables
Adjustment value. For fine
Utility Menu
Media Set Menu
Using the Operation Panel
Maintenance
Replacing Ink Tanks
When to Replace an Ink Tank
When the Ink Check Message is Displayed
When the Replace Tank Message Is Displayed
Handling Ink Tank Precautions
Open the right cover
Replacing an Ink Tank
Press the Ink Replace button
Remove the new ink tank from its package
Maintenance
Replacing Ink Tanks
Executing Print Job
Switching Off Ink Level Detection
Cleaning the Printer
Maintenance
Replacing the Printhead
Handing Printhead Precautions
Press the Power button to set the printer on
How to Replace the Printhead
Press or to display Replace Head then press
Press the Cancel Job/Utility button
Maintenance
After removing the cover, the display reads Rep. P.Head OK
Remove the old printhead
Replacing the Printhead
Open the right cover
Replacing the Printhead
Printer is ready for operation
Troubleshooting
Having a problem?
Printer not Operating Correctly
Printer not switched on
Cannot Print
Printer is on but not online
System does not recognize the printer
Cannot install Windows printer driver
Cannot Install Macintosh Driver
Printer not Operating Correctly
Printing Does Not Start
No error message displayed
Media does not feed
Error message is displayed
Problem 3 Paper out
Blank paper ejected from the printer
Printing Halts During Print Job
Poor Print Quality
Print Job Results Abnormal
Printing is faint
Ink smeared
White or Dark Streaks Visible
Edges smeared with ink
Broken lines visible
Print Results Do Not Match Print Job Content
Random, bizarre characters are printing
Thickness of Lines Different
Wrong colors are printing
Colors Wrong
Only one color is printing
Ink consumption exceedingly high
Other Problems
Do not remove the ink tank
Place the removed ink tank in a plastic bag and seal the bag
Garo Error nnnn
Error Messages
Replace x Tank
Ink Tank NG
Ink Check
Ext. I/F Error
Ink level ?
Cover Open
Install P.head Press Online Key
Service Call
Rep. Waste Ink
Printhead NG Press Online Key
Media Jam
No MediaManual
Load Media
Remove Media
Remove the front upper cover
Removing Paper Jams
Removing Paper Jams
Troubleshooting
Removing Paper Jams
Troubleshooting
Performing Print Test
Press the Power button to switch theprinter on
Press or to display Nozzle Check then press
Lamp on
Head Cleaning Procedure
Cleaning the Printhead
Types of Printhead Cleaning
Cleaning the Printhead
Press or to select the head cleaning method, then press
Aligning the Printhead
Press or to select Position Adjust then press
Press or to select Adjust Printer then press
Press or to select Adj. Printhead then press
Press or to select Print Pattern then press
Press or to select Adj. Setting a then press
Correcting Banding
Press the Power button to switchtheprinter on
Press or to display Band Adjust then press
Press or to display Adjust Printer then press
Press or to display Adj. Setting G then press
Press or to display Print Pattern then press
Lines conspicuous
Adjusting the Amount of Line Feed
Press or to display Adj. Printhead then press
Press or to display LF Adjust then press
Press or to display Adj. Setting then press
Adjusting the Amount of Line Feed for Each Media
Press or to display Print Pattern a then press
Press or to display Paper Adjust then press
Press or to select the type of the media, then press
A i n P a p e r J . S e t t i n g
Other Important Information
Universal Cassettes
Options
Paper Feed Units
Exclusive for Proof Paper
Deleting Old USB/IEEE 1394 Printer Drivers
Uninstalling the Software
Uninstall begins
Windows
Uninstalling the Printer Driver
Macintosh
Mount the User Software CD-ROM in the CD-ROM drive
Uninstalling the LPR Port
Uninstalling Garo Status Monitor
Other Important Information
Print Capacity
Specifications
Main Unit
Index
Ink tanks 6-2
Online button 1-10
Reset/Enter button