W . d e l l . c o m s u p p o r t . d e l l . c o m
Dell Precision Workstation T3400 User’s Guide
July NT499
Contents
Changing Between Tower and Desktop
Switching From Tower to Desktop
Switching From Desktop to Tower
Microsoft Windows Vista Contents
Smart Cards and Fingerprint Readers
Uninterruptible Power Supplies
Computer, Keyboard, and Monitor
100
Changing Boot Sequence for Future Boots
Diagnostic Light Codes During Post 100
When to Use the Dell Diagnostics 108 Contents
114
Starting the Dell Diagnostics From Your
Dell Diagnostics Main Menu
113
143
131
154
Removing a Memory Module 160 Installing a Memory Module
General Installation Guidelines 189
149
Installing a Drive-Panel Insert
Installing an Optional Third Hard Drive
Installing an Optional Fourth Hard Drive
Installing an Additional Fan
245
Technical Support and Customer Service 264
Automated Order-Status Service 265 Contents
243
Macrovision Product Notice
Contents
Contents
What Are You Looking For? Find It Here
Finding Information
Click the User’s Guide for your
Specifications
How to configure system settings
System Guides
Direct your call when contacting
Use the Service Tag to identify your
Computer when you use
Enter the Express Service Code to
Tips, articles from technicians, online
Appropriate for your configuration
Providing critical updates for your
Configuration Utilities → Desktop
How to use Windows Vista Click Start→ Help and Support
What Are You Looking For? Find It Here How to use Windows XP
Dell Supported Linux Sites
What Are You Looking For? Find It Here How to use Linux
Front View Tower Orientation
About Your Computer
About Your Computer
Perform an operating system shutdown
Such as printers and keyboards
Operating state
Blinking green The computer is in a power
Mechanical OFF
Steady green The computer is in a normal
PSU only
Back View Tower Orientation
Card
Front View Desktop Orientation
Power button Press to turn on the computer
Blinking green The computer is in a power
Other cards
Back View Desktop Orientation
Back Panel Connectors
VCR
Connector
Processor
Specifications
System Information
Between a 100-Mbps network
Green a good connection exists
Between a 10-Mbps network
Orange a good connection exists
Registered or buffered memory
Connectors
Memory
Non-ECC memory
Card for power requirements
Serial connector
Chassis intrusion switch
Power supply may result in your
Controls and Lights
Supported monitor weight
Power
Upon the power supply wattage rating
Weight
Maximum shock
About Your Computer
Manageability
Advanced Features
Advanced Features
LegacySelect Technology Control
Dell OpenManage Client Instrumentation
Power Management
Power management event
Sleep Mode Wake-Up Methods
Press the power button
Auto power on
Advanced Features
Using RAID with Hard Drive Passwords
About RAID Configurations
About RAID Configurations
Segment Hard drive
RAID Level
Hard drive
RAID Level 10 1+0
Configuring Your Computer for RAID
Setting Your Computer to RAID-Enabled Mode
About RAID Configurations
About RAID Configurations
About RAID Configurations
Page
About RAID Configurations
About RAID Configurations
About RAID Configurations
Migrating to a RAID Level 0 Configuration
Migrating to a RAID Level 5 Configuration
Migrating to a RAID Level 1 Configuration
Migrating to a RAID Level 10 Configuration
Creating a Spare Hard Drive
Rebuilding a Degraded RAID Level 1 Configuration
Changing Between Tower and Desktop Orientations
Setting Up Your Computer
Switching From Tower to Desktop Orientation
Setting Up Your Computer
Switching From Desktop to Tower Orientation
Installing Your Computer in an Enclosure
Setting Up Your Computer
Setting Up Your Computer
Microsoft Windows XP
Transferring Information to a New Computer
P Y D a T a F R O M T H E S O U R C E C O M P U T E R
E a T E a W I Z a R D D I S K
Microsoft Windows Vista
Power Protection Devices
Surge Protectors
Uninterruptible Power Supplies
Line Conditioners
Setting Up Your Computer
Securing Your Computer
Securing Your Computer
Chassis Intrusion Detection
Security Cable Lock
Smart Cards and Fingerprint Readers
Passwords
About Passwords
Using an Administrator Password
Using a Primary System Password
Using a Hard Drive Password
Turning On and Activating TPM
Trusted Platform Module TPM
Computer Tracking Software
Security Management Software
If Your Computer Is Lost or Stolen
Mouse Non-Optical
Cleaning Your Computer
Cleaning Your Computer
Computer, Keyboard, and Monitor
CDs and DVDs
Floppy Drive
System Setup
System Setup
Entering System Setup
System Setup Screens
Hyper-Threading, and supports 64-bit technology
System Setup Options
System System Info
Processor Info
Location
Channel mode dual or single, and type by Dimm slot
Boot Sequence on
Memory Info
Storage devices regardless of the No Boot setting
Boot from the next device listed in the boot sequence
Will not recognize USB storage devices
COM3 The port is configured at 3E8h with IRQ
378h default 278h 3BCh Serial Port #1
Resources are in use, the port is disabled
COM1 The port is configured at 3F8h with IRQ
Virtualization Technology
Off Virtualization Technology is disabled
On Virtualization Technology is enabled
Video Primary Video
Modify or delete the system password
Password Drive Not Set default
Default
Locked a valid administrator password is required to
Does not display any detected intrusions during Post
Off The intrusion detection feature is disabled
Activate Enables and activates TPM security
Intrusions during Post
Using a power strip or surge protector
Power is restored
Off default Computer on Off Do not use the Auto Power Time
Time set in Auto Power Time
Or type the numbers in the appropriate time field
Low Power Mode
System will boot from the network
Mode, Hibernate mode, or when turned off
Enables or disables the numerical and mathematical features
Post Hotkeys
Boot Sequence
Changing Boot Sequence for the Current Boot
Changing Boot Sequence for Future Boots
Clearing Passwords
Clearing Passwords and Cmos Settings
Clearing Passwords and Cmos Settings
Clearing Cmos Settings
Flashing the Bios
Clearing Passwords and Cmos Settings
Power Lights
Troubleshooting Tools
Troubleshooting Tools
Light Pattern
Diagnostic Lights
Diagnostic Light Codes During Post
100
101
102
Occurred Graphics card and restarting
103
Determine if a conflict exists by
Card failure has
104
Beep Codes
Repetitive Short beeps
System Messages
105
Code Description
106
Hardware Troubleshooter
Dell Diagnostics
107
Starting the Dell Diagnostics From Your Hard Drive
When to Use the Dell Diagnostics
109
110
Dell Diagnostics Main Menu
111
112
Troubleshooting
Troubleshooting
Battery Problems
Drive Problems
Problems writing to an optical drive
Optical drive problems
114
Hard drive problems
Mail, Modem, and Internet Problems
115
116
117
Error Messages
Do not use these characters in filenames
Contact the Ieee 1394 device manufacturer
Ieee 1394 Device Problems
Keyboard Problems
118
Program stops responding
Lockups and Software Problems
Computer does not start up
Computer stops responding
120
Other software problems
Program is designed for an earlier Windows operating system
Solid blue screen appears
Mouse Problems
Memory Problems
121
122
Network Problems
123
Power Problems
124
Printer Problems
125
Scanner Problems
Sound and Speaker Problems
No sound from speakers
No sound from headphones
Video and Monitor Problems
126
Screen is difficult to read
Screen is blank
127
128
Only part of the screen is readable
3D image quality is poor
129
130
Drivers
Reinstalling Software
What Is a Driver?
Reinstalling Software
Using Windows Device Driver Rollback
Reinstalling Drivers and Utilities
Save and close any open files, and exit any open programs
Using the Drivers and Utilities Disc
133
Reinstalling Software
135
Starting System Restore Windows XP 136
Using Microsoft Windows System Restore
Restoring Your Operating System
137
Turn on the computer 138
Using Dell PC Restore and Dell Factory Image Restore
Enabling System Restore
Windows XP Dell PC Restore
139
140
141
Using the Operating System Media
Reinstalling Windows XP or Windows Vista
Before you Begin
Save and close any open files and exit any open programs
Turning Off Your Computer
Adding and Replacing Parts
Before You Begin
Recommended Tools
Before Working Inside Your Computer
145
Removing the Computer Cover
Cover hinges
Inside View of Your Computer
146
Cover release latch
147
Power supply System board Secondary hard drive bay
System Board Components
Power connector Memory module Battery socket
148
149
Power Supply DC Connector Pin Assignments
150
DC Power Connector P1
DC Power Connectors P3 and P5
DC Power Connector P2
151
152
DC Power Connector P7
DC Power Connectors P8, P9, P13, and P14
Pin Number Signal name AWG Wire +5 VDC Red
153
DC Power Connector P10
DC Power Connector P12
Pin Number Signal Name
Removing the Front Panel
DC Power Connector P15 525-W PSU Only
+12 Vcdc Blue/White
Removing the Chassis Intrusion Switch
Chassis Intrusion Switch
155
Replacing the Chassis Intrusion Switch
157
Resetting the Chassis Intrusion Detector
Memory
Memory Overview
158
159
Addressing Memory With 4-GB Configurations
Memory module Securing clips Memory module connector
Installing a Memory Module
Removing a Memory Module
Cutouts
DIMM1 Memory module connector
Notch Crossbar Adding and Replacing Parts
161
162
Cards
163
PCI Cards
Release tabs
Release tab
165
Card retention door
Adding and Replacing Parts
167
Release tab
169
Card retention cover
Screws
171
Alignment guide Filler bracket
173
Release tab
175
PCI Express Cards
Card retention cover
177
Card retention door Adding and Replacing Parts
Alignment bar
179
Alignment bar Alignment guide Filler bracket
181
Adding and Replacing Parts
183
Alignment bar
Drives
Tower Computer Drive Configurations
185
Additional Sata hard drive
186
Media Card Reader
187
Desktop Computer Drive Configurations
Reader
Removing and Replacing the Metal Shield Lower Drive Bays
About Metal Shields Present in Some Drive Configurations
188
189
General Installation Guidelines
Power Cable Connectors
Power cable
Sata data cable
Sata Data Cable Connectors
SAS Data Cable Connectors
190
Disconnect the serial ATA cable from the hard drive
Hard Drive
Removing a Hard Drive Tower or Desktop Computer
Drive Cable Colors
Bay
Card Hard drive in secondary hard
193
Hard drive in primary hard drive bay
Blue tabs
195
Connect one end of the serial ATA cable to the hard drive
To install a SAS hard drive
197
Removing an Optional Third Hard Drive Tower Computer
If you are removing a SAS drive
Power cable Serial ATA cable Sata connector
199
Installing an Optional Third Hard Drive Tower Computer
200
201
Removing an Optional Fourth Sata Hard Drive Tower Computer
Sliding-plate lever
Installing an Optional Fourth Hard Drive Tower Computer
203
Removing an Optional Third Hard Drive Desktop Computer
Optional serial ATA hard drive in lower 5.25-inch drive bay
205
Installing an Optional Third Hard Drive Desktop Computer
Hard-drive holder
207
Optional third hard drive is
209
Power cable Power supply Serial ATA cable
Optional serial ATA hard drive desktop illustrated
Installing an Additional Fan
Fan slots Fan release tab Fan cable
211
212
Drive Panel
213
Removing the Drive Panel Tower Computer
Drive release latch
214
Replacing the Drive Panel Tower Computer
Drive panel tabs
215
Removing the Drive Panel Desktop Computer
Replacing the Drive Panel Desktop Computer
217
Tabs
Installing a Drive-Panel Insert
Removing a Drive-Panel Insert
Drive panel Drive-panel insert Drive-panel insert release
219
Floppy Drive or Media Card Reader
If you are removing a floppy drive
Removing a Floppy Drive or Media Card Reader Tower Computer
221
Floppy drive connector Floppy Adding and Replacing Parts
Attach the screws to the new drive 222
223
If you are installing a floppy drive
225
Drive-conversion latch Power cable Floppy drive cable
Adding and Replacing Parts
227
Floppy drive connector Floppy
Drive retention insert
229
Power cable
Removing an Optical Drive Tower Computer
Optical Drive
231
CD/DVD drive cable
233
Installing an Optical Drive Tower Computer
Adding and Replacing Parts
CD/DVD-drive cable
235
236
Removing an Optical Drive Desktop Computer
237
Installing an Optical Drive Desktop Computer
Adding and Replacing Parts
239
Installing the Optional Speaker
Speaker optional
241
Speaker optional
Removing the Processor
Processor
243
244
Heat-sink assembly
245
Replacing the Processor
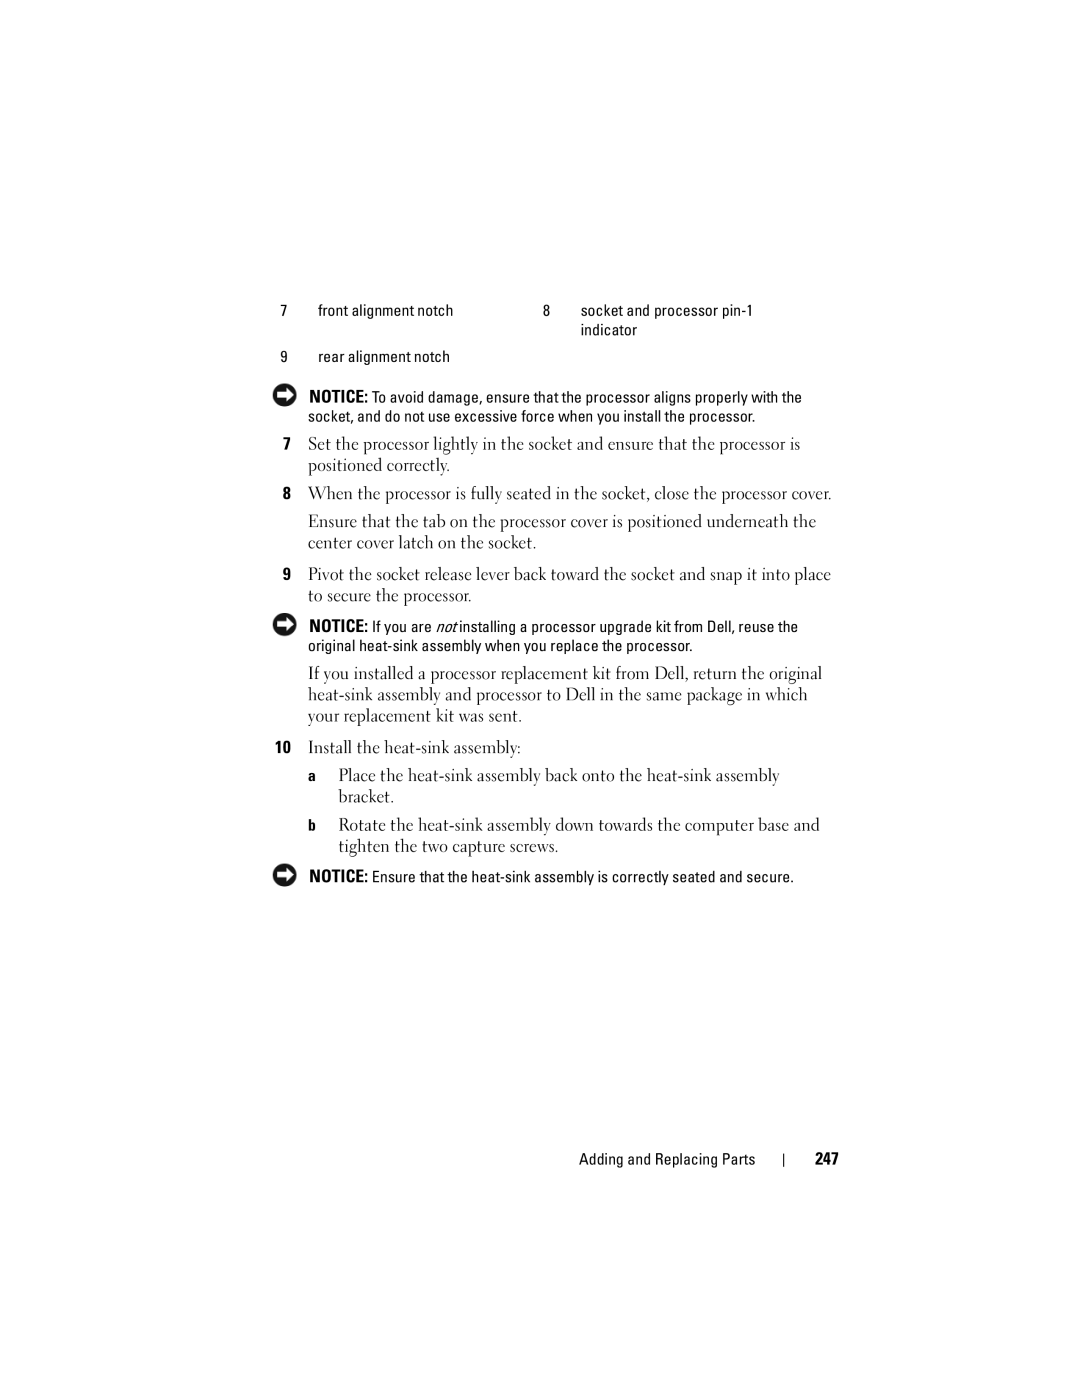
Processor cover Socket
Processor cover Tab
246
Center cover latch Release lever
Rear alignment notch
Indicator
247
Front alignment notch
Captive screw housing
Battery
248
Removing the Battery
About the Battery
249
250
System battery Battery socket tab
Panel
Replacing the Battery
251
USB port
Headphone connector Microphone connector
Panel Components
Removing the I/O Panel
253
Heat-sink assembly Captive screw housing
Fan release lever
255
Replacing the I/O Panel
Panel
Removing the Power Supply
Power Supply
Power supply screws
Replacing the Power Supply
257
Removing the System Board
System Board
259
Remove the system board screws
Replacing the System Board
261
Replacing the Front Panel
Replacing the Computer Cover
Getting Help
Getting Help
Obtaining Assistance
263
DellConnect Online Services
Technical Support and Customer Service
265
Problems With Your Order
AutoTech Service
Automated Order-Status Service
Getting Help
267
Before You Call
268
269
Contacting Dell
270
271
Appendix
FCC Notice U.S. Only
FCC Class B
272
Macrovision Product Notice
273
Glossary
274
275
276
277
278
279
280
281
282
283
284
285
286
287
288
289
290