Model Felcom
00080934515
General
How to discard this product How to discard a used battery
Important Notices
Safety Instructions
Table of Contents
Transmitting Code description
File Operations
MAINTENANCE, Troubleshooting
SP-1
Mail Customercare@inmarsat.com
Foreword
Introduction
Vii
PC Board Program No Version No Date of Modification
Features
Program Number
Viii
Category of Units
System Configuration
Inmarsat C System Overview
Inmarsat C system configuration
Inmarsat C System Configuration
Satellite Position
Xii
Inmarsat system satellites
Region Satellite
Inmarsat
Xiii
Xiv
Communications Network
Types of MES
This page is intentionally left blank
Xvi
Lrit system
Lrit Compliance
Xvii
Xviii
Communication Unit
Turning the power on/off
Diagnostics
Operational Overview
F16PC icon
Terminal Unit PC Operation
Starting, quitting the application
PC requirements
Controls description
Shortcut keys
Shortcut keys
Ctrl
Num Lock
Keyboard Function key description
Function keys
Standby display
Standby Display
Location of display indications
Communication network mode
Display indications
3a Communication status
Communication unit status
Logging status
3b RF CON board program version number
Frame synchronization
Ocean region receiving
Ship’s position
Displayed when a routine message has
Other information
Date and time
Word wrap options window
Setup menu
Editor setup menu
Menu Overview
Keying Sequence
Error Messages and Alerts
Location of error messages and alerts
File
Press the 8 key to choose 8. Print Setting
Choosing a Printer
File menu
This page intentionally left blank
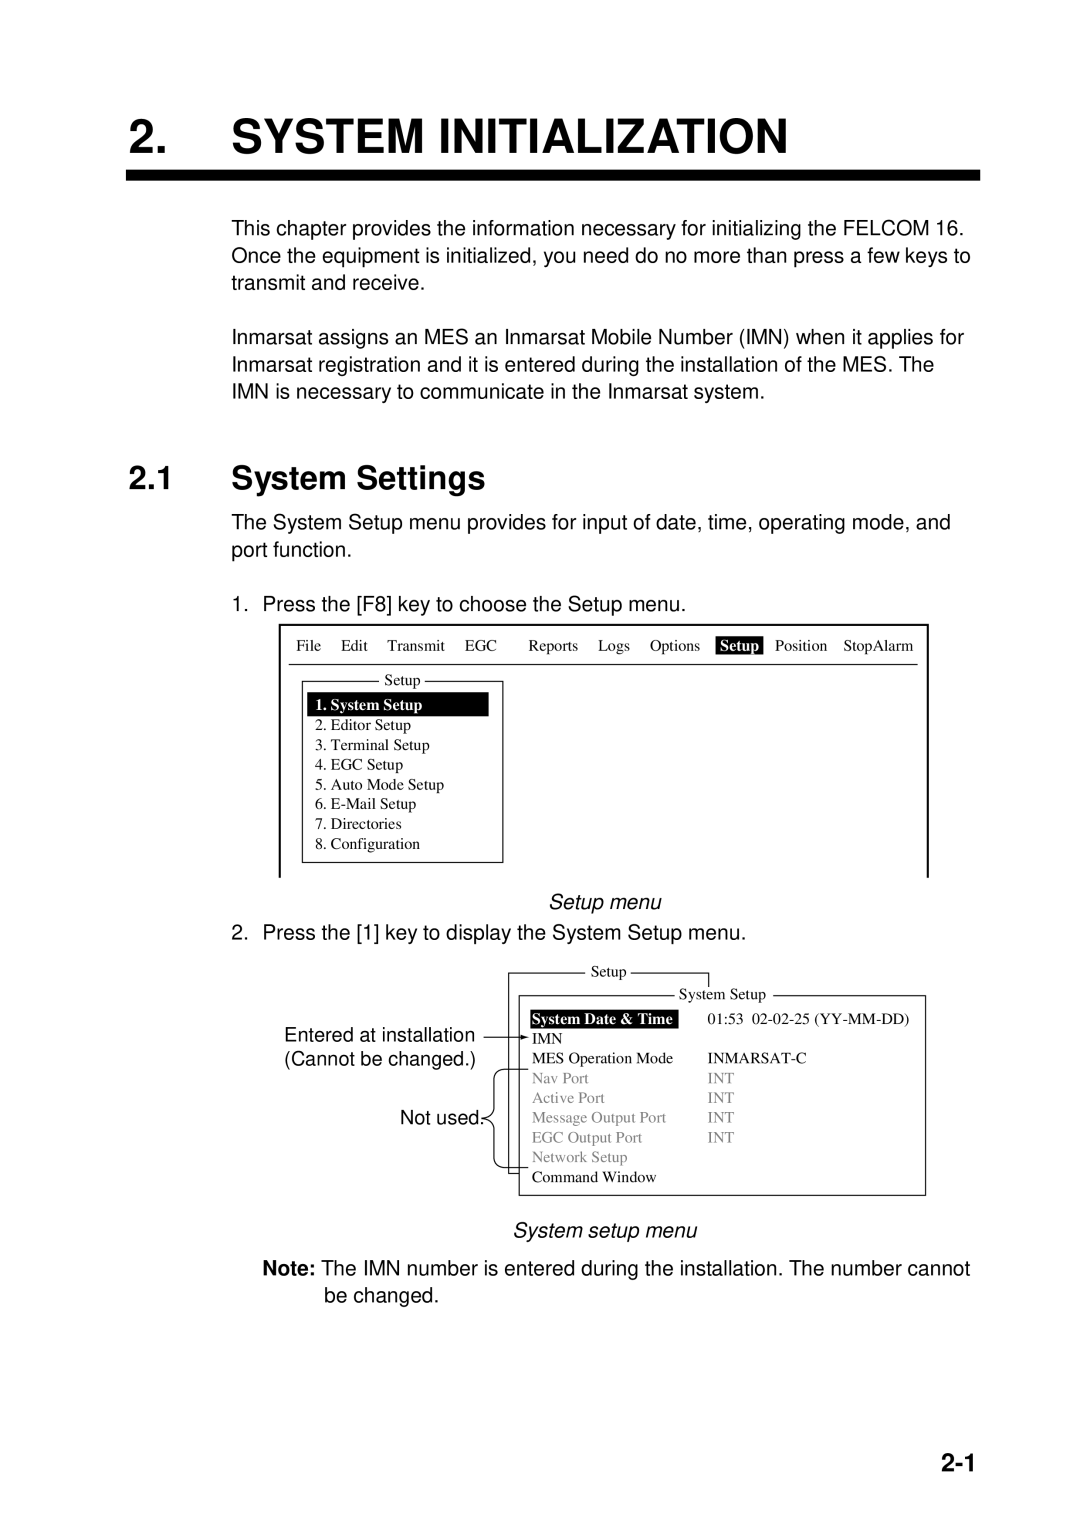
System Initialization
System Settings
System setup menu
Date and time entry window
System setup menu, MES operation mode options window
MES Operation Mode
For technicians
Currency unit options
PC Window Setup
Terminal Setup menu
Date options
Editor screens
Window color setup menu
RCV Message Display
EGC Message Display Communications display
Login screen
Login and Logout
Login
Press the 1 key to display the Login screen
Login replaces Idle Flashing during login
Appearance of display screen during login
Appearance of display screen during logout
Logout
Options menu, logout screen
EGC system
EGC Settings
What is the EGC Enhanced Group Call service?
System Initialization
Additional Position
EGC setup
Press the 4 key to display the EGC Setup menu
EGC setup menu
Press the Enter key to close the navarea entry window
EGC setup menu, Navarea entry window
Press the Enter key to open the navarea entry window
Navareas
EGC setup menu, update window
EGC setup menu, station code entry window
EGC channel list
Adding EGC channels
EGC channel list entry screen
EGC channel list, update window
Auto EGC message print menu
Saving, printing EGC messages automatically
Automatically saving EGC messages
Auto EGC message save menu
Automatically printing EGC messages
044
NCS channel list, update window
Adding NCS Channels
NCS channel list
System Initialization
LES List
Setting toll charges
Configuration menu
Configuration
Telenor S.S.Inc
Press the 2 key to display the LES List
LES list
LES list, LES data entry window
LES list options
Registering LES to LES list
LES list, text entry window
Editing the LES list
Sample LES list printout
Printing the LES list
Station list items
Station List
Adding stations to the station list
Sample station list
583
Procedure for Telex
Destination communication type options
T30
Procedure for FAX
Modem type options window
Procedure for E-mail
Station list
Editing the station list
Press F8, 8 and 1 to display the Station List
Sample station list printout
Printing the station list
Latitude entry window
Ship position, update
Entering Own Ship’s Position
Ship position window
Directories menu
Creating a directory where to store messages
Setup menu, message directory Windows XP
Creating a Directory
Message Directory Windows XP
Message directory
Specifying directory where to store messages
Setup menu, E-Mail/SMS service list
Mail Service/SMS Station List
Setup menu, configuration
Press the 5 key to display the E-mail/SMS Service List
Service LES Name
Mail setup items
Service station list, service station name entry window
System Initialization
Mail station list
Mail Setup
Mail setup
Press the Enter key to open the e-mail station list
Station List Station List LES List LES List
Saving, Loading System Settings
Saving system settings
Load Window
Loading system settings to the terminal unit
This page is intentionally left blank
Internal memory
File Operations
Files and Working Areas
Text editor screen
Preparing Files
Preparing a routine file
Preparing message with addressee code
Addressee code and password
Preparing message with both addressee code and password
Preparing a confidential file
Editor menu setup
Press the F2 key to choose the Edit menu
Working with text
Cutting and pasting text
Appearance of highlighted text
Text pasted at cursor location
Cursor selects location where to paste text
Copying and pasting text
Choose the text you want to copy
Search and Replace
Insert with Citation
Select All
Replace menu, query or all
Press the 2 key to choose 2. Replace
Replace menu
Replace menu, direction menu
Time or Pos. Ins
Replace start window
Go to line
Goto line options
Save screen Windows XP
Configuration of file menu
Saving Files
Save file, retain place on screen
Close
Save file, clear screen
File menu, close file prompt
Save screen
Opening files
Switching between files
How to switch between files
Opening Files
Overwrite file window
Opening a file when both working areas are occupied
Prompt for closing a file
To enter same file name as edited file, press the Enter key
Save screen, prompt for saving a message before closing
Saving a File Under a New Name
Sample print screen
Printing Files
Overwrite confirmation screen
Combining Files
Prompt for verification of file delete
Deleting Files
Sample delete screen
Rename window
Renaming Files
File, rename
Yes is selected press the Enter key to decode the file
Decoding E-mail Attachment
Decode window
Mime decode screen
Code description
Inmarsat C Communications
Transmitting
Transmit menu
Transmitting prepared message
Message, subscriber, destination type and code
Station Na
Transmit message menu
Transmit message menu, station list
Message File
Station List Group Station Name Type Code ID / Address
Attach File
Press the Enter key to open the attach file window
Transmit message menu, select file window opened
LES ID options
Transmit message screen
LES
Display log printout example Confirmation OFF
Transmit Message Status
Transmit message menu, destination type options window
See procedure next
See procedure on
Mail See procedure on
Station ID
Transmit message menu, country/ocean code window
Transmit message menu, station ID window opened
Country/Ocean Code
LED ID entry window
Modem Type
Transmit message menu, modem type options window
Subject
Transmit message menu, address entry window
Transmit message menu, subject entry window opened
Address
Transmit message menu, select file window
Press the Enter key to open the select file window
Transmit Message
Transmitting a file stored on the hard disk
Press the 1 key to choose Transmit Message
Send window Windows XP
Editmsg.001 Normal Waiting
Canceling transmission on a message awaiting transmission
Cancel screen
Automatically receiving delivery status
Press the Enter key to open the cancel window
Cancel window
Requesting delivery status
Send Status
Message File
Station
Priority
Normal 02-02-25
Manually requesting delivery status
Request delivery status display
Sample message file list
Not used
Accessing the code number services
Code Content Remarks
Maritime safety service code number services
Send message details example e-mail
Displaying the send message log
Logs menu
Send message log
Receiving
When a message is received
Displaying, printing received messages
Setting the receive alarm
Auto mode setup menu
Rec date & time
Display message list description Message No
Size
Addressee
Normal 200
Location of password
Sample printout
R0021105.002
Normal 02-11-05
About attachments
Attachment name
Example of main text and text mail with attachment data
Normal 32767 02-02-04 Saved
Automatically printing received messages
Saving received messages to the hard disk
Sample delete message screen
Automatically saving received messages to the hard disk
R0021106.001
Deleting received messages
Sample receive message log
Delete window
Display log description
Display Log
Displaying and printing the display log
Sample display log
Automatic printing of display log
Sample display EGC message screen
EGC Messages
Displaying and reprinting EGC messages
EGC menu
EGC network ID list
Displaying EGC closed network ID Enid
EGC message log
Displaying the EGC message log
This page intentionally left blank
Data Reporting
Data Reporting and Polling
Data report menu
Setting a data report
Reports menu
Report Times
Data report menu regular interval reporting
PIN Code
Setting a message report
Message report menu
Data Reporting and Polling
With cursor and press the Enter key
Choose a file. When chosen File is activated. Choose file
Position, speed, course
Charge
Automatic printing of data report, polling command
Polling command
Polling commands
Polling command on MES signalling channel
Polling command on MES message channel
PIN Code
Other polling commands
Sample MES message channel printout
Polling reception
Data network ID list
Dnid Data Network Identification
Displaying Dnid
Dnid effective
Enabling/Disabling Dnid
This page intentionally left blank
Press the 3 key to choose Abort
Options menu when Felcom 16 functions as Inmarsat MES
Other Functions
Aborting an Operation
Pacific
Scanning NCS Common Channel
Ocean region menu
NCS scan confirmation screen
Press the 4 key to choose Select EGC Ch
Options menu when Felcom 16 functions as EGC receiver
Choosing EGC Receiving Channel
Choosing NCS Channel
Description of LES information table
LES Information
LES information display
Other Functions
When the power can’t be turned on
MAINTENANCE, Troubleshooting
General Checking and Maintenance
Cleaning the communication unit
Test menu
Diagnostics
Self test at power on
Press the 3 key to choose Diagnostic Test
Sample communication unit self test results
Program No. ** = Version no
PV test sequence
Performance Verification PV Test
PV test screen
PV test procedure
Results of PV test
System Status Monitor
Replacing the Fuse
Messages in this category are prefixed with Trouble
Error Messages
Error Message Meaning Action
Equipment trouble messages
Messages in this category are prefixed with Warning
AP-1
Appendix
Menu Tree
F3 Transmit
AP-2
F5 Reports
AP-3
F7 Options Felcom functions as Inmarsat MES
AP-4
INMARSAT-C, EGC
AP-5
AP-6
AP-7
AP-8
International Telex/Telephone Country Code List
AP-9
AP-10
NTT
AP-11
AP-12
AP-13
Area and Country
AP-14
Beijing Marine China 311 211 Bezeq Israel 127 327
AP-15
April/2003
Land earth station operator Country
AP-16
International Telex Abbreviations
AP-17
International Telegraphy Alphabet
AP-18
Messages
F1 File
AP-19
F3 Transmit
F5 Data report
AP-20
F7 PV test
AP-21
Parts List
AP-22
Parts Location
Communication unit
Antenna unit
SP-1
Furuno Specifications of Inmarsat C MES Felcom
This page is intentionally left blank
IN-1
Index
Index
IN-2
IN-3