Kug-titl Page 1 Thursday, March 6, 1997 442 PM
LN17 and LN17ps Printers User Guide
Second Printing, May
Kug-titl Page 2 Thursday, March 6, 1997 442 PM
Table of Contents
Kug.toc Page ii Thursday, March 6, 1997 442 PM
Kug.toc Page iii Thursday, March 6, 1997 442 PM
Kug.toc Page iv Thursday, March 6, 1997 442 PM
Using the Hard Drive/ Downloading Fonts
Kug.toc Page v Thursday, March 6, 1997 442 PM
Kug.toc Page vi Thursday, March 6, 1997 442 PM
Kug-ch01 Page 1 Thursday, March 6, 1997 444 PM
Chapter
Kug-ch01 Page 2 Thursday, March 6, 1997 444 PM
Kug-ch01 Page 3 Thursday, March 6, 1997 444 PM
LN17 LN17ps Printer Models
Kug-ch01 Page 4 Thursday, March 6, 1997 444 PM
How Much This Book Must I Read?
Front View
Kug-ch01 Page 5 Thursday, March 6, 1997 444 PM
Rear View
Main Tray
Power Saver
Special Features
Kug-ch01 Page 6 Thursday, March 6, 1997 444 PM
Edge to Edge Printing
Automatic Language Sensing Switching
Kug-ch01 Page 7 Thursday, March 6, 1997 444 PM
Kug-ch01 Page 8 Thursday, March 6, 1997 444 PM
State Saving
Kug-ch01 Page 9 Thursday, March 6, 1997 444 PM
PostScript Option Duplex Printing
For Information on Look
Kug-ch01 Page 10 Thursday, March 6, 1997 444 PM
Collating Offsetting Memory Expansion
Kug-ch01 Page 11 Thursday, March 6, 1997 444 PM
Memory Considerations
Kug-ch01 Page 12 Thursday, March 6, 1997 444 PM
Option Settings 600 x 600 dpi 1200 x 600 dpi
Kug-ch01 Page 13 Thursday, March 6, 1997 444 PM
Maintaining the Printer
Kug-ch01 Page 14 Thursday, March 6, 1997 444 PM
Replacing Fuser Cartridge Bias Transfer Roll
Kug-ch01 Page 15 Thursday, March 6, 1997 444 PM
Technical Support
Kug-ch01 Page 16 Thursday, March 6, 1997 444 PM
Transporting the Printer
Kug-ch02 Page 1 Thursday, March 6, 1997 445 PM
Paper Handling
Kug-ch02 Page 2 Thursday, March 6, 1997 445 PM
Front Tray Paper Size
Kug-ch02 Page 3 Thursday, March 6, 1997 445 PM
Mailbox
Output Tray Collator†
Kug-ch02 Page 4 Thursday, March 6, 1997 445 PM
Storing Paper
Kug-ch02 Page 5 Thursday, March 6, 1997 445 PM
Using the Main Tray or Lower Tray
Simplex
Duplex
Kug-ch02 Page 6 Thursday, March 6, 1997 445 PM
Kug-ch02 Page 7 Thursday, March 6, 1997 445 PM
Adjusting Main Tray for Paper Size
Kug-ch02 Page 8 Thursday, March 6, 1997 445 PM
Adjusting Lower Tray for Paper Size
Kug-ch02 Page 9 Thursday, March 6, 1997 445 PM
Using the Front Tray
Kug-ch02 Page 10 Thursday, March 6, 1997 445 PM
Kug-ch02 Page 11 Thursday, March 6, 1997 445 PM
Loading Front Tray
Kug-ch02 Page 12 Thursday, March 6, 1997 445 PM
Adjust the side guide to the size
Lwr1-Lwr2-Main Deck and Cassette is installed
Tray Switching Setting Description
Kug-ch02 Page 13 Thursday, March 6, 1997 445 PM
Kug-ch02 Page 14 Thursday, March 6, 1997 445 PM
PCL Tray Switching Source Mapping
PCL Paper Source Alternate Names
Lower 1-Lower Deck and Cassette is installed Lwr1-Lwr2-Main
Source Mapping Description Setting
Kug-ch02 Page 15 Thursday, March 6, 1997 445 PM
Kug-ch02 Page 16 Thursday, March 6, 1997 445 PM
Configuration
Base One Two Envelope
Kug-ch02 Page 17 Thursday, March 6, 1997 445 PM
PCL Paper Source Source Mapping Setting
Example Lower Tray-Main Tray
Kug-ch02 Page 18 Thursday, March 6, 1997 445 PM
Bin Unlock button Open bin indicators Power switch
Using Mailbox Collator
Kug-ch02 Page 19 Thursday, March 6, 1997 445 PM
Kug-ch02 Page 20 Thursday, March 6, 1997 445 PM
Printing to the Mailbox/Collator
Kug-ch02 Page 21 Thursday, March 6, 1997 445 PM
Enabling Passwords
Press Online to bring the printer back online
Kug-ch02 Page 22 Thursday, March 6, 1997 445 PM
Kug-ch02 Page 23 Thursday, March 6, 1997 445 PM
Disabling Passwords
Press Online To bring the printer back online
Kug-ch02 Page 24 Thursday, March 6, 1997 445 PM
Kug-ch02 Page 25 Thursday, March 6, 1997 445 PM
Opening Password-Enabled Bins
Kug-ch02 Page 26 Thursday, March 6, 1997 445 PM
Using Offset Catch Tray OCT
Kug-ch02 Page 27 Thursday, March 6, 1997 445 PM
Using Envelope Feeder
Kug-ch02 Page 28 Thursday, March 6, 1997 445 PM
Loading Envelope Feeder
Duplex
Paper Size Weight
Printing
Kug-ch02 Page 29 Thursday, March 6, 1997 445 PM
Kug-ch02 Page 30 Thursday, March 6, 1997 445 PM
Print Orientation Control Panel Settings
Kug-ch03 Page 1 Thursday, March 6, 1997 443 PM
Using the Control Panel
Display
Line by 16-character display Indicator lights Control keys
Kug-ch03 Page 2 Thursday, March 6, 1997 443 PM
Kug-ch03 Page 3 Thursday, March 6, 1997 443 PM
Keys
Key Description
Kug-ch03 Page 4 Thursday, March 6, 1997 443 PM
Down
Kug-ch03 Page 5 Thursday, March 6, 1997 443 PM
Kug-ch03 Page 6 Thursday, March 6, 1997 443 PM
Navigating the Menu System
Kug-ch03 Page 7 Thursday, March 6, 1997 443 PM
Reset All Cancel PS Job
Indicator Purpose Example
Menu Indicators
Kug-ch03 Page 8 Thursday, March 6, 1997 443 PM
Kug-ch03 Page 9 Thursday, March 6, 1997 443 PM
Setting a Menu Option
Kug-ch03 Page 10 Thursday, March 6, 1997 443 PM
Kug-ch03 Page 11 Thursday, March 6, 1997 443 PM
Main Menu
Kug-ch03 Page 12 Thursday, March 6, 1997 443 PM
Menu
Option English Equivalent
Mailbox Menu †
Kug-ch03 Page 13 Thursday, March 6, 1997 443 PM
Kug-ch03 Page 14 Thursday, March 6, 1997 443 PM
PCL Emulat Menu
L E m u l a t M e n u
Kug-ch03 Page 15 Thursday, March 6, 1997 443 PM
Standard
Kug-ch03 Page 16 Thursday, March 6, 1997 443 PM
Kug-ch03 Page 17 Thursday, March 6, 1997 443 PM
PostScript Menu
Print Resolution † Print Quality †
Copies Duplex Paper Source Default Tray Paper Size
Kug-ch03 Page 18 Thursday, March 6, 1997 443 PM
PostScript Menu †
Kug-ch03 Page 19 Thursday, March 6, 1997 443 PM
Kug-ch03 Page 20 Thursday, March 6, 1997 443 PM
Interface Menu
T e r f a c e M e n u
Kug-ch03 Page 21 Thursday, March 6, 1997 443 PM
Kug-ch03 Page 22 Thursday, March 6, 1997 443 PM
Kug-ch03 Page 23 Thursday, March 6, 1997 443 PM
Ethernet Menu Options
Kug-ch03 Page 24 Thursday, March 6, 1997 443 PM
System Menu hierarchy showing factory settings
Test Menu
Kug-ch03 Page 25 Thursday, March 6, 1997 443 PM
Kug-ch03 Page 26 Thursday, March 6, 1997 443 PM
Reset Menu
LN17 Printer Driving Software
Environment Printer Driver Diskette
LN17 PCL 5e Emulation Printer Drivers
Macintosh System
LN17 PostScript Printer Drivers
Software
DECprint Supervisor
Kug-ch05 Page 1 Thursday, March 6, 1997 447 PM
Using the Hard Drive Downloading Fonts
Kug-ch05 Page 2 Thursday, March 6, 1997 447 PM
Print/Disk Spooling State Saving
Kug-ch05 Page 3 Thursday, March 6, 1997 447 PM
Formatting the Hard Drive
Kug-ch05 Page 4 Thursday, March 6, 1997 447 PM
Downloading Fonts Macros
Kug-ch06 Page 1 Thursday, March 6, 1997 448 PM
Troubleshooting
Kug-ch06 Page 2 Thursday, March 6, 1997 448 PM
Printer Operation Problems
Kug-ch06 Page 3 Thursday, March 6, 1997 448 PM
Problem
Kug-ch06 Page 4 Thursday, March 6, 1997 448 PM
Problem
System Language option to PostScript and re-send the job
Kug-ch06 Page 5 Thursday, March 6, 1997 448 PM
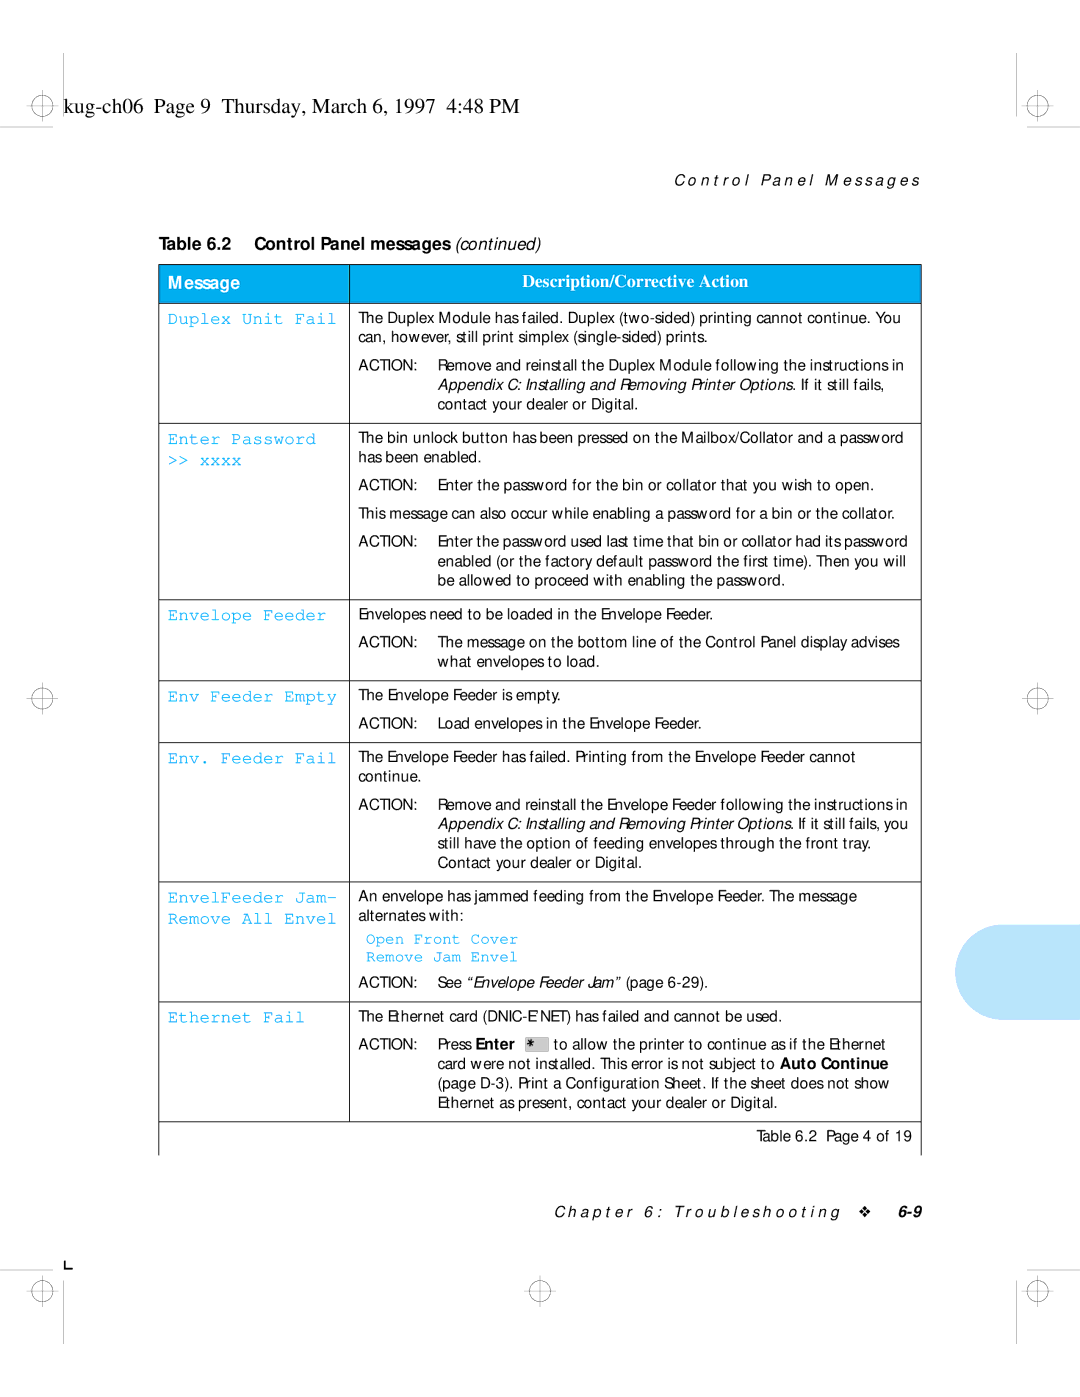
Message
Kug-ch06 Page 6 Thursday, March 6, 1997 448 PM
Message
Kug-ch06 Page 7 Thursday, March 6, 1997 448 PM
Kug-ch06 Page 8 Thursday, March 6, 1997 448 PM
Duplex Unit Fail
Kug-ch06 Page 9 Thursday, March 6, 1997 448 PM
Kug-ch06 Page 10 Thursday, March 6, 1997 448 PM
Flushing
Kug-ch06 Page 11 Thursday, March 6, 1997 448 PM
Kug-ch06 Page 12 Thursday, March 6, 1997 448 PM
Load Statement
Kug-ch06 Page 13 Thursday, March 6, 1997 448 PM
Kug-ch06 Page 14 Thursday, March 6, 1997 448 PM
Lwr1-Lwr2-Main
Kug-ch06 Page 15 Thursday, March 6, 1997 448 PM
Kug-ch06 Page 16 Thursday, March 6, 1997 448 PM
Kug-ch06 Page 17 Thursday, March 6, 1997 448 PM
Ten seconds
Kug-ch06 Page 18 Thursday, March 6, 1997 448 PM
Printer waits ten seconds, then resumes in effect, pressing
For you
Pg Protect Off
Kug-ch06 Page 19 Thursday, March 6, 1997 448 PM
Kug-ch06 Page 20 Thursday, March 6, 1997 448 PM
Remove Jam Envel
Kug-ch06 Page 21 Thursday, March 6, 1997 448 PM
Kug-ch06 Page 22 Thursday, March 6, 1997 448 PM
This message appears until Another print job is received
Kug-ch06 Page 23 Thursday, March 6, 1997 448 PM
Kug-ch06 Page 24 Thursday, March 6, 1997 448 PM
Printer is exiting Power Saver mode
Fuser has not warmed up yet
None Format The Disk option has been selected
Flash Sequence
Kug-ch06 Page 25 Thursday, March 6, 1997 448 PM
Clearing
Paper Jam?
Paper Jams
Kug-ch06 Page 26 Thursday, March 6, 1997 448 PM
Control Panel
Kug-ch06 Page 27 Thursday, March 6, 1997 448 PM
Main Tray Jam
Front Tray Jam
Lower 1 Tray Jam
Kug-ch06 Page 28 Thursday, March 6, 1997 448 PM
Lower 2 Tray Jam
Envelope Feeder Jam
Kug-ch06 Page 29 Thursday, March 6, 1997 448 PM
OCT Jam
Mailbox/Collator Jam
Kug-ch06 Page 30 Thursday, March 6, 1997 448 PM
Duplex Module Jam
Paper Exit Jam
Kug-ch06 Page 31 Thursday, March 6, 1997 448 PM
Print Cartridge Jam
Paper Mismatch Jam
Misfeed Jam at Startup
Kug-ch06 Page 32 Thursday, March 6, 1997 448 PM
Remove all trays a
Replace all trays
Kug-ch06 Page 33 Thursday, March 6, 1997 448 PM
Defective EP cartridge, or the EP Replace EP cartridge
Kug-ch06 Page 34 Thursday, March 6, 1997 448 PM
Defective paper stock, creases Replace paper stock
Kug-ch06 Page 35 Thursday, March 6, 1997 448 PM
Kug-ch06 Page 36 Thursday, March 6, 1997 448 PM
For installation and removal instructions
Cartridge is at its end of life Print in the direction
For ordering information. See Appendix B
Possible Causes Corrective Actions
Kug-ch06 Page 37 Thursday, March 6, 1997 448 PM
Wrinkled prints
Kug-ch06 Page 38 Thursday, March 6, 1997 448 PM
Random deletions
Kug-ch06 Page 39 Thursday, March 6, 1997 448 PM
Kug-ch06 Page 40 Thursday, March 6, 1997 448 PM
Kug-appa Page 1 Thursday, March 6, 1997 450 PM
Appendix a
Option Comments
Kug-appa Page 2 Thursday, March 6, 1997 450 PM
Toner EP Cartridge
Fuser Cartridge
Memory Options
Kug-appa Page 3 Thursday, March 6, 1997 450 PM
PostScript Option
Hard Drive
PC and Macintosh cables
Kug-appa Page 4 Thursday, March 6, 1997 450 PM
User Documentation
Software Media and Documentation
Kug-appa Page 5 Thursday, March 6, 1997 450 PM
QA-09N**-H Media and Documentation
QA-09N**-GZ
Kug-appa Page 6 Thursday, March 6, 1997 450 PM
Kug-appb Page 1 Thursday, March 6, 1997 450 PM
Appendix B
Kug-appb Page 2 Thursday, March 6, 1997 450 PM
Replacing EP Cartridge
P l a c i n g t h e E P C a r t r i d g e
Kug-appb Page 3 Thursday, March 6, 1997 450 PM
Kug-appb Page 4 Thursday, March 6, 1997 450 PM
Kug-appb Page 5 Thursday, March 6, 1997 450 PM
Replacing Fuser Cartridge/BTR
Kug-appb Page 6 Thursday, March 6, 1997 450 PM
Kug-appb Page 7 Thursday, March 6, 1997 450 PM
Kug-appb Page 8 Thursday, March 6, 1997 450 PM
Kug-appb Page 9 Thursday, March 6, 1997 450 PM
Kug-appb Page 10 Thursday, March 6, 1997 450 PM
Kug-appc Page 1 Thursday, March 6, 1997 451 PM
Appendix C
Sheet Paper Deck and Cassette
Kug-appc Page 2 Thursday, March 6, 1997 451 PM
Kug-appc Page 3 Thursday, March 6, 1997 451 PM
Precautions
Kug-appc Page 4 Thursday, March 6, 1997 451 PM
Memory SIMMs
Kug-appc Page 5 Thursday, March 6, 1997 451 PM
Installing a Memory Simm
Kug-appc Page 6 Thursday, March 6, 1997 451 PM
Kug-appc Page 7 Thursday, March 6, 1997 451 PM
Kug-appc Page 8 Thursday, March 6, 1997 451 PM
Removing a Memory Simm
Kug-appc Page 9 Thursday, March 6, 1997 451 PM
Kug-appc Page 10 Thursday, March 6, 1997 451 PM
Simm
Kug-appc Page 11 Thursday, March 6, 1997 451 PM
Kug-appc Page 12 Thursday, March 6, 1997 451 PM
Install a Digital LN17 PostScript print driver now
Kug-appc Page 13 Thursday, March 6, 1997 451 PM
Removing PostScript Simm
Kug-appc Page 14 Thursday, March 6, 1997 451 PM
Press Enter Message display changes to
Kug-appc Page 15 Thursday, March 6, 1997 451 PM
Kug-appc Page 16 Thursday, March 6, 1997 451 PM
Installing Hard Drive
Kug-appc Page 17 Thursday, March 6, 1997 451 PM
R d D r i v e
Kug-appc Page 18 Thursday, March 6, 1997 451 PM
Kug-appc Page 19 Thursday, March 6, 1997 451 PM
Removing Hard Drive
Kug-appc Page 20 Thursday, March 6, 1997 451 PM
Duplex Module
Installing Duplex Module
Kug-appc Page 21 Thursday, March 6, 1997 451 PM
P l e x M o d u l e
Kug-appc Page 22 Thursday, March 6, 1997 451 PM
Kug-appc Page 23 Thursday, March 6, 1997 451 PM
Removing Duplex Module
Kug-appc Page 24 Thursday, March 6, 1997 451 PM
Installing One Sheet Paper Deck Cassette
Kug-appc Page 25 Thursday, March 6, 1997 451 PM
Kug-appc Page 26 Thursday, March 6, 1997 451 PM
Kug-appc Page 27 Thursday, March 6, 1997 451 PM
Installing Two Sheet Paper Decks Cassettes
Kug-appc Page 28 Thursday, March 6, 1997 451 PM
Paper Decks
Kug-appc Page 29 Thursday, March 6, 1997 451 PM
Kug-appc Page 30 Thursday, March 6, 1997 451 PM
Kug-appc Page 31 Thursday, March 6, 1997 451 PM
Removing a Sheet Paper Deck and Cassette
Kug-appc Page 32 Thursday, March 6, 1997 451 PM
Kug-appc Page 33 Thursday, March 6, 1997 451 PM
Installing the OCT
Kug-appc Page 34 Thursday, March 6, 1997 451 PM
Kug-appc Page 35 Thursday, March 6, 1997 451 PM
Kug-appc Page 36 Thursday, March 6, 1997 451 PM
Removing the OCT
Kug-appc Page 37 Thursday, March 6, 1997 451 PM
Mailbox/ Collator
Installing Mailbox/Collator
Kug-appc Page 38 Thursday, March 6, 1997 451 PM
Lowering it into position
Kug-appc Page 39 Thursday, March 6, 1997 451 PM
Kug-appc Page 40 Thursday, March 6, 1997 451 PM
Kug-appc Page 41 Thursday, March 6, 1997 451 PM
Removing
Kug-appc Page 42 Thursday, March 6, 1997 451 PM
Kug-appc Page 43 Thursday, March 6, 1997 451 PM
Envelope Feeder
Kug-appc Page 44 Thursday, March 6, 1997 451 PM
Kug-appc Page 45 Thursday, March 6, 1997 451 PM
Kug-appc Page 46 Thursday, March 6, 1997 451 PM
Removing Envelope Feeder
Kug-appc Page 47 Thursday, March 6, 1997 451 PM
Kug-appc Page 48 Thursday, March 6, 1997 451 PM
Digital Network Interface Card
Kug-appc Page 49 Thursday, March 6, 1997 451 PM
Installing the Dnic
Kug-appc Page 50 Thursday, March 6, 1997 451 PM
Kug-appc Page 51 Thursday, March 6, 1997 451 PM
Kug-appc Page 52 Thursday, March 6, 1997 451 PM
Kug-appc Page 53 Thursday, March 6, 1997 451 PM
Dnic
Kug-appc Page 54 Thursday, March 6, 1997 451 PM
Appendix D
N t r o l P a n e l O p t i o n s
Table D.1 Page 1
Bin N †
Menu Option Locations Description Settings
Default Tray
Default Source
Disable Password†
Demo
Duplex PCL†
Enable Password†
Duplex PostScript†
Edge to Edge
Font Number
Ethernet Menu†
Font Source
Format the Disk†
Front Tray Size
Jam Recovery
Hex Dump
Interface Menu
Lang. Sensing
Language
LocalTalk Menu†
Mailbox Menu†
Memory Check
Manual Size
Orientation
Protection
Output Bin
Size
Paper Size
Password†
Parallel Menu
PCL Emulat Menu
Port Timeout
Port Enable
Pitch
Point Size
Print Errors
Power Saver
PostScript Menu†
Print Density
Reset Ethernet†
Reset All
Reset LocalTalk†
Reset Menus
State Saving
Source Mapping
System Language
Symbol Set
Quotation marks or international characters
Coming through the parallel port
Test Menu
Tray Switching
Test Print
Kug-appe Page 1 Thursday, March 6, 1997 455 PM
Appendix E
TrueType Fonts Intellifonts Bitmap Fonts
Kug-appe Page 2 Thursday, March 6, 1997 455 PM
Kug-appe Page 3 Thursday, March 6, 1997 455 PM
Printing a PCL Font List
Kug-appe Page 4 Thursday, March 6, 1997 455 PM
PostScript Fonts
Kug-appf Page 1 Thursday, March 6, 1997 456 PM
Appendix F
LN17 LN17ps
Kug-appf Page 2 Thursday, March 6, 1997 456 PM
One 250-sheet paper tray
Kug-appf Page 3 Thursday, March 6, 1997 456 PM
Kug-appf Page 4 Thursday, March 6, 1997 456 PM
Kug-appg Page 1 Thursday, March 6, 1997 456 PM
Appendix G
Kug-appg Page 2 Thursday, March 6, 1997 456 PM
Kug-appg Page 3 Thursday, March 6, 1997 456 PM
Paper Size
Number
Kug-appg Page 4 Thursday, March 6, 1997 456 PM
Output Tray
Kug-appg Page 5 Thursday, March 6, 1997 456 PM
Standard
Collator
Kug-appg Page 6 Thursday, March 6, 1997 456 PM
Raster Resolution
Kug-apph Page 1 Thursday, March 6, 1997 457 PM
Appendix H
Sound Pressure Level
Kug-apph Page 2 Thursday, March 6, 1997 457 PM
LpAm, dbA
Bystander positions
Kug-apph Page 3 Thursday, March 6, 1997 457 PM
Acoustic Noise
Zuschauerpositionen
Gerät
Kug-apph Page 4 Thursday, March 6, 1997 457 PM
FCC Compliance Statement for United States Users
Kug-apph Page 5 Thursday, March 6, 1997 457 PM
Compliance Statement for International Users
Kug-apph Page 6 Thursday, March 6, 1997 457 PM
Operational Safety
Kug-apph Page 7 Thursday, March 6, 1997 457 PM
Kug-apph Page 8 Thursday, March 6, 1997 457 PM
Laser Safety Finland Sweden
Numerics
Kug.ix Page 1 Thursday, March 6, 1997 457 PM
Keys 3-4 to
Messages 6-6 to 6-24 Navigating 3-6 to
Kug.ix Page 2 Thursday, March 6, 1997 457 PM
Installing C-49 to C-52
Removing C-53 to C-54
Loading 2-11 to 2-12 Location 1-5 Paper jams
Kug.ix Page 3 Thursday, March 6, 1997 457 PM
Kug.ix Page 4 Thursday, March 6, 1997 457 PM
Removing C-8 to C-9
Kug.ix Page 5 Thursday, March 6, 1997 457 PM
PCL 2-14 to
Kug.ix Page 6 Thursday, March 6, 1997 457 PM