HP Photosmart R707 Digital Camera with HP Instant Share
Page
Copyright and Trademark Information
Page
Table of Contents
Focusing the Camera Using Auto Focus Using Focus Lock
Using My Mode
Chapter Reviewing Images and Video Clips
Contrast AE Bracketing Date & Time Imprint
Chapter Transferring Printing Images
163
Memory Capacity
HP Photosmart R707 User’s Manual
Chapter Getting Started
Setup
Installing the camera dock insert Optional
Attaching the Wrist Strap
Installing a Memory Card Optional
Installing the Battery
Attaching the Ferrite to AC Adapter Cord
Charging the Battery
Will start blinking to show that the battery is charging
Turning on Power
Choosing the Language
Setting the Date and Time
Installing the Software
Follow the on-screen instructions to install the software
Macintosh
Camera Parts
Back of the Camera
Controller
Name Description
Zoom lever
Menu/OK button
Share button
Print button
HP Instant
Playback
Name Description
Top of the Camera
Shutter button
Front, Side, and Bottom of the Camera
USB
Camera States
Camera Menus
Use the buttons to move to the menu tab for that menu
To display the Playback Menu
To display the HP Instant Share Menu , press the HP Instant
Menu , see Using
Setup Menu on
Buttons to move to the menu
Use
Using the Help Menu
Camera Status Screen
Help Menu Tab. The Help Menu
Chapter Taking Pictures Recording Video Clips
Taking Still Pictures
Recording Audio with Still Pictures
Orientation Sensor
To stop recording audio, release the Shutter button
Recording Video Clips
Using Live View
Focusing the Camera
Using Auto Focus
Using Focus Lock
Using the Focus Range Settings
You can determine the focus by observing
Understanding the Focus Search Priority
Hints on Using Manual Focus
When using Manual Focus, here are some hints that may help
This position, press the button until the image begins to
Using Zoom
Optical Zoom
Digital Zoom
HP Photosmart R707 User’s Manual
Setting the Flash
Using the Self-Timer Settings
Secure the camera to a tripod or set it on a stable surface
For Video Clips
Using the Burst Setting
Using the Shooting Modes
Once and then use
Best F-number aperture and shutter speed for
Playback Menu see Preview Panorama on
Using Panorama Mode
Noise Reduction for Long Exposures
Taking a Panoramic Sequence of Pictures
Displayed in the Image Display
Taking Pictures and Recording Video Clips
Using My Mode
Selecting and Saving Preferred Settings in My Mode
Using the My Mode Saved Settings Sub-Menu
Press the Menu/OK button to display the My Mode Capture Menu
Using the Capture Menu
Screen
Help for the Menu Options
EV Compensation
Next to the icon
Image Quality
3MP
Custom Image Quality
Resolution Settings
Compression Settings
White Balance
Outdoors in shade, in dark cloudy conditions, or at
Manual White Balance
ISO Speed
AE Metering
AE Metering sub-menu, use
Center of the frame. Exposure will be based
Adaptive Lighting
Without Adaptive Lighting
Adaptive Lighting sub
Color
Saturation
Description
Sharpness
Contrast
AE Bracketing
+/-1.0
+/-0.3
+/-0.7
Off
Date & Time Imprint
Date & Time Imprint sub
Camera will not imprint a date or date and time
HP Photosmart R707 User’s Manual
Chapter Reviewing Images Video Clips
Using Playback
Video clips. Press and hold either
Attached
Using HP Instant Share on
Indicates this image has an audio clip
Indicates this is a video clip
Total Images Summary Screen
Selecting Images for Printing
Viewing Thumbnails
Magnifying Images
Using the Playback Menu
Video Clip Screen
# Icon Description
Exit Exits the Playback Menu
Panorama Mode on
Icon
Image Quality on
See Using HP Instant Share on
Delete
HP Photosmart R707 User’s Manual
Remove Red Eyes
Image Advice
Image Info
ISO Speed setting
That is provided in the Playback Menu view of the image
# Description
Record Audio
Rotate
Preview Panorama
Playback Menu page 86, select Preview Panorama
HP Photosmart R707 User’s Manual
Chapter Using HP Instant Share
Setting Up the HP Instant Share Menu on the Camera
Using HP Instant Share
Setting Up Destinations on a Windows Computer
At the Welcome screen, click Start
Setting Up Destinations on a Macintosh Computer
102
Using the HP Instant Share Menu
HP Instant Share Menu
Selecting All Images for HP Instant Share Destinations
Share All Images
Page
HP Photosmart R707 User’s Manual
How HP Instant Share Mails Images
HP Photosmart R707 User’s Manual
Confirm the following
Camera without Installing the HP Image Zone Software on
Transferring Images to a Computer
Turn off the camera
HP Photosmart R707 User’s Manual
Printing Panoramas
Printing Panoramas from Panorama Maker
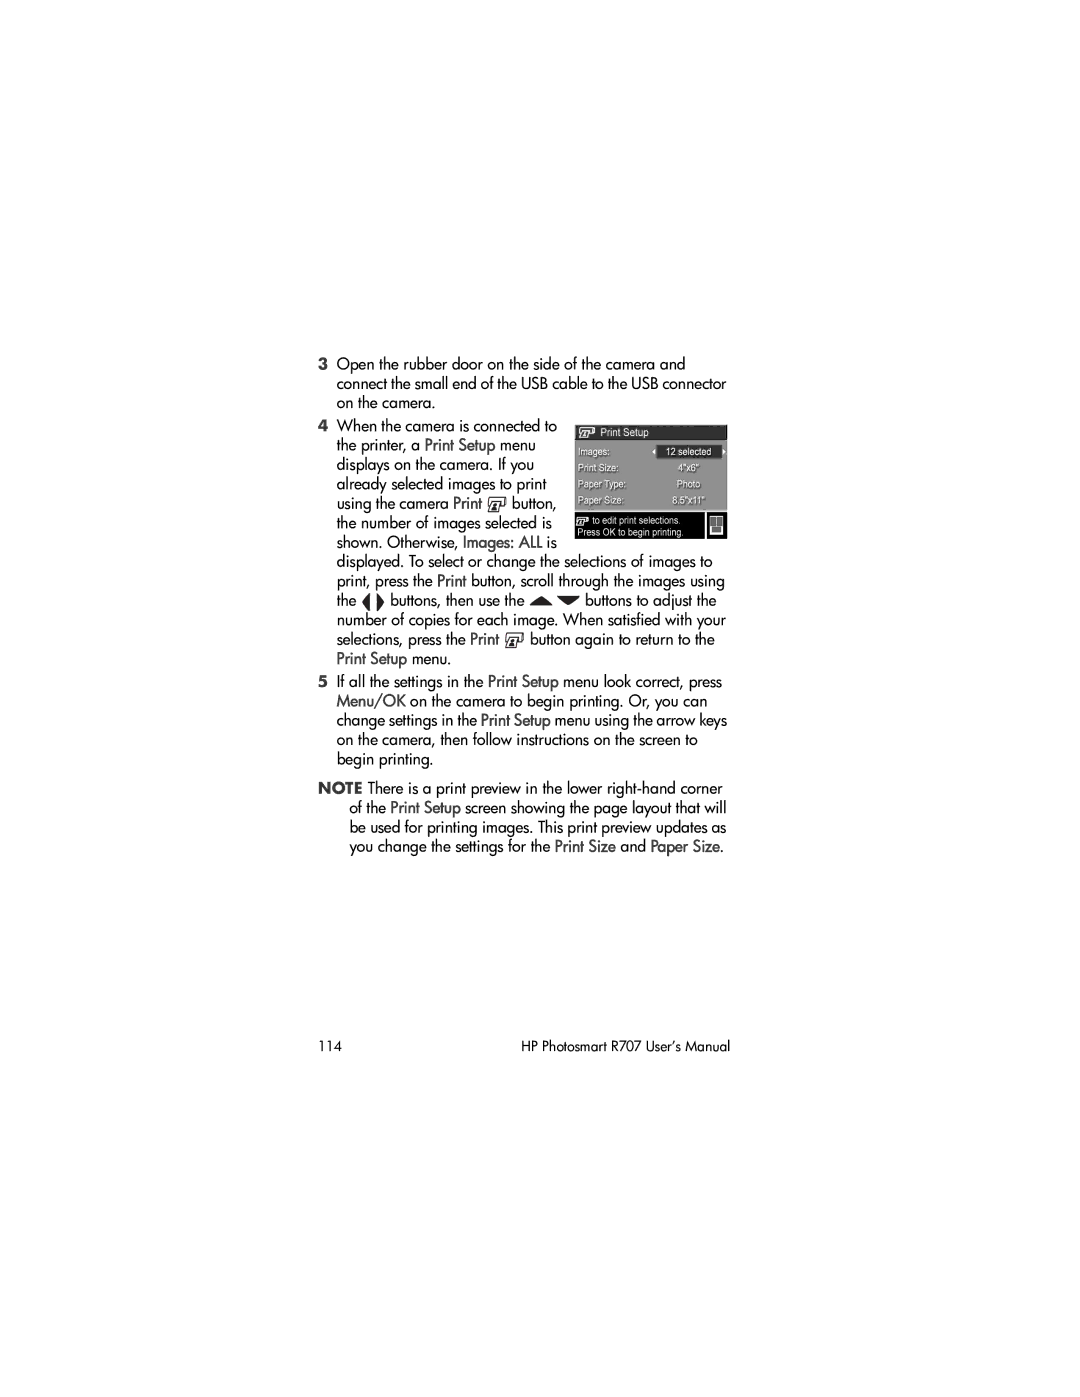
Printing Images Directly from the Camera
Printing Panoramas from HP Image Zone
Transferring and Printing Images 113
114
Chapter Using the Setup Menu
Camera Menus on page 28 and then use
Display Brightness
Camera Sounds
Focus Assist Light
Focus Assist Light sub-menu, highlight Auto or Off
Live View at Power On
Date & Time
USB Configuration
TV Configuration
Language
Move Images to Card
Reset Settings
Setup Menu page 115, select Reset Settings
Chapter Troubleshooting Support
Resetting the Camera
Page
Using a Memory Card Reader
Transferring Images to a Windows Computer
Transferring Images to a Macintosh Computer
Configuring the Camera as a Disk Drive
130
Problems and Solutions
Gauge goes
Battery
See Extending Battery Life on
Frequently
Camera Accessories on
Solution Have to
Ion battery
Lithium
Respond
Button
Between
Long delay
Occurs
Taking a
Focus Range Settings on
Picture Shutter button
Shutter
Blurry
Solution My image is
Setting the Flash on
Flash Off
Too bright
Use AE Bracketing see
Too dark
Use Adaptive Lighting see
When trying
Power
Resetting the Camera on
Wrong
Shake it
Even hot to
Touch
Error Messages on the Camera
Battery is
Card is
Press OK to
Format card
Locked. Please
Format Memory
Playback Menu see
Normal focus
Macro mode Blinking
Blinking
Macro
Use Focus Lock see
Camera shake
Cannot display
Message Possible cause Solution Number
Fatal error
Image
Unsupported
Message Possible cause Solution Unable to
Printer
Photo tray is
Paper jam
Message Possible cause Solution Printer has a
Print Setup screen
Has stalled Printer is out
Message Possible cause Solution Borderless
Printing is not
Error Messages on the Computer
Message Possible cause Solution Cannot Connect
To Product
Configuration
Configuration setting to
Camera setting Disk Drive in the Setup
Save/Print
Could Not Send
To Service
Problem
Communication
Camera Self-diagnostic Tests
HP Accessibility Website HP Photosmart Website
Getting Assistance
Support Process
HP Photosmart R707 User’s Manual
Phone Support in the United States
Phone
Locations
Phone Support in Europe, the Middle East, and Africa
Finland +358 0203 66
Spain 902 010 Sweden +46 077 120
Other Phone Support Worldwide
Korea, Republic of +82
Malaysia 1 800 805
162
Appendix a Managing Batteries
Top Points About Batteries
Extending Battery Life
Safety Precautions for Using Lithium Ion Batteries
Performance per Battery Type
Type of use
Number of Shots per Battery Type
Disposable Duracell CP1 battery
Above table, please note that
Battery Gauge
Icon Description
Recharging the Lithium Ion Battery
Camera with HP Hours Power/Memory light on AC power adapter
Safety Precautions for Recharging Lithium Ion Batteries
Sleep Time-out for Power Conservation
Appendix B Purchasing Camera Accessories
Some accessories for this digital camera are as follows
HP Photosmart R-series dock- C8887A
HP Photosmart SD memory cards
176
Color depth
Feature Description Resolution
Sensor
Lens
Tripod mount
Feature Description Focus
External flash Flash settings
Built-in flash
Feature Description Storage
Options
Compression settings
Feature
Custom Image Quality Resolution
Full Color default, Black & White, Sepia
Settings Date & Time
Feature Description Sharpness
Settings Contrast
Magnification
Weight
Feature Description Power
Dimensions
Temperature
Memory Capacity
Images 800 KB each
184
Index
Connections
Description 11 HP Instant Share button 23
Change setting 121 choose at first startup
Memory 183 number of pictures remaining
Range
Turn on/off power