Choose which connection method to use
The following methods can be used to connect your printer.
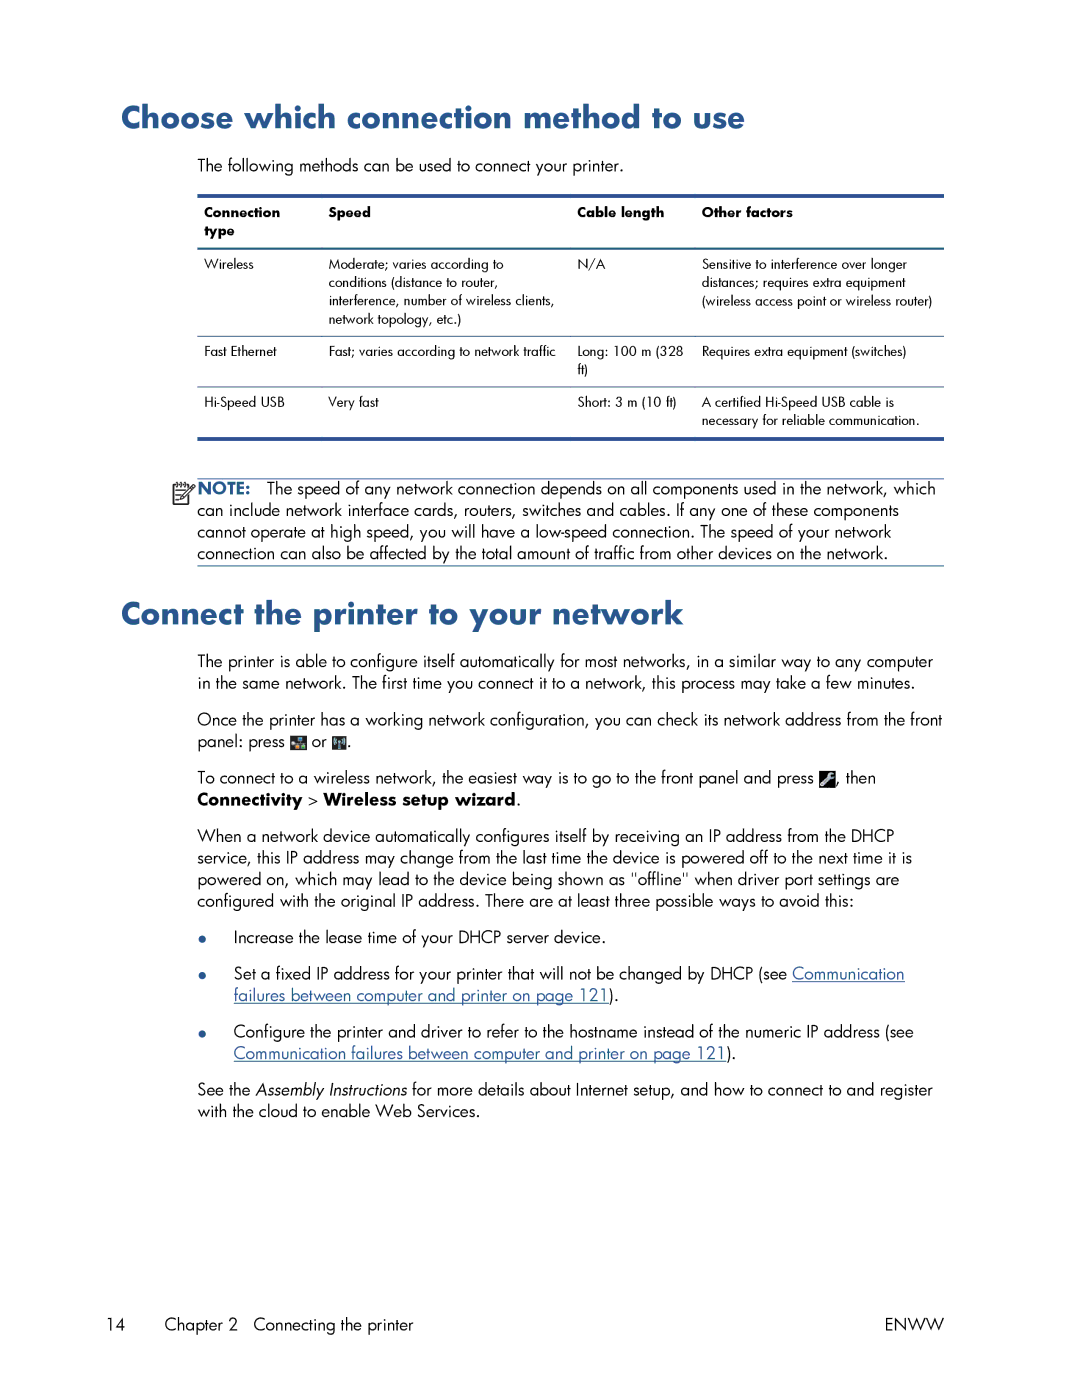
Connection | Speed | Cable length | Other factors |
type |
|
|
|
|
|
|
|
Wireless | Moderate; varies according to | N/A | Sensitive to interference over longer |
| conditions (distance to router, |
| distances; requires extra equipment |
| interference, number of wireless clients, |
| (wireless access point or wireless router) |
| network topology, etc.) |
|
|
|
|
|
|
Fast Ethernet | Fast; varies according to network traffic | Long: 100 m (328 | Requires extra equipment (switches) |
|
| ft) |
|
|
|
|
|
Very fast | Short: 3 m (10 ft) | A certified | |
|
|
| necessary for reliable communication. |
|
|
|
|
![]()
![]() NOTE: The speed of any network connection depends on all components used in the network, which can include network interface cards, routers, switches and cables. If any one of these components cannot operate at high speed, you will have a
NOTE: The speed of any network connection depends on all components used in the network, which can include network interface cards, routers, switches and cables. If any one of these components cannot operate at high speed, you will have a
Connect the printer to your network
The printer is able to configure itself automatically for most networks, in a similar way to any computer in the same network. The first time you connect it to a network, this process may take a few minutes.
Once the printer has a working network configuration, you can check its network address from the front panel: press ![]() or
or ![]() .
.
To connect to a wireless network, the easiest way is to go to the front panel and press ![]() , then Connectivity > Wireless setup wizard.
, then Connectivity > Wireless setup wizard.
When a network device automatically configures itself by receiving an IP address from the DHCP service, this IP address may change from the last time the device is powered off to the next time it is powered on, which may lead to the device being shown as "offline" when driver port settings are configured with the original IP address. There are at least three possible ways to avoid this:
●Increase the lease time of your DHCP server device.
●Set a fixed IP address for your printer that will not be changed by DHCP (see Communication failures between computer and printer on page 121).
●Configure the printer and driver to refer to the hostname instead of the numeric IP address (see Communication failures between computer and printer on page 121).
See the Assembly Instructions for more details about Internet setup, and how to connect to and register with the cloud to enable Web Services.
14 Chapter 2 Connecting the printer | ENWW |