Manuals
/
Intel
/
Computer Equipment
/
Switch
Intel
410 manual 2Unpacking the RAID Array, 3Installation of Ramp on Shipping Pallet
Models:
410
1
15
60
60
Download
60 pages
35.31 Kb
12
13
14
15
16
17
18
19
<
>
Install
Appendix A Configuration Records – Blank Forms
1.7Connecting the Controller to Computer
Accessing the Command Line Interpreter CLI
Perform a System Backup
3.4Setting Controller Communications
PC Program Card Handling Precautions
Select Administrative Tools
Most-LikedFeatures Least-LikedFeatures
Page 15
Image 15
Chapter 1. Unpacking and Setting Up Your RAID Array 410 Subsystem Components
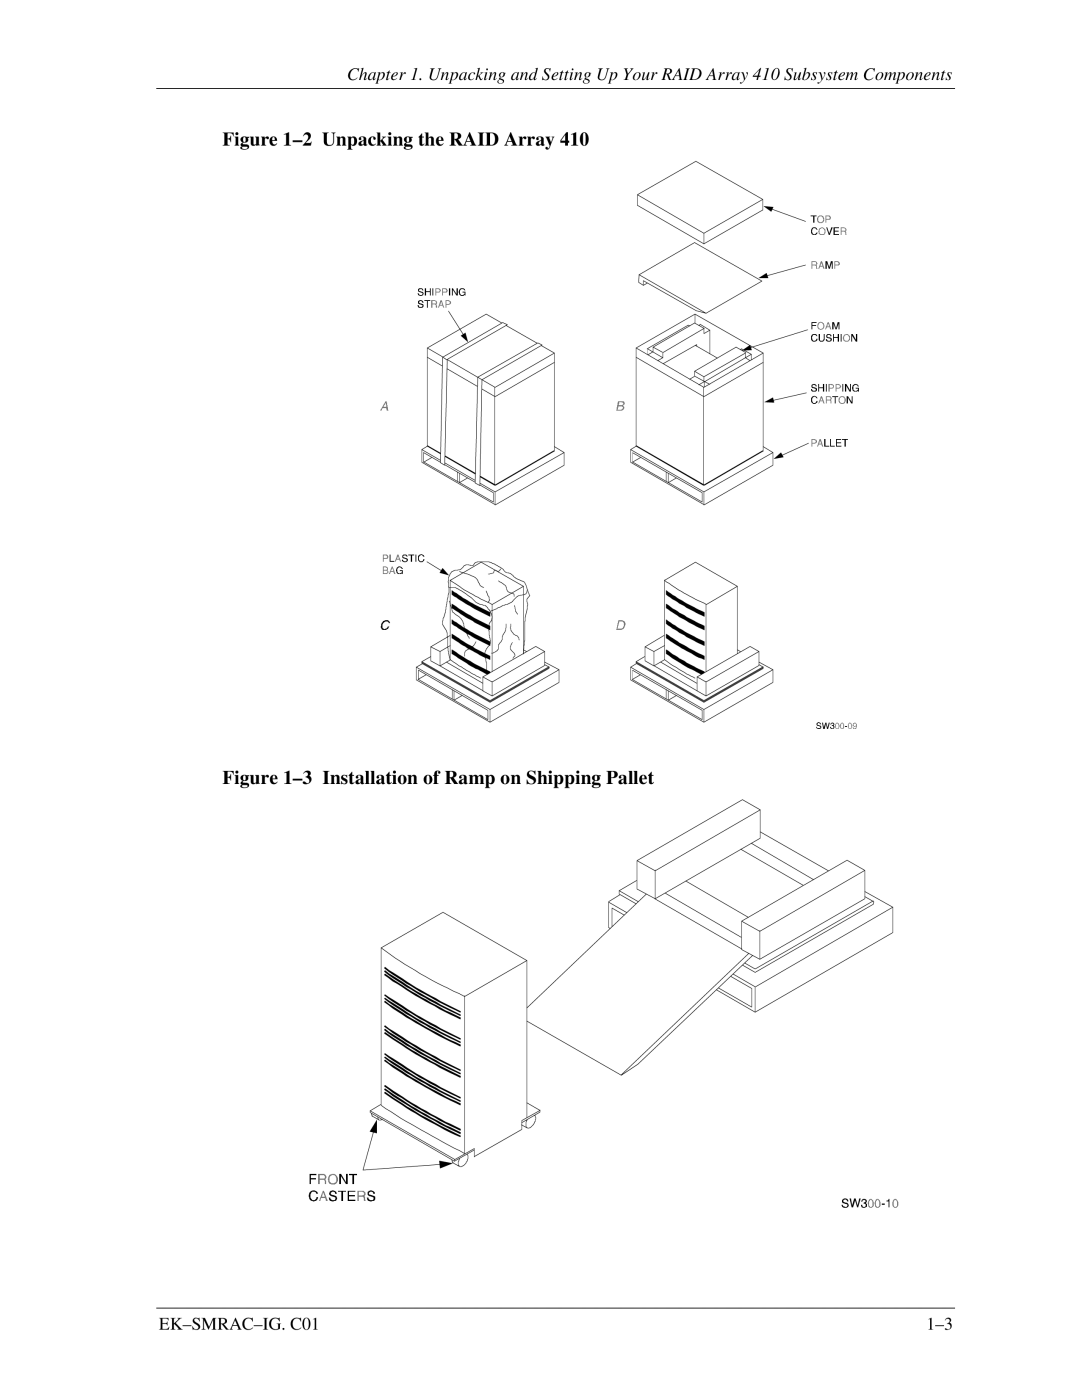
Figure
1–2
Unpacking the RAID Array 410
Figure
1–3
Installation of Ramp on Shipping Pallet
EK–SMRAC–IG.
C01
1–3
Page 14
Page 16
Page 15
Image 15
Page 14
Page 16
Contents
Order Number: EK–SMRAC-IG.C01
Installation Guide
Getting Started
RAID Array 410 for Windows NT – Intel
Third Edition, June
Contents
Figures
Appendix A Configuration Records – Blank Forms
Revision Record
Revision Level
Date
Page
Document Structure
About This Guide
Chapter 2: Host Adapter Installation
Audience
viii
Appendix A: Configuration Record
Associated Documents
Conventions
6.Creating an Initial Configuration Chapter
Installation “Checklist”
Pre-installationSteps
Perform a System Backup
∙The associated system hardware manuals
Page
1.1Site Preparation
1.3Removing the RAID Array 410 from the Pallet
1.2Unpacking the RAID Array 410 SWXRA-Yx
Figure 1–2Unpacking the RAID Array
Figure 1–3Installation of Ramp on Shipping Pallet
1.4Placing the RAID Array 410 Enclosure
1.6.2 Installing PC Program Card in Controller
1.6.1 PC Program Card Handling Precautions
Figure 1–4PC Program Card Slot Location
1.7Connecting the Controller to Computer
Page
EK–SMRAC–IG.C01
Page
Page
2.1Install the Host Adapter
Host Adapter Installation – Intel-basedSystem
2.1.2 Installing the Host Adapter
2.1.1 Preparing to Install the Host Adapter
Figure 2–1Connecting SCSI Cable
2.2Installing the Subsystem
EK–SMRAC–IG.C01
2.4.1 Windows NT Not Installed on System
2.3Configuration Utilities
2.4.2 Windows NT Previously Installed
Congratulations
Page
3.1RAID Manager for Windows NT
3.4Setting Controller Communications
3.3Installing the RAID Manager Software
3.5Setting the Controller Configuration
Click on OK after making the above selections
3.6Creating an Initial Configuration
3.6.1 Displaying Physical/Logical View of System
NOTES
6.Choose Modify from the choices listed
3.6.2 Practice Example: Creating a Single Disk
3.6.3 Practice Example: Creating a Stripeset
3.6.4 Practice Example: Creating a Mirrorset
3.6.5 Practice Example: Adding a Spare Disk
3.6.6 Practice Example: Deleting Storagesets
Congratulations
3.7Saving the RAID Configuration
Target
Date__________________
Name of RAIDset
Type of RAIDset
Page
4.1.1 Verifying that hszdisk.sys Loaded
4.1Completing Configurations under Windows NT
1.Select Program Manager
4.1.2 Completing a New RAID Array Configuration
2.Select Administrative Tools
3.Select Disk Administrator
Figure 4–3Disk Administrator Screen Display
Understanding the Disk Administrator Display
Before proceeding, you should verify the following
3.Optional: Make disk logical names permanent
Figure 4–6Tools Pull-DownChoices
EK–SMRAC–IG.C01
4.1.3Changes to RAID Array Configuration
EK–SMRAC–IG.C01
Configuration Records – Blank Forms
Disks Used
Date__________________
Name of RAIDset Type of RAIDset
Target
Target
Appendix A. Configuration Records – Blank Forms
Date__________________
Name of RAIDset Type of RAIDset
Disks Used
Date__________________
Name of RAIDset Type of RAIDset
Target
Accessing the Command Line Interpreter CLI
B.1 What is the CLI?
B.2 Accessing the CLI
3.Set the communications parameters to
Manual Rating
Reader’s Comments
Most-LikedFeatures Least-LikedFeatures
Manual Order Number