4 MENU SWITCH SETTING
4-8 RECORDING CURRENT ADJUSTMENT
Thanks to this function, it is not necessary to adjust the recording current each time the tape is changed. When a tape with a different optimum recording current is used, this function allows you to take advantage of this tape’s performance. If automatic adjustment is performed on a tape which has been used many times, its optimum recording current may be quite different from that of a new tape. In this case, perform automatic adjustment using the new tape.
4 MENU SWITCH SETTING |
|
| ||||||
|
| |||||||
|
|
|
|
|
|
| VIDEO CASSETTE RECORDER |
|
AUDIO INPUT / AUDIO MONITOR SELECT |
|
|
| POWER | ||||
SDI | CH1 | CH2 | CH3 | CH4 | SIF |
|
|
|
AES/EBU | CH1 | CH2 | CH3 | CH4 | LINE |
| ON | I |
L |
|
|
| |||||
ANALOG | CH1 | CH2 | CH3 | CH4 | CPN | COMPONENT DIGITAL | OFF | O |
R |
|
|
|
|
|
| ||
|
|
|
|
|
| Variable Motion |
| |
CH1 | CH2 |
| CH3 | CH4/TRACKING |
|
|
|
|
|
|
|
|
| CTL TC UB DF SERVO CF GEN 16:9 AP 525 | CONDITIONCOUNTER | RESET VCON REMOTE |
|
|
|
|
|
| AUTO OFF P.READ V.VAR PB/EE REMOTE 625 | UB |
|
|
|
|
|
|
|
|
| PB |
|
|
|
|
|
|
| MENU | SET HOLD PB/EE |
|
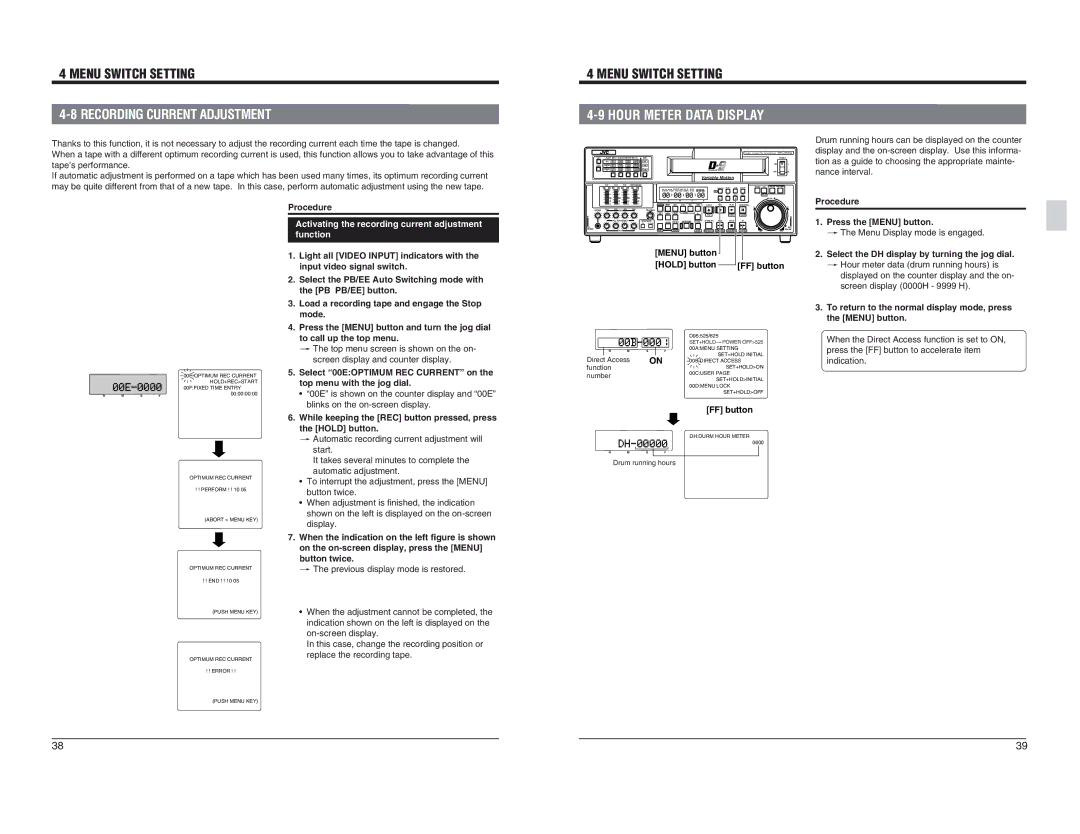
Drum running hours can be displayed on the counter display and the
|
|
|
|
|
|
|
|
|
| 00E:OPTIMUM REC CURRENT |
|
|
|
|
|
|
|
|
|
| HOLD+REC>START |
|
|
|
|
|
|
|
|
|
| 00F:FIXED TIME ENTRY |
H | M | S |
|
|
| F | 00:00:00:00 | |||
OPTIMUM REC CURRENT ! ! PERFORM ! ! 10 05
(ABORT > MENU KEY)
OPTIMUM REC CURRENT ! ! END ! ! 10 05
(PUSH MENU KEY)
OPTIMUM REC CURRENT
Procedure
Activating the recording current adjustment function
1.Light all [VIDEO INPUT] indicators with the input video signal switch.
2.Select the PB/EE Auto Switching mode with the [PB PB/EE] button.
3.Load a recording tape and engage the Stop mode.
4.Press the [MENU] button and turn the jog dial to call up the top menu.
[ The top menu screen is shown on the on- screen display and counter display.
5.Select “00E:OPTIMUM REC CURRENT” on the top menu with the jog dial.
•“00E” is shown on the counter display and “00E” blinks on the
6.While keeping the [REC] button pressed, press the [HOLD] button.
[ Automatic recording current adjustment will start.
It takes several minutes to complete the automatic adjustment.
•To interrupt the adjustment, press the [MENU] button twice.
•When adjustment is finished, the indication shown on the left is displayed on the
7.When the indication on the left figure is shown on the
[ The previous display mode is restored.
•When the adjustment cannot be completed, the indication shown on the left is displayed on the
In this case, change the recording position or replace the recording tape.
|
|
|
|
|
|
|
|
|
| STILL |
|
| H | M | S |
| F |
|
|
|
|
| ASSEM VIDEO DA1 | DA2 | DA3 | DA4 | EJECT | REC | PLAY | PAUSE/STILL |
| |
|
|
|
|
|
|
|
|
| X1 | |
PHONES CH1 CH2 REC CH3 CH4 | TRACKING |
|
|
|
|
|
|
|
|
|
| IN | ENTRY OUT | INSERT |
| TC | TOP |
| VIDEO | AUDIO |
|
PULL FOR VARIABLE | METER MODE | CANCEL PREVIEW | AUTO EDIT | PREROLL | STAND BY | REW | STOP | FF |
| |
PULL |
|
|
|
|
|
|
|
|
| PULL |
RELEASE | SHIFT | REVIEW |
|
|
|
|
|
|
| RELEASE |
PLAY |
|
| USER | SERVO/SYS | TIME CODE ON SCREEN | OTHERSREV | FWD | |||
| [MENU] button |
|
|
| ||||||
| [HOLD] button |
| [FF] button | |||||||
|
|
| D95:525/625 |
|
|
| SET+HOLD[POWER OFF>525 |
H | M | S | 00A:MENU SETTING |
F | |||
Direct Access | ON | SET+HOLD INITIAL | |
00B:DIRECT ACCESS | |||
function |
|
| SET+HOLD>ON |
number |
|
| 00C:USER PAGE |
|
| SET+HOLD>INITIAL | |
|
|
| |
|
|
| 00D:MENU LOCK |
|
|
| SET+HOLD>OFF |
|
|
| [FF] button |
|
|
| DH:DURM HOUR METER |
|
|
| 0600 |
H | M | S | F |
| Drum running hours | ||
Procedure
1.Press the [MENU] button.
[ The Menu Display mode is engaged.
2.Select the DH display by turning the jog dial.
[ Hour meter data (drum running hours) is displayed on the counter display and the on- screen display (0000H - 9999 H).
3.To return to the normal display mode, press the [MENU] button.
When the Direct Access function is set to ON, press the [FF] button to accelerate item indication.
! ! ERROR ! !
(PUSH MENU KEY)
38 | 39 |