4 MENU SWITCH SETTING |
|
Up to five menu switch settings can be registered on the user page (User Page function). |
The User Page function allows you to register frequently used menu switches for quicker access when you want |
4 MENU SWITCH SETTING
4-6 USER PAGE REGISTRATION/CHANGE/DELETE (User page function) (con't)
to change the settings. |
|
| Procedure |
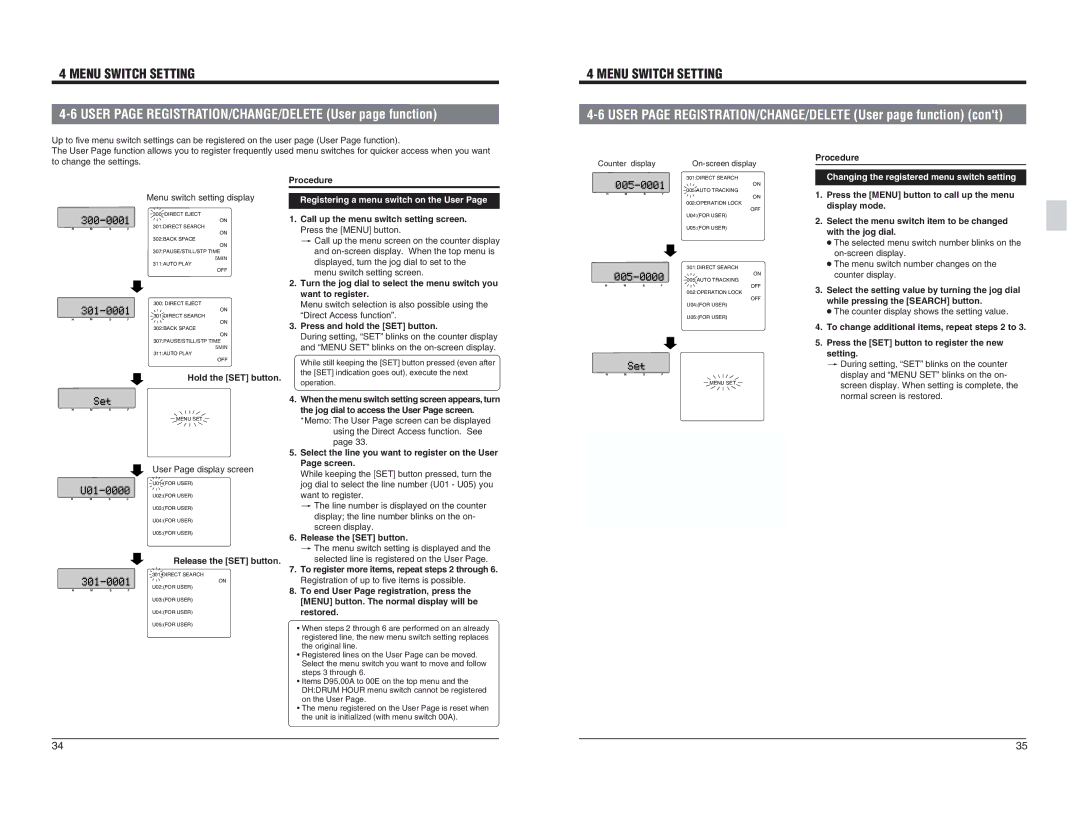
Menu switch setting display | Registering a menu switch on the User Page |
|
Counter | display |
| |||||||||||
|
|
|
|
|
|
|
|
|
|
|
|
| 301:DIRECT SEARCH |
|
|
|
|
|
|
|
|
|
|
|
|
| ON |
H |
| M |
|
|
|
|
| S |
|
|
| 005:AUTO TRACKING | |
|
|
|
|
|
| F | ON | ||||||
|
|
|
|
|
|
|
|
|
|
|
|
| |
|
|
|
|
|
|
|
|
|
|
|
|
| 002:OPERATION LOCK |
|
|
|
|
|
|
|
|
|
|
|
|
| OFF |
Procedure
Changing the registered menu switch setting
1. Press the [MENU] button to call up the menu |
display mode. |
HMSF
HMSF
HMSF
HMSF
HMSF
300: DIRECT EJECT ON 301:DIRECT SEARCH ON 302:BACK SPACE ON 307:PAUSE/STILL/STP TIME 5MIN 311:AUTO PLAY OFF
300: DIRECT EJECT ON 301:DIRECT SEARCH ON 302:BACK SPACE ON 307:PAUSE/STILL/STP TIME 5MIN 311:AUTO PLAY OFF
Hold the [SET] button.
MENU SET
User Page display screen U01:(FOR USER) U02:(FOR USER) U03:(FOR USER) U04:(FOR USER) U05:(FOR USER)
Release the [SET] button.
301:DIRECT SEARCH ON U02:(FOR USER)
U03:(FOR USER)
U04:(FOR USER)
U05:(FOR USER)
1.Call up the menu switch setting screen. Press the [MENU] button.
[ Call up the menu screen on the counter display and
menu switch setting screen.
2.Turn the jog dial to select the menu switch you want to register.
Menu switch selection is also possible using the ÒDirect Access functionÓ.
3.Press and hold the [SET] button.
During setting, ÒSETÓ blinks on the counter display and ÒMENU SETÓ blinks on the
While still keeping the [SET] button pressed (even after the [SET] indication goes out), execute the next operation.
4. | When the menu switch setting screen appears, turn |
| the jog dial to access the User Page screen. |
| *Memo: The User Page screen can be displayed |
| using the Direct Access function. See |
| page 33. |
5. | Select the line you want to register on the User |
| Page screen. |
| While keeping the [SET] button pressed, turn the |
| jog dial to select the line number (U01 - U05) you |
| want to register. |
| [ The line number is displayed on the counter |
| display; the line number blinks on the on- |
| screen display. |
6. | Release the [SET] button. |
| [ The menu switch setting is displayed and the |
| selected line is registered on the User Page. |
7. | To register more items, repeat steps 2 through 6. |
| Registration of up to five items is possible. |
8. | To end User Page registration, press the |
| [MENU] button. The normal display will be |
| restored. |
¥When steps 2 through 6 are performed on an already registered line, the new menu switch setting replaces the original line.
¥Registered lines on the User Page can be moved. Select the menu switch you want to move and follow steps 3 through 6.
¥Items D95,00A to 00E on the top menu and the DH:DRUM HOUR menu switch cannot be registered on the User Page.
¥The menu registered on the User Page is reset when the unit is initialized (with menu switch 00A).
|
|
|
| U04:(FOR USER) |
|
|
|
| U05:(FOR USER) |
|
|
|
| 301:DIRECT SEARCH |
|
|
|
| ON |
|
|
|
| 005:AUTO TRACKING |
H | M | S | F | OFF |
|
|
|
| 002:OPERATION LOCK |
|
|
|
| OFF |
|
|
|
| U04:(FOR USER) |
|
|
|
| U05:(FOR USER) |
H | M | S | F |
|
|
|
|
| MENU SET |
2. | Select the menu switch item to be changed |
| with the jog dial. |
| ● The selected menu switch number blinks on the |
|
|
| ● The menu switch number changes on the |
| counter display. |
3. | Select the setting value by turning the jog dial |
| while pressing the [SEARCH] button. |
| ● The counter display shows the setting value. |
4. | To change additional items, repeat steps 2 to 3. |
5. | Press the [SET] button to register the new |
| setting. |
| [ During setting, ÒSETÓ blinks on the counter |
| display and ÒMENU SETÓ blinks on the on- |
| screen display. When setting is complete, the |
| normal screen is restored. |
34 | 35 |