13 |
|
|
|
| ||||
| ||||||||
TIME CODE |
|
|
|
|
| |||
DATA0 77 | 6 | 5 | 4 | 3 | 2 | 1 | 0 | |
| 7 | |||||||
| D1 401p 401p 401p 401p 400p 400p 400p 400p | |||||||
| D2 |
|
|
|
|
|
|
|
Corresponding menu switches |
|
|
|
| ||||
No. | Menu switch name |
| Setting |
| Set value | |||
400p | VITC |
|
| 7 |
| 0 |
| |
| (625) |
|
|
| : |
| : |
|
|
|
|
|
| 22 |
| 15 |
|
401p | VITC |
|
| 7 |
| 0 |
| |
| (625) |
|
|
| : |
| : |
|
|
|
|
|
| 22 |
| 15 |
|
TIME CODE |
|
|
|
|
| |||
DATA0 78 |
|
|
|
|
|
|
| |
| 7 | 6 | 5 | 4 | 3 | 2 | 1 | 0 |
| D1 |
|
| 421 | 421 |
|
|
|
| D2 |
|
|
|
|
|
|
|
Corresponding menu switches |
|
|
|
| ||||
No. | Menu switch name |
| Setting |
| Set value | |||
ON SCREEN |
|
|
|
|
| ||||
DATA0 83 | 7 | 6 | 5 | 4 | 3 | 2 | 1 | 0 | |
|
| ||||||||
| D1 | 504 | 504 | 513 | 512 | 504 |
|
|
|
| D2 |
|
|
|
|
|
|
|
|
Corresponding menu switches |
|
|
|
| |||||
No. | Menu switch name |
| Setting |
| Set value | ||||
504 | INFORMATION |
| TIME |
|
|
| 0 | ||
| SELECT |
|
| TIME + MODE |
| 1 | |||
|
|
|
|
| TIME + SUBTC |
| 3 | ||
|
|
|
|
| TIME + SUBTC |
| 4 | ||
|
|
|
|
| + MODE |
|
|
| |
512 | MUTING/ALARM |
| OFF |
|
|
| 0 | ||
| MESSAGE |
|
| ON |
|
|
| 1 | |
513 | EDIT ON SCREEN |
| OFF |
|
|
| 0 | ||
|
|
|
|
| ON |
|
|
| 1 |
TBC |
|
|
|
|
|
|
| ||
DATA0 84 | 7 | 6 | 5 | 4 | 3 | 2 | 1 | 0 | |
|
| ||||||||
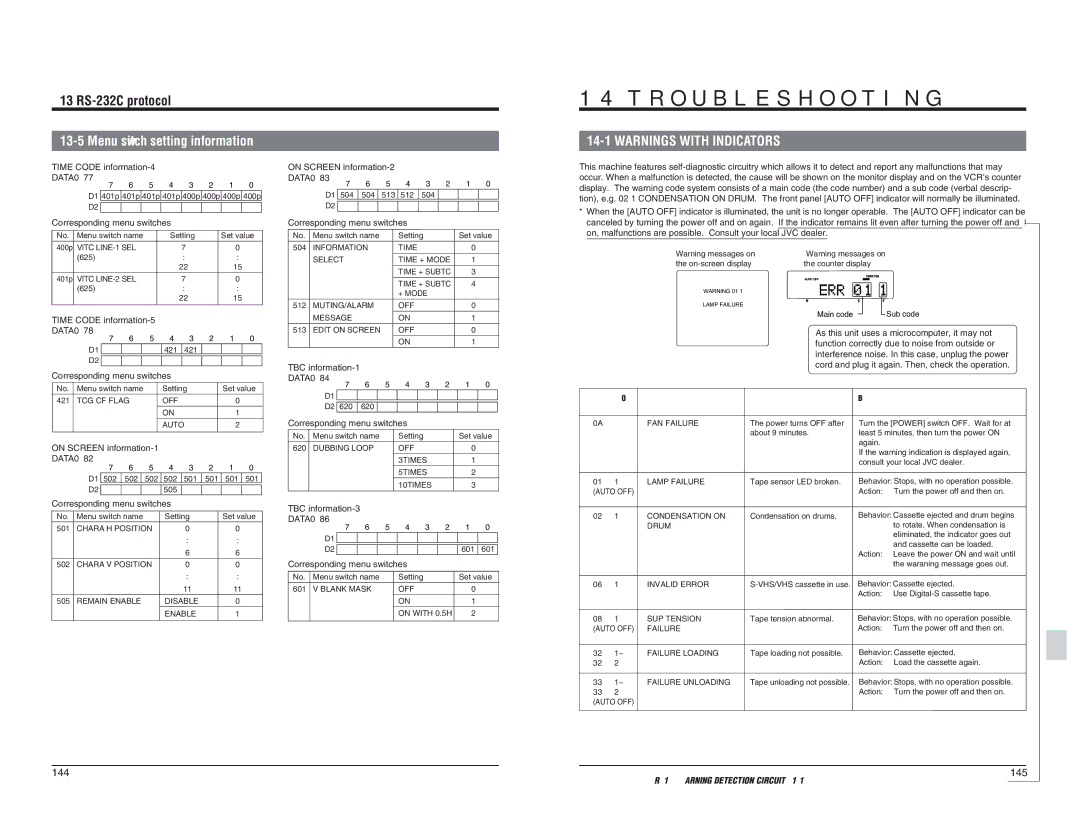
14 TROUBLESHOOTING
This machine features
*When the [AUTO OFF] indicator is illuminated, the unit is no longer operable. The [AUTO OFF] indicator can be canceled by turning the power off and on again. If the indicator remains lit even after turning the power off and ← on, malfunctions are possible. Consult your local JVC dealer.
Warning messages on | Warning messages on | |||||
the | the counter display |
| ||||
| AUTO OFF |
|
| CONDITION |
| |
WARNING 01 1 |
|
|
|
|
|
|
LAMP FAILURE | H | M | S | F | ||
|
|
|
|
|
| |
Main code | Sub code |
As this unit uses a microcomputer, it may not | |
function correctly due to noise from outside or | |
interference noise. In this case, unplug the power | |
cord and plug it again. Then, check the operation. | |
421 TCG CF FLAG | OFF | 0 |
| ON | 1 |
D1 |
|
|
D2 | 620 | 620 |
Warning |
|
code |
|
Warning code information Behavior and actions to be taken
|
|
|
|
|
| AUTO |
| 2 |
| |
ON SCREEN |
|
|
|
|
| |||||
DATA0 82 | 7 | 6 |
| 5 | 4 | 3 | 2 | 1 | 0 | |
|
|
| ||||||||
| D1 | 502 | 502 |
| 502 | 502 | 501 | 501 | 501 | 501 |
| D2 |
|
|
|
|
|
|
|
|
|
|
|
|
|
| 505 |
|
|
|
| |
Corresponding menu switches |
|
|
|
| ||||||
No. | Menu switch name |
| Setting |
| Set value | |||||
501 | CHARA H POSITION |
| 0 |
| 0 |
| ||||
|
|
|
|
|
|
| : |
| : |
|
|
|
|
|
|
|
| 6 |
| 6 |
|
502 | CHARA V POSITION |
| 0 |
| 0 |
| ||||
|
|
|
|
|
|
| : |
| : |
|
Corresponding menu switches |
|
|
|
| ||||||||
No. | Menu switch name |
| Setting |
|
| Set value | ||||||
620 | DUBBING LOOP |
| OFF |
|
| 0 |
| |||||
|
|
|
|
|
|
| 3TIMES |
| 1 |
| ||
|
|
|
|
|
|
| 5TIMES |
| 2 |
| ||
|
|
|
|
|
|
| 10TIMES |
| 3 |
| ||
TBC |
|
|
|
|
|
|
|
|
| |||
DATA0 86 |
|
|
|
|
|
|
|
|
| |||
| 7 |
| 6 |
| 5 | 4 |
| 3 | 2 | 1 | 0 | |
| D1 |
|
|
|
|
|
|
|
|
|
|
|
|
|
|
|
|
|
|
|
|
|
|
| |
| D2 |
|
|
|
|
|
|
|
|
| 601 | 601 |
Corresponding menu switches |
|
|
|
| ||||||||
No. | Menu switch name |
| Setting |
|
| Set value | ||||||
0A |
| FAN FAILURE |
01 | 1 | LAMP FAILURE |
(AUTO OFF) |
| |
02 | 1 | CONDENSATION ON |
|
| DRUM |
The power turns OFF after about 9 minutes.
Tape sensor LED broken.
Condensation on drums.
Turn the [POWER] switch OFF. Wait for at | |
least 5 minutes, then turn the power ON | |
again. |
|
If the warning indication is displayed again, | |
consult your local JVC dealer. | |
Behavior: Stops, with no operation possible. | |
Action: | Turn the power off and then on. |
Behavior: Cassette ejected and drum begins | |
| to rotate. When condensation is |
| eliminated, the indicator goes out |
| and cassette can be loaded. |
Action: | Leave the power ON and wait until |
| the waraning message goes out. |
| 11 | 11 |
505 REMAIN ENABLE | DISABLE | 0 |
| ENABLE | 1 |
601 | V BLANK MASK | OFF | 0 |
|
| ON | 1 |
|
| ON WITH 0.5H | 2 |
06 | 1 | INVALID ERROR |
Action: Use |
08 | 1 |
(AUTO OFF) | |
321~
322
331~
33 | 2 |
(AUTO OFF) | |
SUP TENSION
FAILURE
FAILURE LOADING
FAILURE UNLOADING
Tape tension abnormal. | Behavior: Stops, with no operation possible. | |
| Action: | Turn the power off and then on. |
Tape loading not possible. | Behavior: Cassette ejected. | |
| Action: | Load the cassette again. |
Tape unloading not possible. | Behavior: Stops, with no operation possible. | |
| Action: | Turn the power off and then on. |
144 | 145 |
Refer to “1.8 WARNING DETECTION CIRCUIT” on page 1.12 of the service manual.