Sewing Machine Maquina DE Coser Machine a Coudre
Important Safety Instructions
Instrucciones DE Seguridad Importantes
Importantes Consignes DE Securite
Sears, Roebuck and Co., D/817 WA, Hoffman Estates, IL60179
Garantia
Artfculo
De la mquina
Sewing speed Maximum
Especificaci6n
Table of Contents
Indice
Partie III. Couture AU Point Droit suite
Tdentification des pices
Vilt
Oudet invisible
Section I. Names of Parts
Names of Parts
Mallette de transport ou meuble
Gabinete o estuche porttil
Partie 1. Identification DES Pli=CES DE
Identification des pices
141516 1819
Available Accessories and Attachments
Ref. No
Orderedper instructionsabove
Nombre Delarticulo MAQUtNA DE Coser
Accessoires disponibles
Accesorios y refacciones disponibles
Repuestos Sears para su envfoinmediato
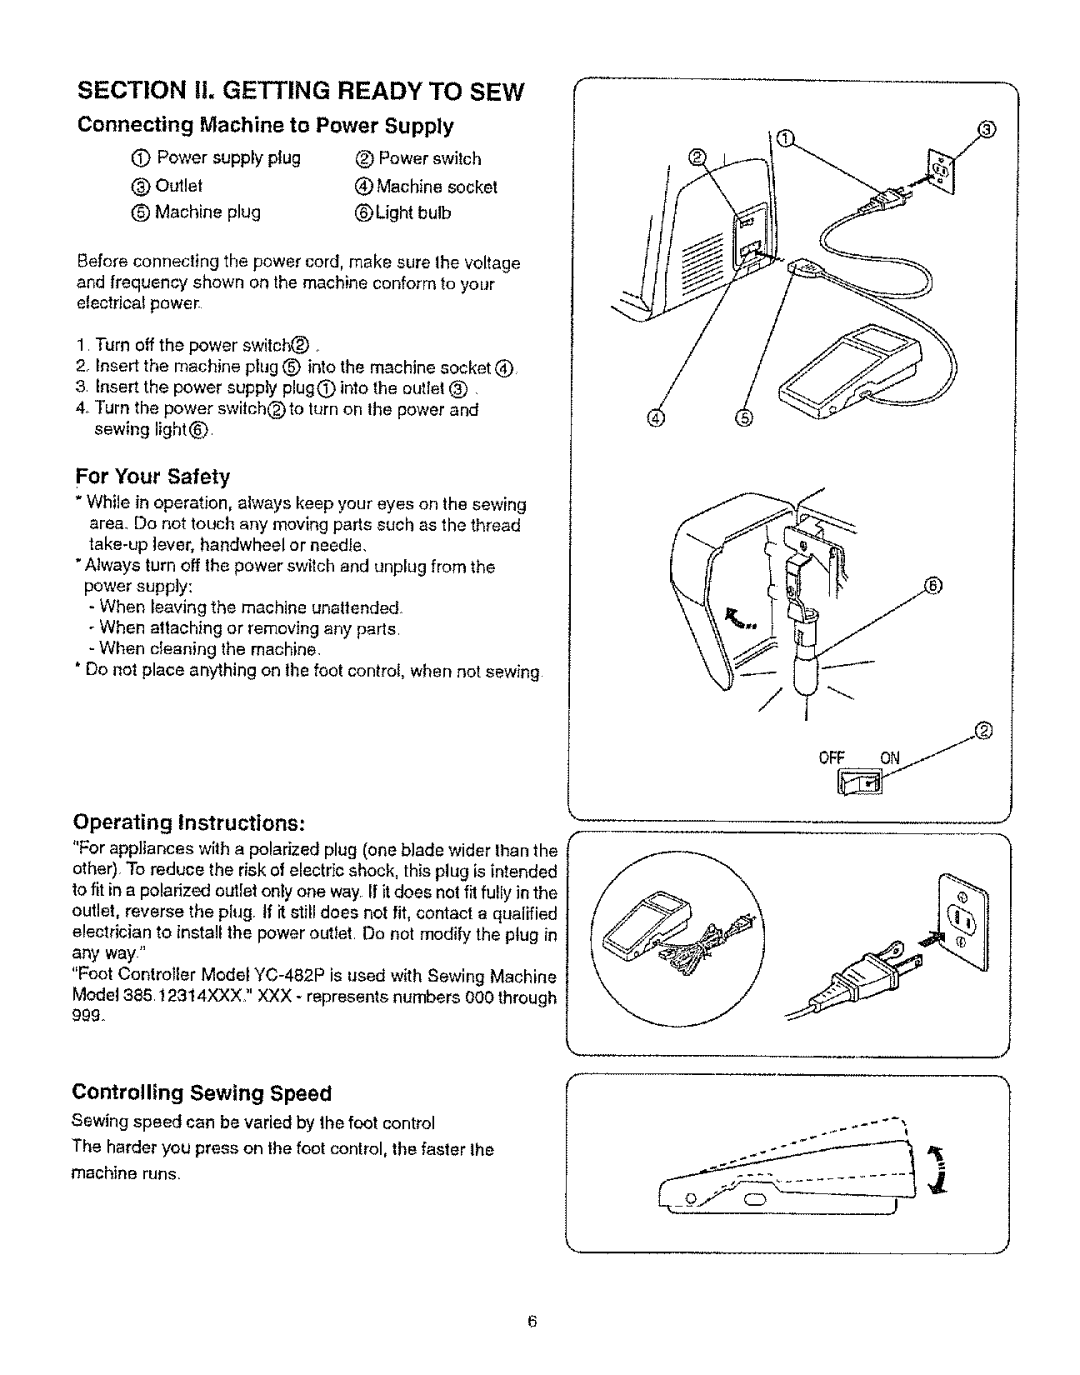
Operating Instructions
Connecting Machine to Power Supply
For Your Safety
Controlling Sewing Speed
Branchez la machine
Partie !i. PREPAREZ-VOUS ,8.COUDRE
Conexi6n de la mquina a la red elctrica
Control de la velocidad de costura
Presser Foot Lifter
Setting Spool Pins
Accessory Kit
Thread Cutter
Coupe-fil
Palanca de elevaci6n del prensatelas Relbve-pied presseur
Cortahilos
Cortahilos Coupe-fil
Free-arm Sewing
Changing Needle
Changing Presser Foot
For free-arm sewing
Inserte una
Brazo para costura tubular Utilisation du bras libre
Para costura tubular
Travaux sur le bras libre
Presser Foot Types
Prensatetas para ojal incorporado
Tipos de prensatelas Prensatelas para zig-zag
Prensatelas para puntada recta
Pied zig-zag
Universal
Selecting Needle and Thread
Very Light
Ball Point Orange Blue
Selecci6n de aguja e hilo
Universal
Azui
Vinyle, daim
Choix de raiguille et du fi
Tissu Type Daiguilte Daiauille
Denim, toile
Blankpage p.ginablanca pageblanche
Bobbin winding
Bobbin Winding
Removing bobbin case
C6mo sacar el portacanillas
Embobinado de la canilla
Remplir la canette
Embobinado de la canilla
Thread
Embobinado de la caniila Continuaci6n
Remplissage de la canette suite
Inserting bobbin
Colocaci6n de la canilla
Insertion de la canette
Threading the Machine
Threading the machine
Enfilage de la machine
Enhebrado del hilo de la aguja
Tirahilos
Hacia atrs o utitice
Tension is too tight
Adjust the Needle Thread Tension for
Correct tension
Si la tension est trop 4levee
Ajustede la tensi6n del hilo de la aguja para puntada recta
El bile estzi demastado tense
El hilo ester demasiado flojo
Tension is too loose
Adjust the Needle Thread Tension for Zigzag Stitch
Is too tight
El hilo estd demasiado flojo
Tension correcte
Endroit du tissu Envers du ttssu
El hilo estd demasiado tense
Stitch Length Control
Adjusting Stretch Stitch Balance
Stitch Selector
Equilibrio de los patrones distorsionados
Rdglage de la Iongueur du point
Finishing sewing
Straight Stitch
Turn a Square Corner
Use the Seam Guides
Couture dun angle droit
Partie IlL Couture AU Point Droit
Para girar en esquinas de ingulo recto Guiapara esquinas
Zipper Sewing
La couture des fermetures glissire
Costura a la vista
SurpiqQre
Zipper Sewing
To sew
Costura de cremalleras continuaci6n = Para coser
Couture des fermetures glissibre suite La couture
Dents de la fermeture Ruban de la fermeture Fnvers du tissu
La tela
P38
Using the Darning Plate
Darning
Thread tension
Platine repriser
Uo de la tapa zurcidora
Zurcido
Reprisage
Basic Zigzag
Satin Stitch
Puntada en satfn
Puntada de zig-zag
Partie IV. Points ZIG-ZAG Zig-zag simple
Point de bourdon
Stitch selector Length To t
Applique
Monogramming
Stitch Selector Length Needle
Monogrammes
Monogramas
Aplicaciones Appliques
Decorativa
Needle thread tension
Bar Tacking
Button Sewing
Costura de botones Posedesboutons
Puntada de refuerzo
Brides De renfort
Du point
Lower the presser foot
Overcasting Stitch
Stitch Selector Or F Length Needle
Dobladillo invisible
Puntada de sobrehilado
Surfilage
Presser foot Zigzag foot
LaceWork
Stitch Selector Length Needle thread tension
Needle thread tension 1 to
Puntada de multiple zig-zag
Trabajos con encajes
Dentelle
Point Zig-zag Multiple
Needle thread tension 3 to
Decorative Stitch of Geometric Patterns
Shell Stitch
Stitch Selector
Puntada en forma de concha Point Coquille
3a9
Straight Stretch
Ttl
Rick-rack Stretch
Stitch length Needle thread tension Presser foot
Extensi6n de Rick-rack
Seccion Vl. Puntadas Elasticas Partie Vl, Points
Puntada recta triple Point droit extensible
Zig-zag Croquet extensible
Tension 1 to4
Serging
Overcast Stretch Stitching
Place raw edge of fabric to the left of the needle as
De a tongitud
Puntada eldstica de sobrehilado Surjetage extensible
Puntada de dobladillo
De la lengitud
You can also use this Stitch in patchwork quilting
Feather Stitch
Length
Sew this pattern Seam that is already joined
Longueurdu point
Point Ddpines
Slecteur de point
Tension du fil suprieur
Section VII. Buttonhole
Buttonhole
Ojal incorporado
SECClON
Partie Vii. Boutonniire
Boutonnibre
Buttonhole
Boutonnibre suite
Ojal continuaci6n
Section VIII. Care of Your Machine
Replacing the Light Bulb
Limpieza de los dientes del transporte
Remplacement de Iampoule
Cambiando la bombilla
Cleaning the Shuttle Race
Cleaning the shuttle area 3Bobbin case Levers
Limpieza de la corredera de la lanzadera
Limpie el drea de la lanzadera Nettoyage de la navette
Oil shuttle area
Oiling the Machine
Oil behind the face cover
Huilage du socie
Lubricaci6n de la mdquina Huilage de la machine
Lubrique los puntos indicados en la irustraciSn
Distorted
Troubleshooting
Seam puckering Cloth is not
Is incorrectly inserted
AI coser saltan algunas 1, La aguja no est& bien colocada
Portabonina y lazadera
Canilla+
Uniformemente
Le fil de la canette se casse Laigui!le se casse
En cas de problbme ProblmeCause
Reference
La couture fronce
U.S.A or Canada
Call 24 hours a day, 7 days a week