NTI NODEMUX SERIES UNIVERSAL KVM SWITCH
7.For Units with Touch-screen support (-TSO option)
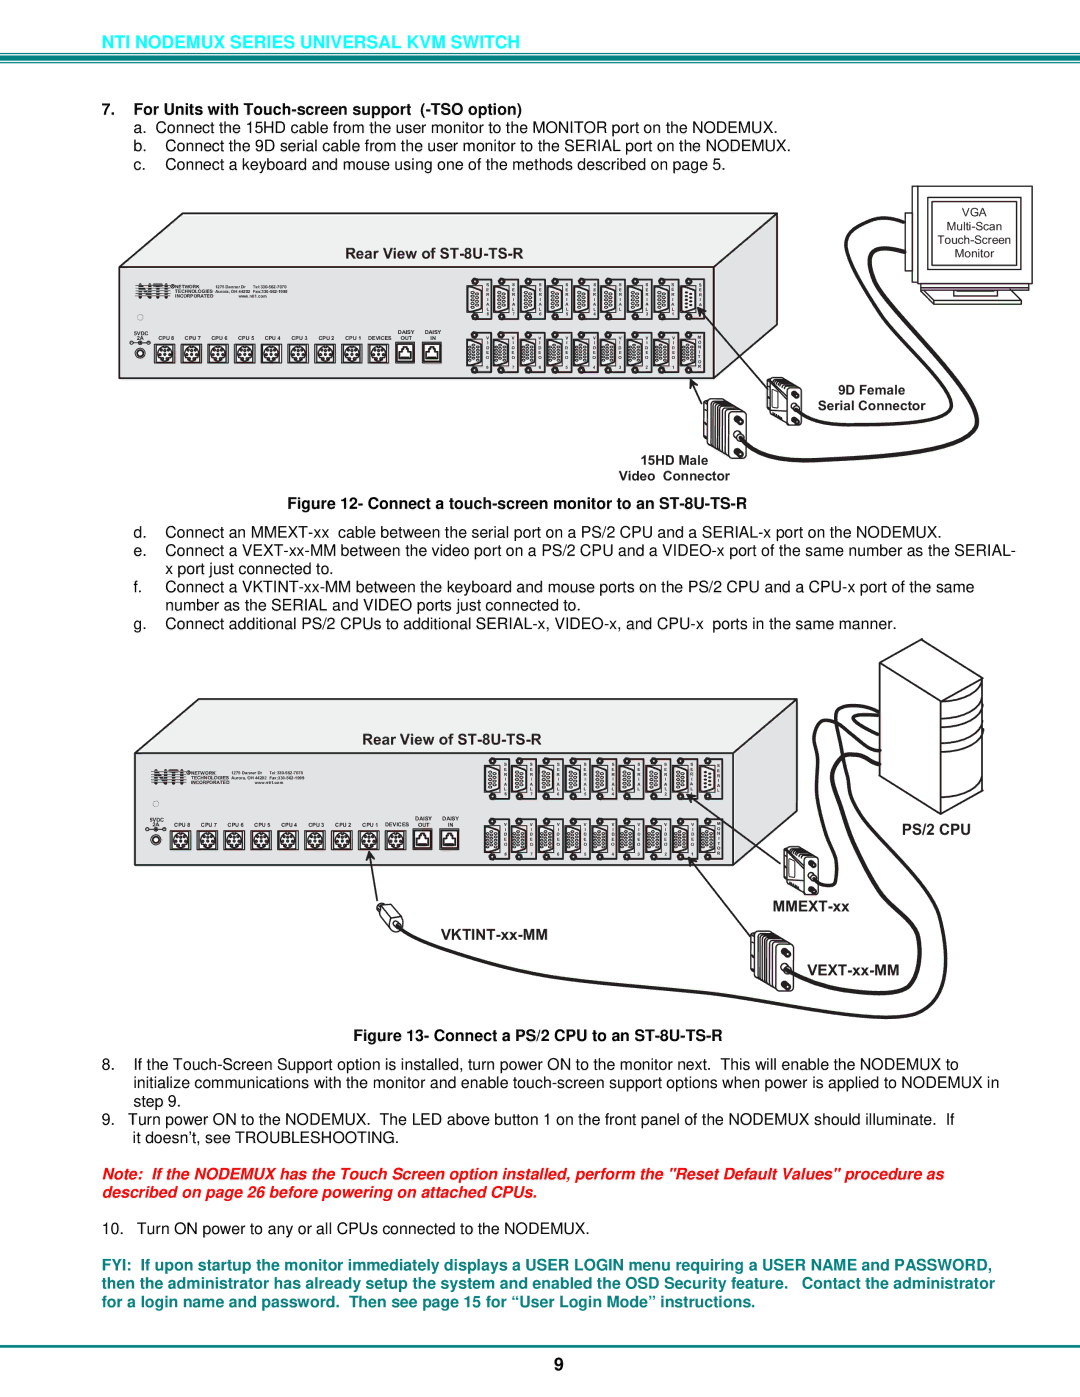
a.Connect the 15HD cable from the user monitor to the MONITOR port on the NODEMUX.
b.Connect the 9D serial cable from the user monitor to the SERIAL port on the NODEMUX.
c.Connect a keyboard and mouse using one of the methods described on page 5.
RearViewofST-8U-TS-R
| RNETWORK | 1275DannerDr |
|
|
|
|
| S | S | S | S | S | S | S | S | S | |||
|
|
|
|
|
| E | E | E | E | E | E | E | E | E | |||||
|
|
|
|
|
| ||||||||||||||
NTINCORPORATED | www.nti1.com |
|
|
|
|
| R | R | R | R | R | R | R | R | R | ||||
|
|
|
|
|
|
|
|
|
|
| I | I | I | I | I | I | I | I | I |
|
|
|
|
|
|
|
|
|
|
| A | A | A | A | A | A | A | A | A |
|
|
|
|
|
|
|
|
|
|
| L | L | L | L | L | L | L | L | L |
|
|
|
|
|
|
|
|
|
|
| 8 | 7 | 6 | 5 | 4 |
| 2 | 1 |
|
5VDC |
|
|
|
|
|
|
| DAISY | DAISY |
|
|
|
|
|
|
|
| M | |
2A | CPU8 | CPU7 | CPU6 | CPU5 | CPU4 | CPU3 | CPU2 | CPU1 DEVICES | OUT | IN | V | V | V | V | V | V | V | V | |
- | + |
|
|
|
|
|
|
|
|
| I | I | I | I | I | I | I | I | O |
|
|
|
|
|
|
|
|
|
|
| D | D | D | D | D | D | D | D | N |
|
|
|
|
|
|
|
|
|
|
| E | E | E | E | E | E | E | E | I |
|
|
|
|
|
|
|
|
|
|
| O | O | O | O | O | O | O | O | T |
|
|
|
|
|
|
|
|
|
|
|
|
|
|
|
|
|
|
| O |
|
|
|
|
|
|
|
|
|
|
| 8 | 7 | 6 | 5 | 4 | 3 | 2 | 1 | R |
VGA
Monitor
9DFemale SerialConnector
15HDMale VideoConnector
Figure 12- Connect a touch-screen monitor to an ST-8U-TS-R
d.Connect an
e.Connect a
f.Connect a
g.Connect additional PS/2 CPUs to additional
RearViewofST-8U-TS-R
|
| S | S | S | S | S | S | S | S | S | |
RNETWORK | 1275DannerDr | E | E | E | E | E | E | E | E | E | |
R | R | R | R | R | R | R | R | R | |||
NTINCORPORATED | www.nti1.com | I | I | I | I | I | I | I | I | I | |
|
| A | A | A | A | A | A | A | A | A | |
|
| L | L | L | L | L | L | L | L | L | |
|
| 8 | 7 | 6 | 5 | 4 |
| 2 | 1 |
| |
5VDC |
|
|
|
|
|
|
| DAISY | DAISY |
|
|
|
|
|
|
|
| M | |
2A | CPU8 | CPU7 | CPU6 | CPU5 | CPU4 | CPU3 | CPU2 | CPU1 DEVICES | OUT | IN | V | V | V | V | V | V | V | V | |
- | + |
|
|
|
|
|
|
|
|
| I | I | I | I | I | I | I | I | O |
|
|
|
|
|
|
|
|
|
|
| D | D | D | D | D | D | D | D | N |
|
|
|
|
|
|
|
|
|
|
| E | E | E | E | E | E | E | E | I |
|
|
|
|
|
|
|
|
|
|
| O | O | O | O | O | O | O | O | T |
|
|
|
|
|
|
|
|
|
|
|
|
|
|
|
|
|
|
| O |
|
|
|
|
|
|
|
|
|
|
| 8 | 7 | 6 | 5 | 4 | 3 | 2 | 1 | R |
Figure 13- Connect a PS/2 CPU to an ST-8U-TS-R
PS/2CPU
MMEXT-xx

VEXT-xx-MM
8.If the
9.Turn power ON to the NODEMUX. The LED above button 1 on the front panel of the NODEMUX should illuminate. If
it doesn’t, see TROUBLESHOOTING.
Note: If the NODEMUX has the Touch Screen option installed, perform the "Reset Default Values" procedure as described on page 26 before powering on attached CPUs.
10. Turn ON power to any or all CPUs connected to the NODEMUX.
FYI: If upon startup the monitor immediately displays a USER LOGIN menu requiring a USER NAME and PASSWORD, then the administrator has already setup the system and enabled the OSD Security feature. Contact the administrator for a login name and password. Then see page 15 for “User Login Mode” instructions.
9