Techno Tidbits & Problem-solving
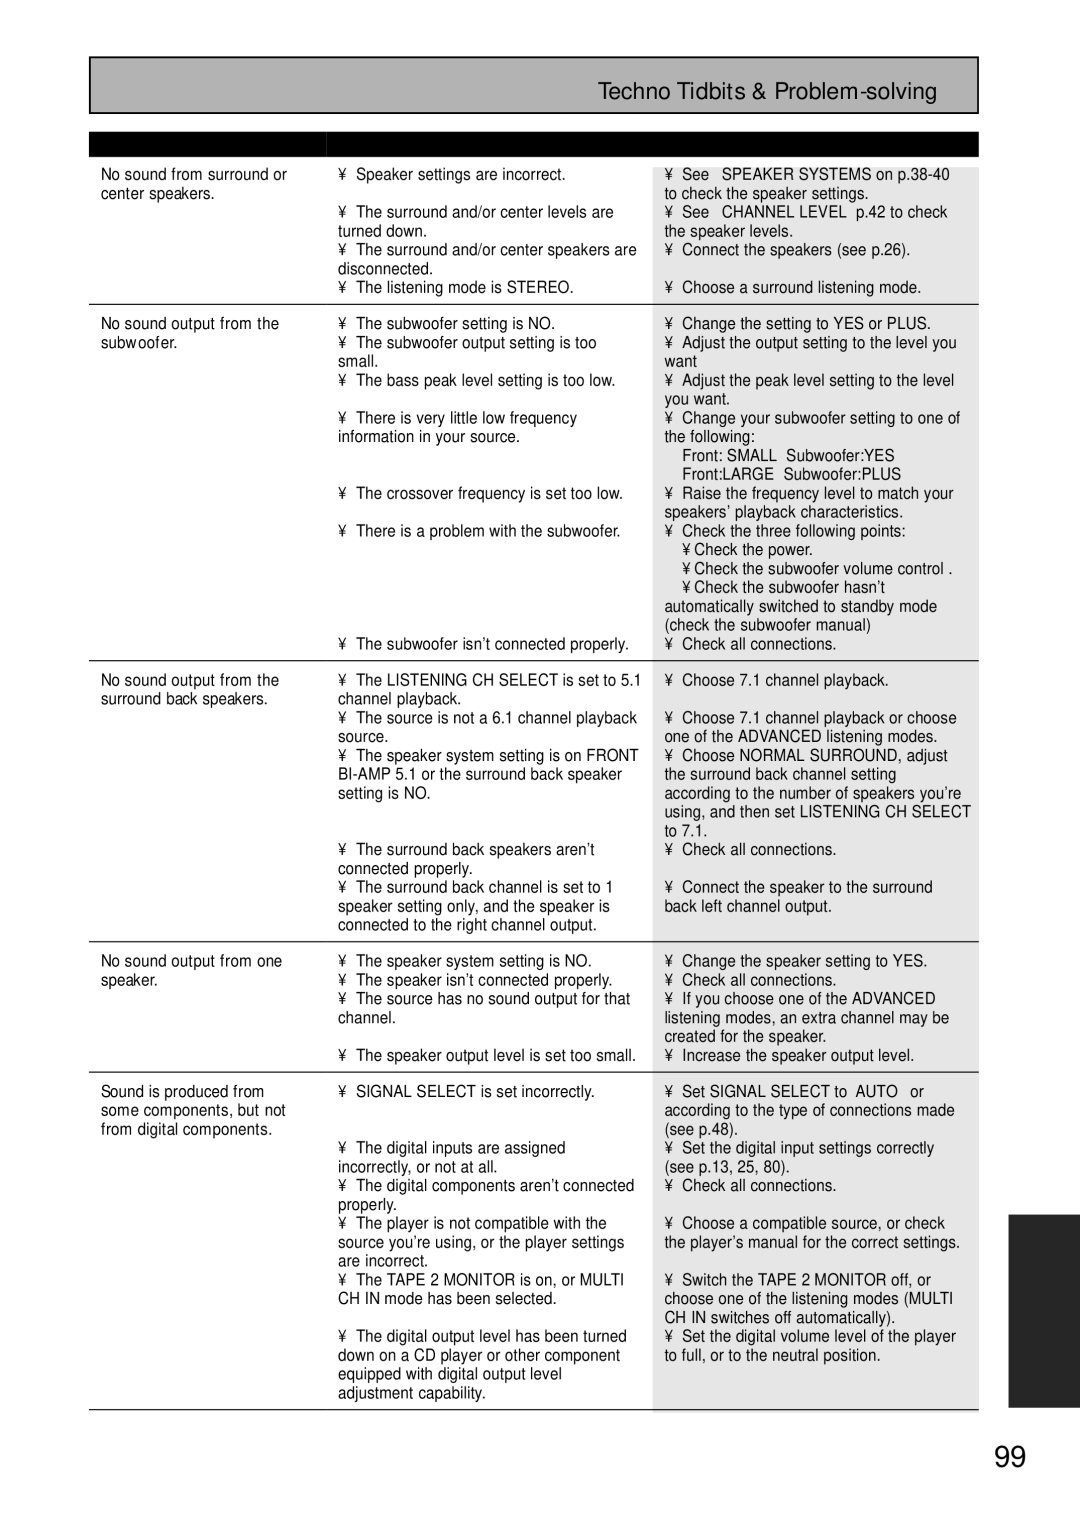
Symptom | Cause | Remedy |
| ||
No sound from surround or | • | Speaker settings are incorrect. |
|
|
|
• | See “SPEAKER SYSTEMS” on | ||||
center speakers. |
|
| to check the speaker settings. | ||
| • The surround and/or center levels are | • See “CHANNEL LEVEL” p.42 to check | |||
| turned down. | the speaker levels. | |||
| • The surround and/or center speakers are | • | Connect the speakers (see p.26). | ||
| disconnected. |
|
|
| |
| • The listening mode is STEREO. | • Choose a surround listening mode. | |||
No sound output from the | • | The subwoofer setting is NO. | • Change the setting to YES or PLUS. | ||
subwoofer. | • | The subwoofer output setting is too | • Adjust the output setting to the level you | ||
| small. | want |
| ||
| • | The bass peak level setting is too low. | • Adjust the peak level setting to the level | ||
|
|
| you want. |
| |
| • There is very little low frequency | • Change your subwoofer setting to one of | |||
| information in your source. | the following: |
| ||
|
|
|
| Front: SMALL | Subwoofer:YES |
|
|
|
| Front:LARGE | Subwoofer:PLUS |
| • | The crossover frequency is set too low. | • Raise the frequency level to match your | ||
|
|
| speakers' playback characteristics. | ||
| • | There is a problem with the subwoofer. | • Check the three following points: | ||
|
|
|
| • Check the power. | |
|
|
|
| • Check the subwoofer volume control . | |
|
|
|
| • Check the subwoofer hasn't | |
|
|
| automatically switched to standby mode | ||
|
|
| (check the subwoofer manual) | ||
| • The subwoofer isn't connected properly. | • | Check all connections. | ||
No sound output from the | • | The LISTENING CH SELECT is set to 5.1 | • | Choose 7.1 channel playback. | |
surround back speakers. | channel playback. |
|
|
| |
| • The source is not a 6.1 channel playback | • Choose 7.1 channel playback or choose | |||
| source. | one of the ADVANCED listening modes. | |||
| • The speaker system setting is on FRONT | • | Choose NORMAL SURROUND, adjust | ||
| the surround back channel setting | ||||
| setting is NO. | according to the number of speakers you're | |||
|
|
| using, and then set LISTENING CH SELECT | ||
|
|
| to 7.1. |
| |
| • The surround back speakers aren't | • | Check all connections. | ||
| connected properly. |
|
|
| |
| • The surround back channel is set to 1 | • Connect the speaker to the surround | |||
| speaker setting only, and the speaker is | back left channel output. | |||
| connected to the right channel output. |
|
|
| |
No sound output from one | • | The speaker system setting is NO. | • Change the speaker setting to YES. | ||
speaker. | • | The speaker isn't connected properly. | • | Check all connections. | |
| • The source has no sound output for that | • If you choose one of the ADVANCED | |||
| channel. | listening modes, an extra channel may be | |||
|
|
| created for the speaker. | ||
| • The speaker output level is set too small. | • Increase the speaker output level. | |||
Sound is produced from | • | SIGNAL SELECT is set incorrectly. | • | Set SIGNAL SELECT to “AUTO” or | |
some components, but not |
|
| according to the type of connections made | ||
from digital components. |
|
| (see p.48). |
| |
| • The digital inputs are assigned | • Set the digital input settings correctly | |||
| incorrectly, or not at all. | (see p.13, 25, 80). | |||
| • The digital components aren't connected | • | Check all connections. | ||
| properly. |
|
|
| |
| • The player is not compatible with the | • Choose a compatible source, or check | |||
| source you're using, or the player settings | the player's manual for the correct settings. | |||
| are incorrect. |
|
|
| |
| • The TAPE 2 MONITOR is on, or MULTI | • Switch the TAPE 2 MONITOR off, or | |||
| CH IN mode has been selected. | choose one of the listening modes (MULTI | |||
|
|
| CH IN switches off automatically). | ||
| • The digital output level has been turned | • Set the digital volume level of the player | |||
| down on a CD player or other component | to full, or to the neutral position. | |||
| equipped with digital output level |
|
|
| |
| adjustment capability. |
|
|
| |
|
|
|
|
|
|
EXPERT
99
En