Techno Tidbits & Problem-solving
Symptom | Cause |
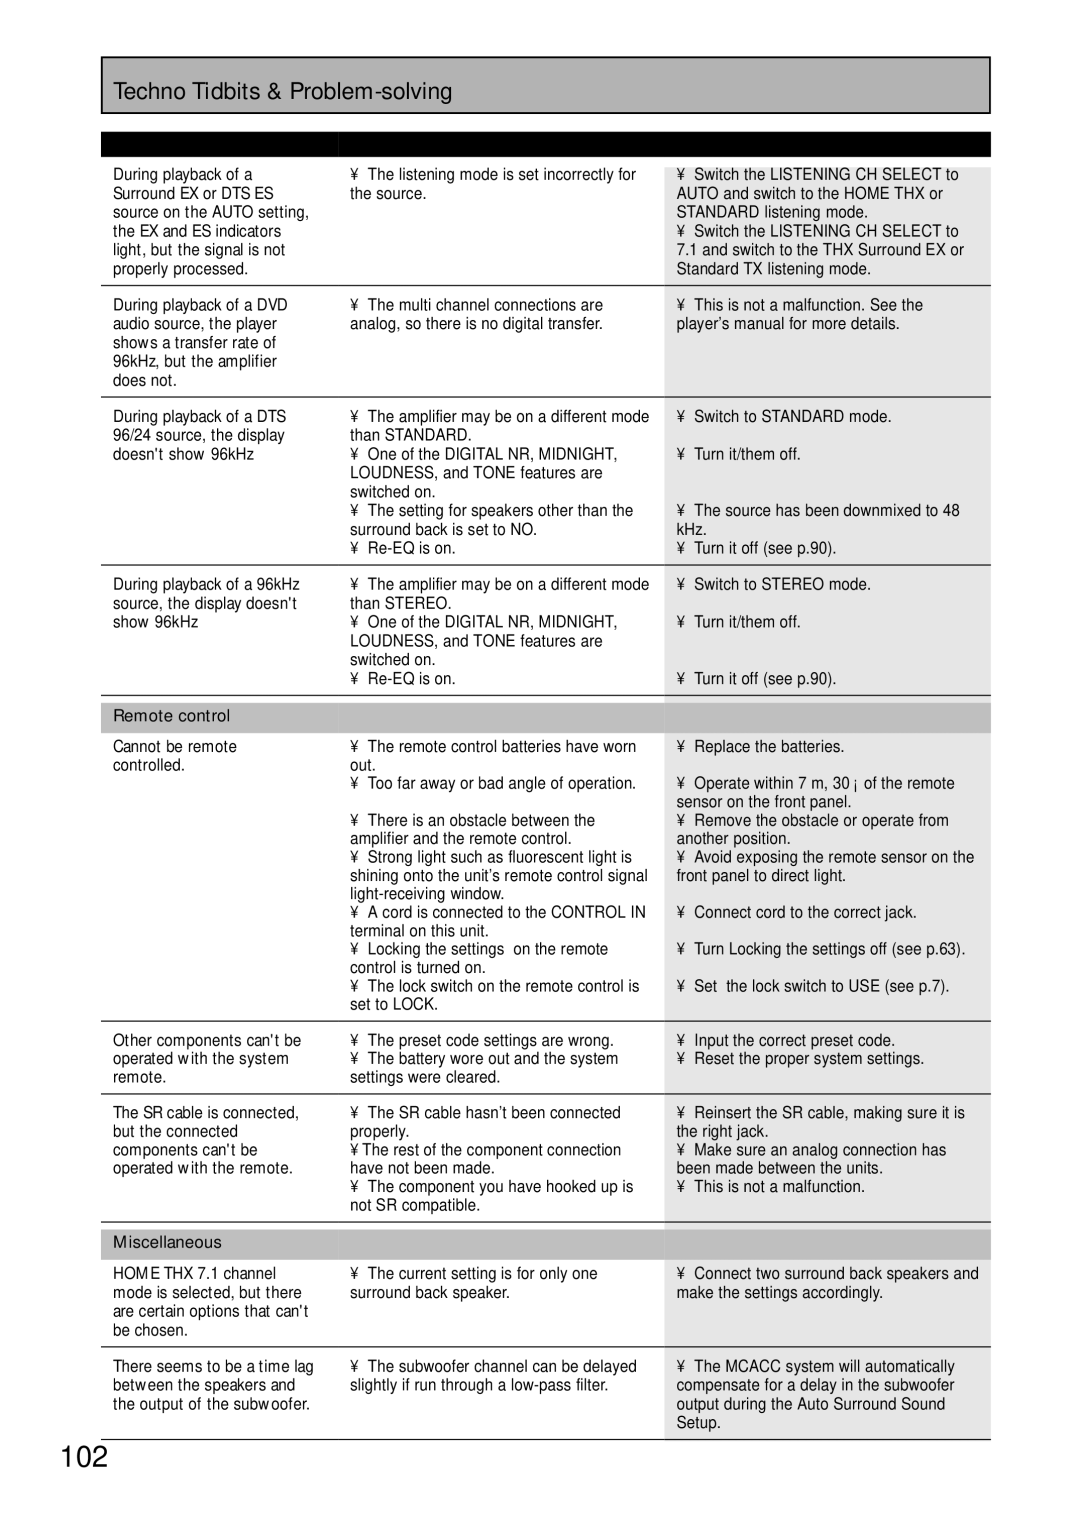
During playback of a | • The listening mode is set incorrectly for |
Surround EX or DTS ES | the source. |
source on the AUTO setting, |
|
the EX and ES indicators |
|
light, but the signal is not |
|
properly processed. |
|
|
|
During playback of a DVD | • The multi channel connections are |
audio source, the player | analog, so there is no digital transfer. |
shows a transfer rate of |
|
96kHz, but the amplifier |
|
does not. |
|
|
|
Remedy
• | Switch the LISTENING CH SELECT to |
AUTO and switch to the HOME THX or | |
STANDARD listening mode. | |
• | Switch the LISTENING CH SELECT to |
7.1 and switch to the THX Surround EX or | |
Standard TX listening mode. | |
|
|
• | This is not a malfunction. See the |
player's manual for more details. | |
During playback of a DTS 96/24 source, the display doesn't show 96kHz
•The amplifier may be on a different mode than STANDARD.
•One of the DIGITAL NR, MIDNIGHT, LOUDNESS, and TONE features are switched on.
•The setting for speakers other than the surround back is set to NO.
•
• | Switch to STANDARD mode. |
• | Turn it/them off. |
• | The source has been downmixed to 48 |
kHz. | |
• Turn it off (see p.90). | |
|
|
During playback of a 96kHz | • The amplifier may be on a different mode | |
source, the display doesn't | than STEREO. | |
show 96kHz | • | One of the DIGITAL NR, MIDNIGHT, |
| LOUDNESS, and TONE features are | |
| switched on. | |
| • | |
|
|
|
|
|
|
Remote control |
|
|
|
|
|
Cannot be remote | • | The remote control batteries have worn |
controlled. | out. | |
| • | Too far away or bad angle of operation. |
| • | There is an obstacle between the |
| amplifier and the remote control. | |
| • | Strong light such as fluorescent light is |
| shining onto the unit's remote control signal | |
| ||
| • | A cord is connected to the CONTROL IN |
| terminal on this unit. | |
| • | Locking the settings on the remote |
| control is turned on. | |
| • | The lock switch on the remote control is |
| set to LOCK. | |
|
|
|
Other components can't be | • | The preset code settings are wrong. |
operated with the system | • | The battery wore out and the system |
remote. | settings were cleared. | |
|
|
|
The SR cable is connected, | • | The SR cable hasn't been connected |
but the connected | properly. | |
components can't be | • The rest of the component connection | |
operated with the remote. | have not been made. | |
| • | The component you have hooked up is |
| not SR compatible. | |
|
|
|
|
|
|
Miscellaneous |
|
|
|
| |
HOME THX 7.1 channel | • The current setting is for only one | |
mode is selected, but there | surround back speaker. | |
are certain options that can't |
|
|
be chosen. |
|
|
|
|
|
There seems to be a time lag | • | The subwoofer channel can be delayed |
between the speakers and | slightly if run through a | |
the output of the subwoofer. |
|
|
102
• | Switch to STEREO mode. |
• | Turn it/them off. |
• Turn it off (see p.90). | |
|
|
|
|
|
|
• | Replace the batteries. |
• | Operate within 7 m, 30° of the remote |
sensor on the front panel. | |
• | Remove the obstacle or operate from |
another position. | |
• | Avoid exposing the remote sensor on the |
front panel to direct light. | |
• | Connect cord to the correct jack. |
• | Turn Locking the settings off (see p.63). |
• | Set the lock switch to USE (see p.7). |
|
|
• | Input the correct preset code. |
• | Reset the proper system settings. |
|
|
• | Reinsert the SR cable, making sure it is |
the right jack. | |
• | Make sure an analog connection has |
been made between the units. | |
• | This is not a malfunction. |
|
|
|
|
|
|
• | Connect two surround back speakers and |
make the settings accordingly. | |
|
|
• | The MCACC system will automatically |
compensate for a delay in the subwoofer | |
output during the Auto Surround Sound | |
Setup. | |
|
|
En