Operating and Maintaining the P80 Console
Page
Page
Trademark Note
Edition Information
Intellectual Property Notice
Page
Important Safety Instructions
Safety Precautions
Important Safety Instructions
Operating and Maintaining the P80 Console
Do not lean on or pull on the console at any time
Product Recycling and Disposal
Hazardous Materials and Proper Disposal
Federal Communications Commission, Part
Regulatory Notices for the Rfid Module
Radio Frequency Interference RFI
Débranchez avant de réparer
Industry Canada
European Applications
PVS and P80 Regulatory Notice
Safety Approvals for Cardiovascular Equipment
Regulatory Notices for Cardiovascular Exercise Equipment
Cardiovascular Type Equipment
Industry Canada
Electrical Recommendations 120 V and 240 V Treadmills
North American 120-volt, 20-amp power receptacle
IEC-320 C13 and C14 plugs
Obtaining Service
Table of Contents
Maintenance
Getting Started
Identifying Parts of the Console
Using the Treadmill Safety Clip
Restart switch
Attaching the safety clip
Treadmill Auto Stop Automatic Stop Function
Configuring the System Settings
5 1 5 6
Channel Up Volume Down Volume Up Channel Down
To view the System menu
About
To view the System Info settings menu
About settings Setting Access Detail
Admin/Tech
Setting Access Detail
Touch Equipment Usage
To view the Usage settings
Equipment Usage settings Setting Access Detail
Equipment Usage
System Settings
To view connectivity information
Touch System Settings, then Connectivity
Connectivity settings Settings Default Detail
Connectivity
Display
To view and change the Display settings
Touch System Settings, then Display
Display settings Setting Setting Options Default Value
Touch System Settings, then TV Settings
TV Settings
Channel Configurations
To view TV Setting information
Touch Extensive Scan
To scan for available channels Touch System Settings
To run an extensive scan Touch System Settings
Touch Channel Guide, then Scan
TV Settings Detail Default
To export this file from your console
Editing the Export/Import Channel File
To edit the file and reload it
Workout Limits
Touch System Settings, then Workout Limits
To modify the Workout Limits settings
To import equipment settings from a USB drive
Manage Settings
To save your equipment settings to a USB drive
Introducing Users to the P80 Console
Language icon
Changing the Default Language
Using the Touch Heart Rate Feature
Heart rate target zones
To use a chest strap transmitter
Using a Chest Strap Transmitter
Tab Function
Using Different Screen Views
Changing the Screen View
Changing the Media View
To return to the Workout Progress panel
Using the Workout Progress Panel
Media buttons Button Action
Using the Media Panel
To choose a media source
To connect your iPod
Connecting and Using Your iPod
To watch on-demand web videos during your workout
Watching On-Demand Web Videos
Touch the tile for the playlist you want to watch
To open Preva Net
Using the Preva Net Panel
Button Action
Preva Net panel
Starting a QuickStart Workout
Beginning Your Workout
To begin a preset workout
Starting a Featured Workout
Starting a Preset Workout
Ending a Workout
Preset workout descriptions
To enter your personal settings
Personal Information and Progress Settings
Setting Default Access Detail Options Value
Motion controls
Adjusting the Workout Intensity
Viewing Your Workout Status While Exercising
To modify the status measurement using the Status Bar
High Fitness Level
Scoring Your Fitness Workout
Low Fitness Level
Medium Fitness Level
Creating a Preva Account
Introducing Preva Accounts to Your Users
Information Description Type
Account information
Creating a Goal
To set up a weekly goal
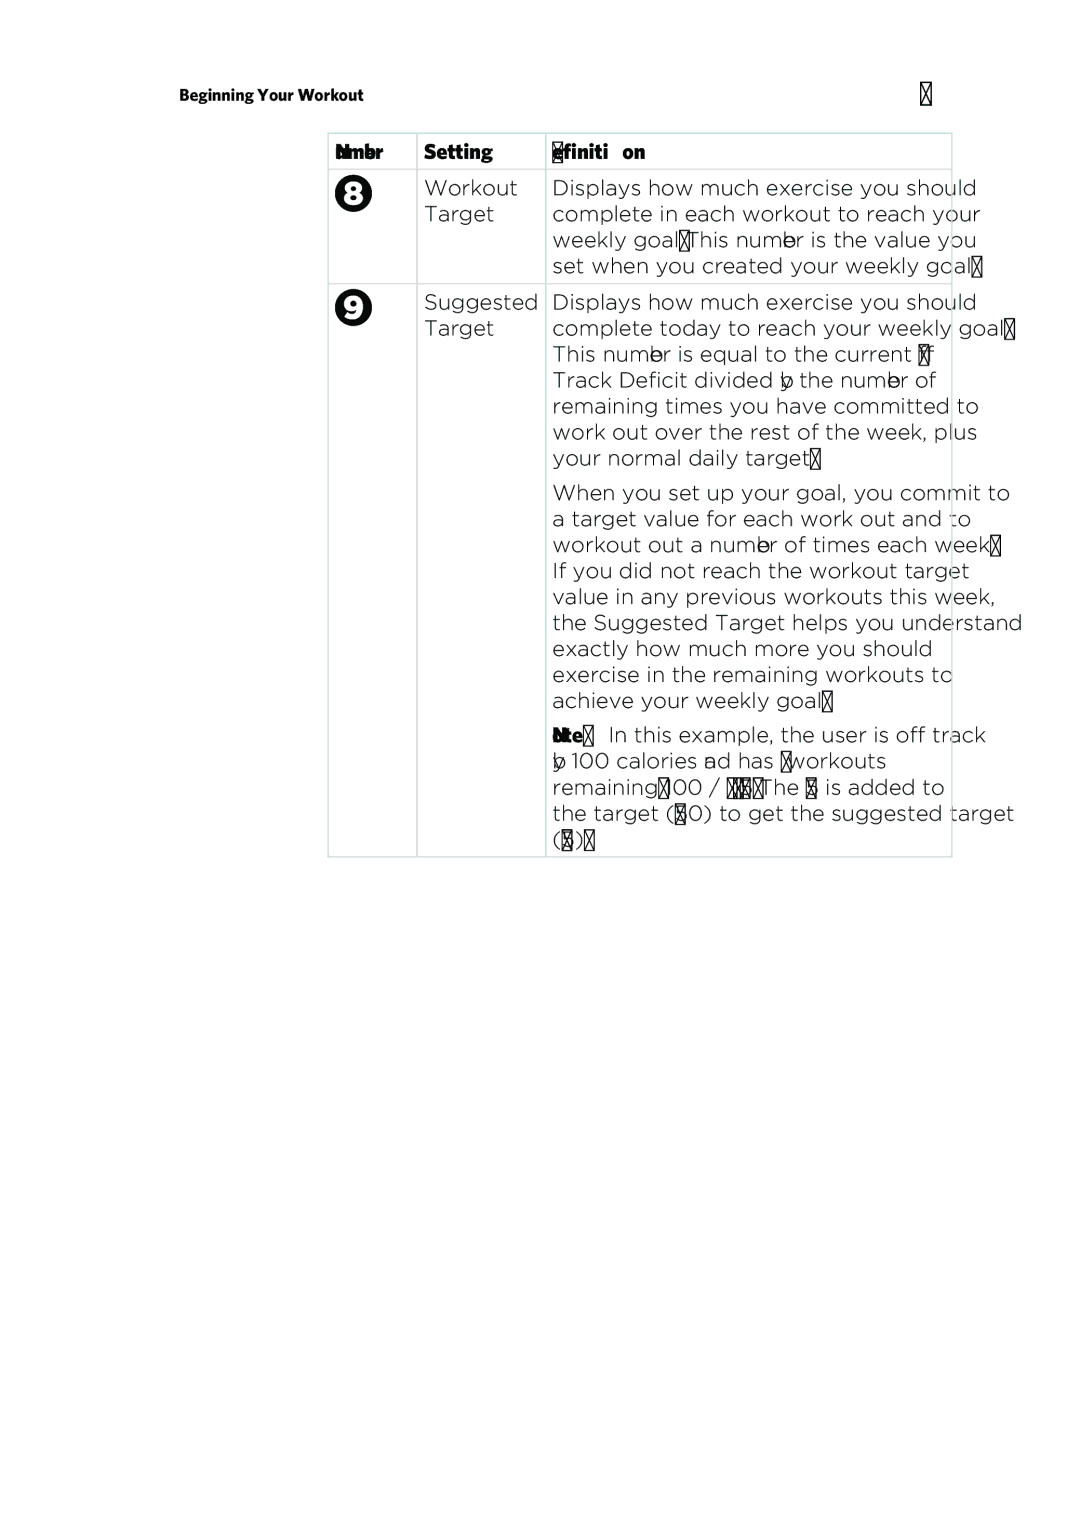
Current Focus Values Definition
Target Values
Tracking Your Progress Toward Your Goal
Number Setting Definition
This number is equal to the current Off
Preva token icon
Preva Tokens
To remove dust and dirt from the console
Cleaning the Console and Display
Changing the Belt Newer Model AMT Only
To clean the screen
Page
Precor Incorporated
Page
Page
Page
301704-301 rev E
Important Safety Instructions
Safety Precautions
Important Safety Instructions
19.7 in. behind or in front the machine
Do not lean on or pull on the console at any time
Educating Users
Regulatory Notices for the Rfid Module
Industry Canada
Regulatory Notices for Cardiovascular Exercise Equipment
Industry Canada
Obtaining Service
Obtaining Updated Documentation
Electrical Recommendations All Equipment Excluding
Commercial Cardiovascular Equipment Limited Warranty
Assembling the AMT
To prepare the AMT for assembly
Fasteners
Hardware Kit not to scale
To unpack the AMT
Required Tools
Unpacking the AMT
To add the side arm supports
Adding the Side Arm Supports
Adding the sleeve and washer
Lower side arm support alignment
Lower side arm attachment
Removal of screws from inner plastic molding
Front pallet anchor locations
To move the AMT from the pallet to its intended location
To remove the access covers
Removing Access Covers
Top cover removal
Front cover assembly removal
To thread the console cables
Threading the Console Cables
Jack plate layout AMT connector locations Position Connector
Cable routing along the frame to the center column
To replace the access covers
Replacing Access Covers
Moisture seal positioning
To position the handlebars for use
Positioning the Handlebars
Repeat steps 1 through 3 to position the other handlebar
View of handlebar placement
To level the AMT
Leveling the AMT
Reposition the adjustable feet as needed
Breaking in the Equipment
Page
Installing the Console
To thread the cable assembly
Threading the Cable Assembly P80
Console positioning on base unit
Cable connections, P80 console
Connecting Cables P80
Location
Connecting the Television Cable
P80 internal cable connections Cable Connector Type Circuit
To connect the television cable
Connecting the television cable
Connecting the Ethernet and base unit data cables
Connecting the Ethernet and Base Unit Data Cables
Connecting the heart rate cable
Connecting the Heart Rate Sensor Cable
Connecting the power cable
Connecting the Power Cable
To complete the installation
Completing the Console Installation P80
Threading the Cable Assembly P30 and P10
Console positioning on base unit
Cable positioning
Connecting Cables P30 and P10
Cable connections, P30 and P10 consoles
P30 and P10 internal cable connections
Cable Connector Type Circuit Location
Completing the Console Installation P30 and P10
To verify that the heart rate display is operational
Verifying That the Heart Rate Display Is Operational
Daily Cleaning
Daily Inspection
To remove dust and dirt from the console To clean the screen
Cleaning the P80 Console and Display
Monthly Maintenance
Weekly Maintenance
To move the AMT
Storing the Chest Strap
Moving the Equipment
Long-Term Storage
Rate of Motion
Minimum requirements for operation
Informational Displays Prior to Shutdown
Symptoms of a Low Battery
Optional Power Adapter Kit
Using the Optional Power Adapter
Replacing the Battery
Warranty Periods and Coverage
Limited Warranty
Conditions and Restrictions
Exclusive Remedies
Complete this portion and keep for your records
Exclusion of Consequential and Incidental Damages
Page
Page
Page
AMT G2 PAG/OM 301704-301 rev E, en