8515 Vehicle-Mount Computer
Copyright 2007 by Psion Teklogix Inc., Mississauga, Ontario
Return-To-Factory Warranty
Limitations or as a result of their exempt status
What is RoHS?
Table of Contents
Getting To Know
Windows Embedded CE
Configuration
Formatting a Memory Card Creating Partitions
Total Recall
Specifications
Peripheral Devices & Accessories
Appendix a Support Services / Worldwide Offices
Appendix B Port Pinouts
Appendix C USB Setup Application
Page
Approvals and Safety Summary
Page
CE Marking
FCC Information To Users
Cm from your body when transmitting
Emissions Information For Canada
Chapter Approvals And Safety Summary
Page
Introduction
Page
Getting To Know
About This Manual
About The 8515 Vehicle-Mount Computer
Text Conventions
Basic Checkout
Page
Preparing The 8515 For Operation
8515 Safety Instructions
Suspend state is displayed
Switching The 8515 On And Off
Battery temperature is above 10 C
Important Operating Instructions
Setting Up The Model RA2040 802.11g Radio
Configuring Your Ieee 802.11 Radio
Calibrating The Touchscreen
You can press Ctrl ESC to display the Start Menu
Nect button
Wireless Statistics
Wireless Properties Dialog Box
Authentication
Accessing Network Key And Key Index
Assigning An IP Address
Configuring An IP Address
To display the Advanced Wireless Settings dialog box
Advanced Features
Name Servers Tab
10 Advanced Wireless Settings
Setting Up The Model RA2041 Radio SCU
Assigning The IP Address
Using The SCU To Connect To The Wlan
SC Model RA2041 CF radio
If you choose Manual WEP, WPA PSK or WPA2 PSK
To configure encryption
Main Tab
SCU Tabs
14 SCU Configuration Menu
Config Tab
Radio Attributes Menu Description Value Default
SCU Security Capabilities
Tion of digital certificates
Global Settings Tab
15 SCU Global Settings Menu
Global Settings Menu Description Value Default
Diags Tab
Status Tab
Resetting The 8515 Vehicle-Mount Computer
Page
Getting to Know
Ports Caring For The Touchscreen Cleaning The 8515
Front Of The 8515 Vehicle-Mount Computer
Features
Modifier Keys
Internal Backup Battery
Stylus
Keyboard
For details
Keys
Function Keys
Function Keys And Macro Keys
Macro Keys
That this option may be restricted to supervisory use only
Display
Keypad Backlight
Calibrating The Touchscreen
Power Indicator LED
8515 Indicators
Onscreen Indicators
Rfid
Scanning Techniques
Audio Indicators
Scan LED Indicators
Scanning
Again
Troubleshooting
Operating One Dimensional 1D Laser Scanners
Monitoring The Network Connection
Ports
Connecting An 8515 To a Windows 2000 Or XP PC
Connecting An 8515 To a Windows Vista PC
General Maintenance
Caring For The Touchscreen
Cleaning
Windows Embedded CE
Page
Level must be set to Supervisor see Security Level on
Navigating Using a Touchscreen And Stylus
Navigating Using The Keyboard
Navigating In Windows Embedded CE 5.0 And Applications
Keyboard Navigation Operation Key or Key Combination
Working With Files, Folders And Programs
Flash Disk StartUp
Startup Desktop
Taskbar
Desktop Icons
Taskbar and Start Menu dialog box is displayed
Security Level
Security settings
Start Menu
Desktop
Security Level Menu
Password Control Panel applet. Refer to Password on
Programs
Require maintenance
Shortcuts List
Shortcuts
10 Task Manager
Choose System Tray from the Shortcuts Start Menu
6 Run
Settings
Shutdown
Starts Bootloader rather than Windows Embedded CE
Menu is not available
Currently available
Using a Dialog Box
If you’re using a keyboard, follow the directions below
Configuration
Page
Page
Page
Pocket PC Compatibility
Remote Desktop Connection
Control Panel
Control Panel
Control Panel Icons
Certificates
Owner
Snmp
Display Background
Display Properties
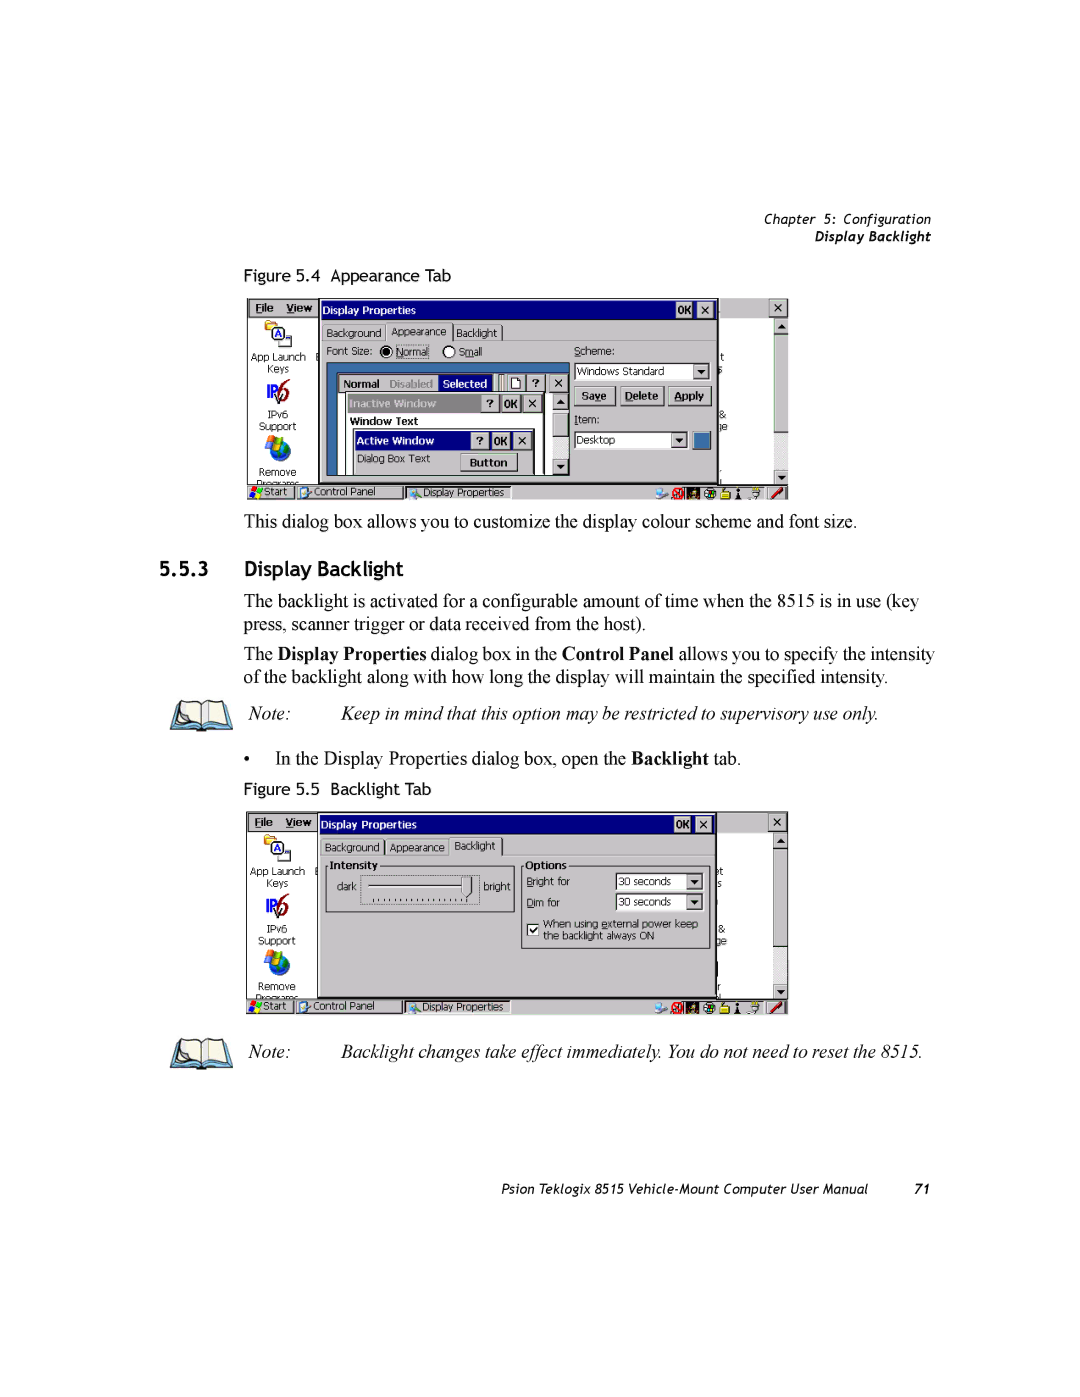
Display Appearance
Display Properties dialog box, open the Backlight tab
Display Backlight
Key Repeat
Keyboard Properties
Backlight
Settings you’ve chosen
One Shots Tab
One Shots
Keyboard Properties dialog box, open the Macros tab
Following a key press
‘Discard’ button
12 Unicode Mapping Tab
Unicode Mapping
To assign
Scancode Remapping
Adding a Remap
Choose Virtual Key, Function or Macro
Lock Sequence
ORANGEBLUE0, ORANGEBLUE8, or ORANGEBLUEBksp
Volume And Sound Properties
Volume Adjustments
Power Properties
Bluetooth radio
Suspend
Battery
22 Advanced Tab
Advanced Power Properties
Devices
Stylus Properties
Appears to require recalibration, contact your supervisor
Touchscreen Calibration
Setting Double-Tap Sensitivity
Disabling The Touchscreen
Manage Triggers
To applications
Trigger Mappings
Tapping this button removes an existing mapping
Add And Edit Trigger Mapping
Control Panel, choose the Certificates icon
Certificate Assignment
Bluetooth Setup
Described below
Devices Tab
Ging purposes
Will be retrieved
Set PIN
Outgoing Tab
Servers Tab
Vation menu
Active Connections Tab
You must reset
Your settings. Then click on OK
Properties Tab
Storage Manager
Select Start SettingsControl Panel
Formatting a Memory Card
Ties dialog
Creating Partitions
43 Partition Properties Dialog
Partition Management
Press the Format button. The Format dialog appears
Total Recall
Creating a Backup Profile
Profile Information
Tap on Next to display the next dialog box-Add Files
Restoring a Profile
Input Panel
Storage device
53 Input Panel Icon
54 Soft Keyboard
Far-right corner of the taskbar
56 Soft Keyboard Options
16 IPv6 Support
Scanner Settings Options Tab
Scanner Settings
Decoded Scanners
Double Click
Translations Tab
Translations tab, choose the Case # to create rules
Are applied
Ports Tab
Serial Port COM
68 Data Bits Options
Snmp Simple Network Management Protocol Setup
71 Snmp Icon
Contacts Tab
Communities Tab
Enable Snmp
75 Modify Community Dialog
Trap Destination Tab
To add a new destination, tap on the Add button
79 Permitted Hosts Options
Permitted Hosts Tab
121
Page
Peripheral Devices & Accessories
Page
External Bar Code Readers
Bluetooth Peripherals
Entering Data With The Bar Code Reader
Network Access
8515 Mounting Accessories Installing The RAM Mounting Kit
Linking An 8515 To An Ethernet Network
Mounting Accessories Installing The RAM Mounting Kit
Table below lists the mounting component part numbers
Component Part Numbers
Bolt Hole Pattern For RAM Vesa Base
2 MT33XX RAM Mounting Kit Specifications
Bolt Hole Pattern For RAM Circular Base
Preparation
Tightening Tool P/N
Torque to 26 in-lbs
Installation
RAM Vesa Base
RAM Vesa Base
Positioning The Vehicle-Mount
Circular Base and Vesa Base Mount Orientations
Optional Mount Kits
Wiring Guidelines
8515 Vehicle-Mount Computer Installations
Wiring Vehicle Power To
Non-Vehicle Installations
11 The Power Pre-regulator Model PS1300
On the vehicle
Without Power Pre-regulator With Power Pre-regulator
Page
Specifications
Page
8515 Vehicle-Mount Computer Specifications
EMC
Colour Display
Internal Lithium-Polymer Battery
External Power
Radio Specifications
FCC Etsi Telec
Bluetooth Version
Supported Types
External Bar Code Scanners
Page
Technical Support
Support Services / Worldwide Offices
Product Repairs
Company Headquarters
Canadian Service Centre
North American Headquarters And U.S. Service Centre
Worldwide Offices
Psion Teklogix S.A
International Subsidiaries
Page
Serial Port Interface Pinout DB-9 male
Port Pinouts
Enhanced USB2 Port Interface Pinout
Enhanced USB1 Port Interface Pinout
CTS PXA
Page
USB Setup
USB Setup Application
Launching The Application
Figure C.1 Welcome Dialog
Figure C.2 Installation Dialog
Installation Complete Dialog Box
Page
Bad Scan Beep 111 bar code reader
Index
Contact Contacts 116 control panel
One Shot Mode 74 unlocking
Rights
Bad Scan Beep
Start Menu Cycle tasks Desktop
802.11b radio, configuring 802.11g radio
Index