INSTALLATION

INSTALLATION

UNIT ASSEMBLY PRIOR TO

INSTALLATION

NOTE: The Top Facing Support, the Side Nailing Strips and the 2 Top Standoffs must be correctly positioned and attached before unit is slipped into position.

TOP STANDOFF ASSEMBLY

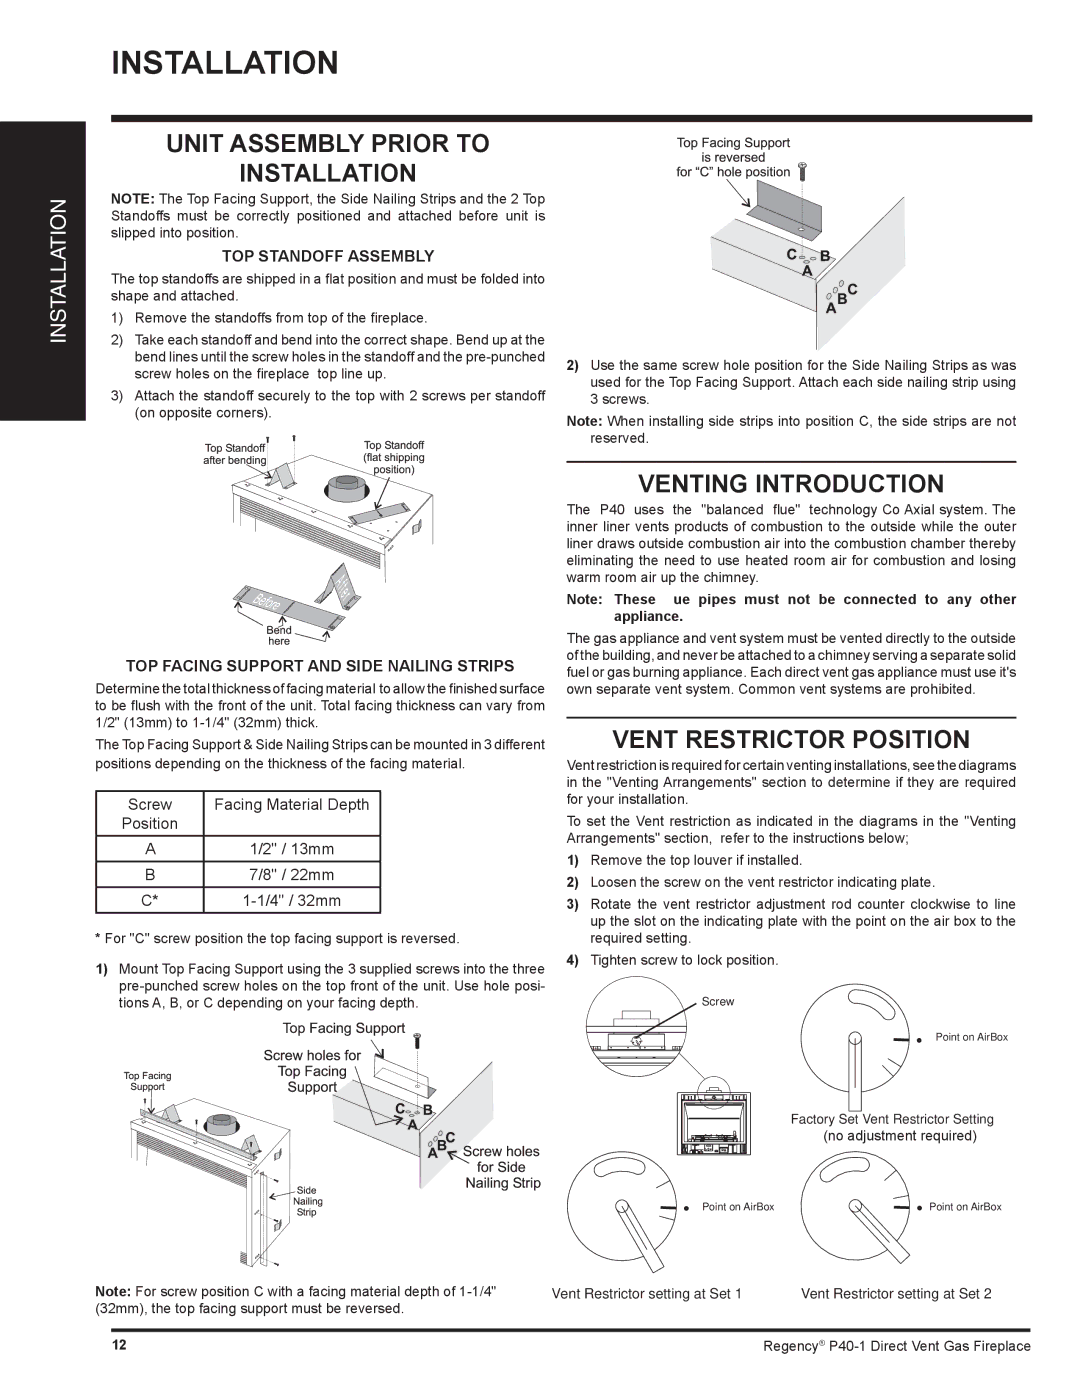
The top standoffs are shipped in a flat position and must be folded into shape and attached.

1)Remove the standoffs from top of the fireplace.

2)Take each standoff and bend into the correct shape. Bend up at the bend lines until the screw holes in the standoff and the pre-punched screw holes on the fireplace top line up.

3)Attach the standoff securely to the top with 2 screws per standoff (on opposite corners).

TOP FACING SUPPORT AND SIDE NAILING STRIPS

Determine the total thickness of facing material to allow the finished surface to be flush with the front of the unit. Total facing thickness can vary from 1/2" (13mm) to 1-1/4" (32mm) thick.

The Top Facing Support & Side Nailing Strips can be mounted in 3 different positions depending on the thickness of the facing material.

Screw

Facing Material Depth

Position


A1/2" / 13mm

B7/8" / 22mm

C*

1-1/4" / 32mm

*For "C" screw position the top facing support is reversed.

1)Mount Top Facing Support using the 3 supplied screws into the three pre-punched screw holes on the top front of the unit. Use hole posi- tions A, B, or C depending on your facing depth.

2)Use the same screw hole position for the Side Nailing Strips as was used for the Top Facing Support. Attach each side nailing strip using 3 screws.

Note: When installing side strips into position C, the side strips are not reserved.

VENTING INTRODUCTION

The P40 uses the "balanced flue" technology Co Axial system. The inner liner vents products of combustion to the outside while the outer liner draws outside combustion air into the combustion chamber thereby eliminating the need to use heated room air for combustion and losing warm room air up the chimney.

Note: These flue pipes must not be connected to any other appliance.

The gas appliance and vent system must be vented directly to the outside of the building, and never be attached to a chimney serving a separate solid fuel or gas burning appliance. Each direct vent gas appliance must use it's own separate vent system. Common vent systems are prohibited.

VENT RESTRICTOR POSITION

Vent restriction is required for certain venting installations, see the diagrams in the "Venting Arrangements" section to determine if they are required for your installation.

To set the Vent restriction as indicated in the diagrams in the "Venting Arrangements" section, refer to the instructions below;

1)Remove the top louver if installed.

2)Loosen the screw on the vent restrictor indicating plate.

3)Rotate the vent restrictor adjustment rod counter clockwise to line up the slot on the indicating plate with the point on the air box to the required setting.

4)Tighten screw to lock position.

Screw

Point on AirBox

Factory Set Vent Restrictor Setting

(no adjustment required)

Point on AirBox

Point on AirBox

Note: For screw position C with a facing material depth of 1-1/4"

Vent Restrictor setting at Set 1

Vent Restrictor setting at Set 2

(32mm), the top facing support must be reversed.


12


Regency® P40-1 Direct Vent Gas Fireplace

Page 12
Image 12
Regency P40-NG1, P40-LP1 Unit Assembly Prior to Installation, Venting Introduction, Vent Restrictor Position

P40-LP1, P40-NG1 specifications

The Regency P40-LP1 and P40-NG1 are notable advancements in the realm of modern technology, particularly designed for energy efficiency and enhanced performance in various applications. These two models cater to the diverse needs of industries striving for both sustainability and productivity.

The P40-LP1 is engineered with a focus on low-pressure applications, utilizing cutting-edge technology to ensure optimal performance in energy consumption. This model features an advanced energy management system that intelligently adjusts power usage based on demand, which not only reduces operational costs but also minimizes the environmental impact. Its compact design and lightweight materials allow for easy installation in various settings, making it a versatile option for multiple industries.

On the other hand, the P40-NG1 is tailored for natural gas applications, making it an ideal choice for environments where natural gas is the primary energy source. This model is equipped with high-efficiency burners that maximize combustion efficiency, producing fewer emissions compared to traditional systems. The P40-NG1 also incorporates an integrated control system, providing users with real-time data monitoring to optimize performance and facilitate preventative maintenance.

Both models are constructed with durable materials designed to withstand harsh operating conditions, ensuring longevity and reliability. Advanced insulation technology further enhances their efficiency by reducing heat loss, allowing these systems to maintain consistent performance over extended periods.

A standout feature of the P40 series is its commitment to user-friendliness. The intuitive interface allows operators to easily navigate settings and access critical system information with minimal training. Additionally, these units are compatible with smart technologies, enabling seamless integration into existing infrastructure for enhanced operational oversight.

In summary, the Regency P40-LP1 and P40-NG1 embody the future of energy solutions, combining efficiency, adaptability, and user-focused design. Whether it’s for low-pressure or natural gas applications, these products deliver reliable performance while adhering to environmental standards. With ongoing advancements in their technology, the P40 series stands as a testament to Regency’s dedication to innovation and sustainability in the energy sector.