3350DNP/5450
Means Power ON. b means Power OFF
Examples Of Indications
Safety Information
Safety During Operation
RWarning
Iii
RCaution
Page
Symbols
How To Read This Manual
Set one original face down Press the Proof key
Making Prints
Press the Start key
Set your originals
Press the Print key
Vii
Enter the desired number of prints with the Number keys
What You Can Do With This Machine
Saving Ink
1 % Steps
Erasing Edge Margins
Inal
Making Fixed Numbers Of Prints From The Same Original
Storing Your Print Settings In Memory
Regaining The Image Density When Ink On The Drum Dries
Making Variable Numbers Of Prints From Different Originals
Printing In Two Colors
Printing Preset Messages On Your Prints
On Line Printing
Making Color Prints
Xii
Printing Your Own Messages On Your Prints
Combining Originals Into One Print With The Memory Board
Table of Contents
On The Drum Dries
Selecting a Mode To Match Your Original
Same Original Using Stored Data
Economy Mode-Saving Ink
Accessing The User Tools 133 User Tools Menu 135
Printing Using The Optional Document Feeder
Color Printing Using The Optional Color Drum
Making a Command Sheet For Make-Up Printing
Xvi
User Tool Menus In Detail 148
Clearing Misfeeds 168
Operation Notes 189
Where To Put Your Machine 193
Combination Chart 198
Poor Printing 185
Xviii
Machine Exterior
Machine Interior
Ink Holder
Paper Delivery Side Plates
Paper Delivery Side Plate Knobs
Master Eject Unit Front Handle
Document Feeder
Options
This page is intentionally blank
Keys
Operation Panel
Number keys
Class key
Indicators
Prev.Next
Panel Display
Sample Display for Selecting the Original key
Display Panel Layout
Printing Paper
Operation
Operation
Originals
= 10 mm
Lift the feed side/end plates
Preparation For Printing
Loading Paper
Carefully open the paper feed tray
Pull out the paper delivery tray until it stops
Setting Up The Paper Delivery Tray
Lift the paper alignment wings
Swing out the guides as shown in the illustration
Lower the paper alignment wings
Turn on the main switch
Input your user code 4 digits with the Number keys
User Codes
Press the Enter key
Lower the platen cover Select the paper type with
Standard Printing
Close the paper delivery side plate
Remove the prints from the paper delivery tray
Replenishing Paper
Loading Paper On The Paper Feed Tray
Place the paper on the paper feed tray
Changing The Paper Size
Remove the paper from the paper feed tray
Push in the paper delivery tray, if necessary
Turn off the main switch
Closing The Paper Feed And Paper Delivery Trays
Close the paper feed tray
Press the Image = key
Adjusting Print Image Position
Adjust image position using the ~, , , and keys
Before Making a Master
Adjusting Print Image Density
After Making a Master
Before Making a Master
Press the Tint key
Tint Mode-Halftone Printing
Changing The Printing Speed
Change the number of prints or check the completed prints
Stopping The Machine During a Multi-print Run
Inch version
Metric version
Check the image position of the trial or proof print
Press the Ratio key
Make your prints
Select the desired ratio with the ←, →, ~, or key
Original sizes you use
Press the OK key
Select Auto with the → or key
⇒ P.25 Adjusting Print Image Position
Enter the desired reproduction ra- tio
Adjust the ratio with the ←, →, ~, or key
Zoom-Reducing And Enlarging In 1 % Steps
Select Mag. with the → or Key
Make your prints Press the Enter key
Enter the ratio with the Num- ber keys
Select Direct. Mag. % with the → or key
Enter The Dimensions Of The Original And Print Paper
Entering The Reproduction Ratios
Enter The Reproduction Ratios
Enter the vertical and horizontal ratio Press the Start key
Adjusting ratios with the ←, →, ~, or key
Image
Select Direct. Mag. size with the → or key
Edge Erase-Erasing Edge Margins
Using Edge Erase mode
When not using Edge Erase mode
Edge Erase-Erasing Edge Margins
Press the Ppr. Type key
Printing On Various Kinds Of Paper
Printing On Thick Paper
Printing On Thin Paper
Select Special with the ←, →, ~, or key
Printing On Envelopes
Printing On Special Kinds Of Paper
Set the side pads move the side pad levers to as shown
Select User 1 or User 2 with the ←, →, ~, or key
To prevent paper misfeeds
Photo Mode Printing
Selecting a Mode To Match Your Original
Or key
Letter/Photo Mode Printing
Adjust the lightness with the ←, →, ~, or key
Press the Original key
Select Pencil with the ← or ~ key
Pencil Mode Printing
Economy Mode-Saving Ink
Press the Economy Mode key
Enter the number of prints re
Auto Cycle-Making Master And Prints At One Stroke
Check the image position Trial or proof print
Press the Auto Cycle key
Operation
Press the Class key
Press the Start key
With the →
Press the OK key Select the desired classes for each grade
Selecting classes with the ~, , , or key
Check the image position of the trial or proof print
Select Manual with the → or key
Image
Mode With 2 Or More Originals Us- ing The Document Feeder
= keys see ⇒ P.25 Adjusting
Repeat step N until you have finished printing
~ key
Select Same-NO.with the ← or
Check the image position is the trial or proof print
One-sided Originals → 1 One-sided Print Of 4 Images
Combine Originals-Combining Originals Into One Print
One-sided Originals → 1 One-sided Print Of 2 Images
A4K B5K A5K B6K A6K
Check the print paper size and the reproduction ratio
Enter the number of prints using the Number keys
Set the first original face down
Press the OK key. Press the Start key
Select combine 2 or Quadruple with the ←, →, ~, or key
Make your prints
Press the Combine key
Auto Combine Mode-Having Images Repeated On One Print
Print Of 2 Images
Print Of 4 Images
Press the OK key Press the Start key
←, →, ~, or key
Press the Skip Feed key
Skip Feed Printing
Skip Feed Printing
Select Store with the → or key
Program-Storing Your Print Settings In Memory
Storing Your Settings
Select the program number you want to recall with the ←, →
Recalling a Program
Protecting a Program
Make sure that Recall is selected Press the OK key
Press the Select key Press the OK key
Press the Cancel key Press the OK key
Press the Yes key
Security Mode-Printing Secret Documents
Make your prints Press the Security key
Press the Quality Start key
Using Quality Start Manually
Manual Quality Start
Auto Quality Start
Job Separation mode, the following limitations apply
Press the Job Separator key
Saving Master
Refer to the PC controller man- ual Press the Ppr size key
On Line Printing
Press the On Line key
Originals
Printing Using The Optional Document Feeder
Set the aligned originals face up into the document feeder
Adjust the guide to the original size
Insert the 2 originals face up
Enter the number of prints with the Number keys
Select Combine 2 or Quadruple with the ←, →, ~, or key
Originals are fed from
Press the Print key
Changing The Color Drum Unit
Color Printing Using The Optional Color Drum
Making Color Prints
Lift the drum unit lock lever
Printing In Two Colors
Out the drum unit while holding handle B2 and drum stay B3
Slide in the drum unit until it locks in position
Check the image position Press the Print key
Exchange the drum unit. See ⇒
Master Cut Length
Changing The Drum Size
Printing Area at 23C/73F, 65 % RH
Image Rotation-Rotating Original Images
Optional Functions
Make-up Modes For Designated Areas
Make-up Printing Features
Main Features
Make-up Modes For Outside Designated Areas
Save Area mode Area outside the desig
Background Patterns
Make-up Printing Features
Command sheet
Making a Command Sheet For Make-Up Printing
Features
How To Make a Command Sheet
Designated area Area recognized Preferred designated area
100
101
When using the diagonal line method
Put the command sheet on top of the original
102
When using the closed area method
103
104
Command Sheets And Finished Prints
When drawing a command sheet using a diagonal line
When drawing a command sheet using a closed line
Make sure that 1 is selected Then press the OK key
Make-up Printing
105
Press the Make-Upkey
Sheets, select Outside Area with
Ing modes for all the command
106
After you have finished designat
107
Make-up Printing With The Optional Document Feeder
108
Density with the ←, →, ~, or key
109
110
Original Command sheet No.1 Print
Make-up Samples
Sample
111
Original Command sheet No.1 Command sheet No.2 Print
112
On Line Overlay
Image Overlay-Merging Images
Overlay
Form
Set originals in the document feeder
114
Press the Stamp key
Stamping Date-Having The Date Stamped On Your Prints
115
Set your originals as shown in the illustration
116
Press the OK key Select the Yes or No key
Set your original as shown in the illustration
117
Stamping-Having Page Numbers Stamped On Your Prints
Select the Page with the → or Press the OK key
118
Set the first original as shown in the illustration
119
Select the desired orientation with the ←, →, ~, or key
Set your originals as shown Illustration
~, or key
Stamping Function-Printing Preset Messages On Your Prints
120
Select Stamp with the ←, →
Select the stamping position with the ←, →, ~, or key
121
Select the page to be stamped with the ←, →, ~, or key
With ←, →, ~, or key
User Stamping-Printing Your Own Messages On Your Prints
122
123
124
One-sided Originals → 1 One-sided Print Of 8 Images
One-sided Originals → 1 One-sided Print Of 16 Images
Repeating An Image Over The Entire Print
125
One-sided Print Of 4, 8, or 16 Images
A4 KL B5 KL
126
127
Press the OK key Set your originals
128
Press the OK key Select one of the desired combine modes
129
Repeat-Repeating An Image Over The Entire Print
130
For example, when you use A4 Loriginals and A3Lpaper
Press the OK key Select the proper reproduction ratio
131
Select Memory Combine with the ← or ~ key
Press the OK key Select Repeat with the ← or ~ key
132
Select the desired user tools menu. See ⇒ P.135 User Tools
Accessing The User Tools
133
Press the User Tools key
Press the User Tools key to re- turn to the Ready condition
134
135
User Tools Menu
System
136
Set Operation Modes
137
Initial Setting
Ratio
138
139
Mode Setting
140
11 No. of Skip Feed
141
142
Type of Paper
143
144
Stamp
User
145
146
Set User Code s
User Code
147
⇒ P.163 6-2 Reset Counters
148
Time Setting
User Tool Menus In Detail
Reproduction Ratio
Press the OK key twice
Class Enter No
149
150
Press the Select key Adjust the erase edge margin
Adjust the erase edge margin with the ←, →, ~, or key
Margin Erase Area
Press the Change key
11 No. of Skip Feed
151
152
14 No. of Q.start
153
Select the paper type and misfeed
Type of Paper
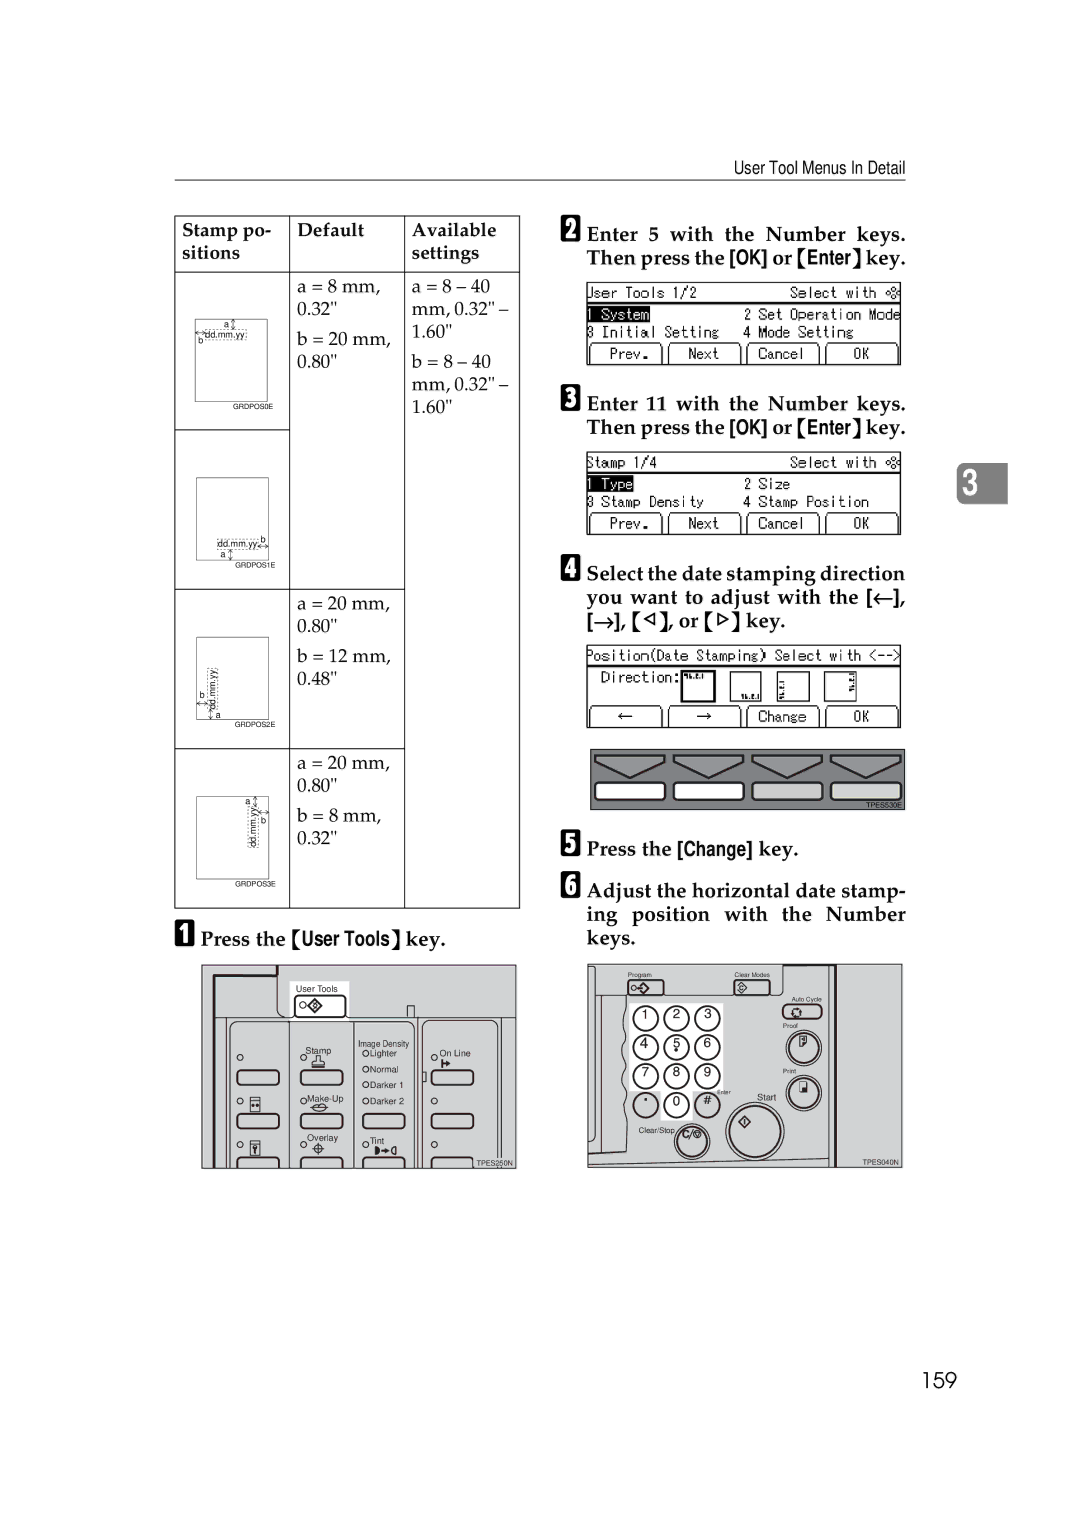
Stamp Position
154
155
Tion with the Number keys
Adjust the horizontal stamp posi
Adjust the vertical stamp position
156
157
158
Regist. User
Position Date
159
160
When you select
When you select P1 1/5
Position
Press the Enter key Press the OK key twice
Make/Chg. Pattern
161
162
Check Counter
163
Reset Counters
Chg. User Code
Press the OK key Enter the new user code with Number keys
Del. User Code
164
165
If Your Machine Does Not Operate As You Want
166
167
Combine Originals Mode
If You Cannot Make Prints As You Want
Remove the misfed paper
Clearing Misfeeds
+ a Paper Misfeed In The Paper Feed Section
168
169
+ a + B Paper Misfeed In The Paper Feed Section
Set the drum unit and close the front door
When The Master Is Wrapped Around The Drum
When Paper Is Wrapped Around The Drum
170
Open the front cover Take out the drum
When Paper Is Misfed Inside The Machine
171
Take out the drum Lower drum unit lock lever B1
Slowly but firmly pull out the misfed paper
+ C Paper Misfeed In The Paper Exit Section
172
Open the front door Lower drum unit look lever B1
173
Open the front door Lower drum unit lock lever B1
174
Pull out the misfed original gen- tly
175
Open the ADF cover
176
To prevent original misfeeds
177
When The Open Cover/Unit Indicator M Lights
Front Door
Document Feeder Cover Option
Open the front door Pull out the ink holder
When The Add Ink Indicator j Lights
178
179
180
When The Master End Indicator C Lights
181
182
When The Master Eject Indicator k Lights
183
When Other Indicators Are Lit
184
When The Prints Are Not Delivered In a Neat Stack
185
Poor Printing
Dirty Background
Pull out the drum unit
186
187
Close the front door Turn on the main switch
Open the front cover and pull out the drum unit
Black Line/Stain
Skipped Prints
188
189
Operation Notes
General Cautions
190
191
Print Paper
Misfed Paper
192
PC Controller
Environments to avoid
Where To Put Your Machine
Environmental Conditions
Optimum environmental conditions
194
Power connection
Access to machine
More than 10 cm More than 60 cm
Main Frame
195
Platen Cover
Maintaining Your Machine
Main Frame
Exposure glass contact glass
197
Optional Document Feeder
Sheet
198
Combination Chart
199
200
Main Frame
Leading Edge Margin
Print Paper Weight
Printing Area
Print Paper Size
Noise Emission
Dimensions W × D × H
Weight
Master Eject Unit Capacity
204
Power Source
Power Consumption
Optional Equipment
205
Original Weight
Document Feeder
Original Capacity
206
Consumables
207
Index
Image Density key
208
On Linekey
209
Security key
210