AM-400
Aviso
Page
GREEN-AND-YELLOW Earth BLUENeutral BROWNLive
Only
Poland Only
Russian Only Внимание
Maximum copy size Document glass A4 Auto document feeder A4
Introduction
Printer type Laser
Copy speed
Communication method
Resolution Horizontal 8 lines/mm Vertical
Scanner type CIS Contact Image Sensor Resolution
Transmission time
Dimensions
Power requirements
Operating temperature
Power consumption
Important safety information
Trademark information
Table of Contents
Messages and Signals
Selecting Print Settings
Cleaning the Scanning Glasses and Rollers
Problems and Solutions
Look at the Operation Panel
Stop key
Alarm indicator
Contrast key
Redial key
Number keys
Speed key
Start key
About condensation
Installation
Unpacking Checklist
Points to keep in mind when setting up
Attaching the trays
Installation
If you need to move the machine
Releasing the scanner
Comments
Connecting the power cord
Germany
Connecting the telephone line cord
Press repeatedly to exit
Setting the dial mode Russia and Poland only
Select the dial mode
Press
Switzerland, Austria
Extension phone optional
France
Installing the Toner Cartridge and Drum Cartridge
Remove the new drum cartridge from its packaging
Close the front cover ➊ and then the side cover ➋
Resetting the drum counter
Manually resetting the toner counter
Loading Printing Paper
Press Copy Or Scan and then
Replace the output tray
Select the paper size
Minimum system requirements
Installing the Software
CD-ROM window
Installation
Installing the Software
Installation
Completing installation of the software on Windows→ XP
Installation
Installing the Software
Sharpdesk online guide Removing the software
Configuring settings on the server
Using the Machine as a Shared Printer on a Network
Windows→ XP
Installation
Windows→ Me
Windows→
Installation
Installing the printer driver on the clients
Select Browse for a printer and click Next
Click Finish
Following window will appear. Click Browse
Using the Machine as a Shared Printer on a Network
Installation
Press Enter
Entering Your Name and Fax Number
After entering the first letter. To clear a mistake, press Z
Enter a two-digit number for the day 01 to Example the 5th
Setting the Date and Time
Example
Enter the year four digits
Press Enter to start the clock
Press a number key to select
General Machine Settings
Desired volume setting
Ringer
Make sure that the date and time
Alarm volume
Press Scan and then Menu
Auto clear
Copy or Scan and then Menu
Key tone off
Selecting the display language
Copying
To select copy mode
Making a Copy
Making a Copy
Using the auto document feeder
Maximum original size when using the document glass
If Memory is Full appears
Selecting Temporary Copy Settings
Enlarge/reduce
Contrast
Are Text and PHOTO. To change the setting, press
Number of Copies
Quality
Duplex Scan
Sort collating sets of copies
Originals
Press Menu Then Z
Permanent Copy Settings
Default copy quality setting
Select the default quality setting
Select the resolution setting
Copy resolution
300 DPI 600 DPI
To increase
Default copy contrast setting
Default contrast level
Until the display at right appears Press Press Z
Up to 20 sheets at once
Using the Auto Document Feeder
Minimum document size Minimum size
Maximum document size
Other restrictions
Adjust the document guides to the width of your document
Loading the Document
Copying onto Envelopes and Cards
Copying onto Envelopes and Cards
Using the auto document feeder
Press a
Sending a Fax
Sending Faxes
Sending a Fax
Speed Dialling Press
See Selecting Temporary Fax Settings on
If you are using the document glass
If the memory becomes full
Using the Redial key
Storing a Number for Speed Dialling
Super G3
Stored #01 OK?
Editing and deleting auto-dial numbers
Display of fax mode appears if needed
Press Enter Make the desired changes to the name
Resolution
Selecting Temporary Fax Settings
To select Duplex Scan, press
Line Monitor
Checking and cancelling stored fax jobs
Other Fax Transmission Settings
Appears and then press Enter
Press Times
Automatic redialling when the line is busy
Press the numeric keys to enter
Recall times for automatic redialling when the line is busy
Press FAX Then press Menu
Press Twice
Automatic redialling after a line error
Example 1 minute Press repeatedly to exit
Desired interval in minutes any 2-digit
Number from 01 to 15 04 to 15
Poland
Press Select the resolution setting
Default resolution for faxing
Fine
To select Monitor OFF
Using an Extension Phone to Send a Fax
Default Line Monitor setting
Press To select Monitor on or
Press to select SEND. Replace the extension phone
When you hear the fax tone, press On the machine
Broadcasting Sending a Fax to Multiple Destinations
Select a destination using one of the methods below
Press Enter To store the destination
When you are ready to begin transmission, press
Broadcasting using a Group Key
Storing numbers in a Group
Display of fax mode appears if needed Press FAX Then press
Press To select SET
Press To select Clear
Deleting a Group
Timer Transmission
Enter the time at which you want the fax to be sent
Specify the destination using one of the methods below
Cancelling a timer job
Select the reception mode
Selecting the Reception Mode
FAX only mode
EXT. TEL mode
Changing the number of rings
Using FAX only Mode
If you hear a fax tone, press on the machine
Using EXT. TEL Mode
Press to select RECEIVE. Replace the extension phone
Size printing Press repeatedly to exit
Reception Ratio
Press Auto to select automatic
Reduction, or 100% to select full
Substitute Reception to Memory
Polling Requesting a Fax Transmission
Special Fax Functions
100
101
Being Polled Memory Polling
102
Clearing a memory polling document
103
Cancelling a print job
Printing
Printing a Document From an Application
104
Selecting Print Settings
Printing Preferences from the Printers and Faxes folder
105
Setup tab
Select the Paper Size and Paper Source
106
Advanced tab
107
108
Printing on Envelopes and Cards
109
Scanning From a Twain Application
Scanning
110
111
Scanning From a Twain Application
112
113
Start your WIA-compliant application on your computer
Scanning From a WIA Application Windows XP/Me only
114
Place the original on the document glass
Click the File menu and select From Scanner or Camera
115
116
117
Scanning From the Scanner Wizard Windows XP/Me only
Scanners and Cameras
118
Scanning From the Operation Panel
Cameras
Selecting Button Manager to handle scanner events
119
Windows→ XP/Me
120
Control Panel, double-clickScanners and Cameras
121
Send to this application, select Sharp Button Manager
Scanning a document from the operation panel
To select scan mode
122
123
Configuring Button Manager settings
124
125
When FAX is selected as the application
126
When OCR is selected as the application
127
When Filing is selected as the application
Press Menu and then Z
Printing Lists
Activity List
128
Group List
Setup List
Timer List
Telephone Number List
130
Transaction Report
Headings in the Transaction Report
131
Transaction Report print condition
Press a number from To select the condition for printing
To turn it off
Auto print-out of Activity List
132
Press To turn on auto print, or
133
Maintenance
Cleaning the Scanning Glasses and Rollers
Cleaning the scanning glass in the auto document feeder
134
Cleaning the document glass
Cleaning the housing
Cleaning the print rollers
135
136
Replacing the Toner Cartridge
137
Continue from on page 19 to install the new toner cartridge
Replacing the Drum Cartridge
Viewing the total number of pages printed
138
Replacing the drum cartridge
139
Problem Solution
Troubleshooting
Problems and Solutions
Line error
141
Dialling and fax transmission problems
142
Fax reception problems
143
Copying problems
144
General problems
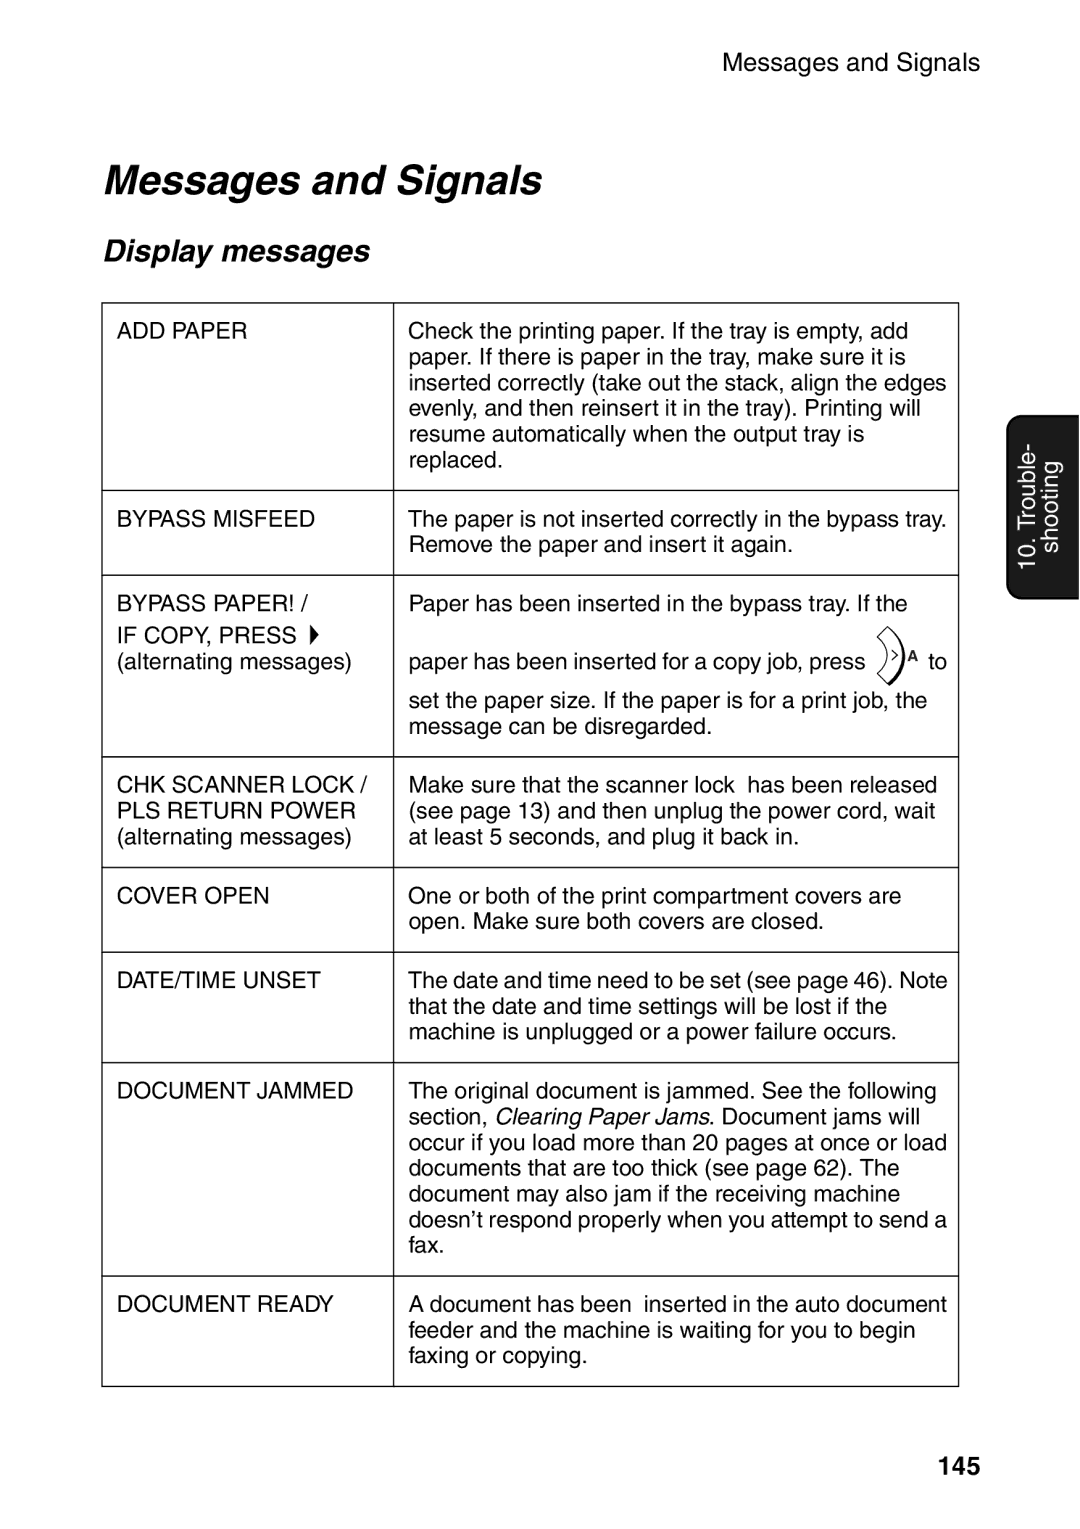
Display messages
Messages and Signals
145
FAX RX in Memory
146
147
Audible signals
Clearing a jammed document
Clearing Paper Jams
148
149
150
Clearing jammed printing paper
151
152
Index
153
Index
Page
Luokan 1 Laserlaite Klass 1 Laserapparat Output Power
Langenwiesenstrasse 7, 8108 Dällikon, Switzerland Phone 01
Sharp House, Thorp Road, Newton Heath, Manchester, M40 5BE
Via Lampedusa 13, 20141 Milano, Italia Telefono +39