XV-Z30000
Model No Serial No
Void the users authority to operate this equipment
See bottom of projector
Sharp Plaza, Mahwah, New Jersey TEL 1-800-BE-SHARP
Information
For Future Reference
Using the Menu Screen
Contents
Reference
Adjusting the Projector Function PRJ-ADJ Menu
Power-Cord Protection
Cleaning
Power Sources
Accessories
Overloading
Damage Requiring Service
Replacement Parts
Safety Check
Do not block the exhaust and intake vents
Avoid locations with extremes of temperature
Rest your eyes occasionally
Other connected equipment
Using the projector in other countries
Temperature monitor function
Observe the following safeguards when using the 3D Glasses
For Macintosh
When you want to view the Setup Manual
For Windows
Optional accessories
Accessories
Part Names and Functions
Power indicator Lamp indicator Temperature warning indicator
Rear View Terminals
Using the Kensington Lock
Introduction
Inserting the Batteries
Ensure that you do not drop it or expose it to
Remote control sensor 33 n 10 m
Usable Range
Easy Start
Setup and Projection
Control
On the remote control
Standard Setup Front Projection
Setting Up the Projector
Video Setup
Setting Up the Projector
Formula for picture size and projection distance
Screen Size and Projection Distance
Ceiling-Mount Setup
Projection PRJ Mode
Terminals on the Projector
Connecting the Projector to Other Equipment
Connecting to Video Equipment
Connecting to a computer using the RGB cable
Connecting to a Computer
Controlling the Projector by a Computer
AC socket Power cord supplied To AC outlet
Connecting the Power Cord
When connecting to the LAN terminal using a LAN cable
Turning the Projector On
Turning the Projector On/Off
ROn-screen display
Press H&V Shift on the remote control
Image Projection
Shifting the Lens
Rotate the adjustment feet to adjust the projected angle
Using the Adjustment Feet
Adjusting the Focus
Adjusting the Projected Image Size
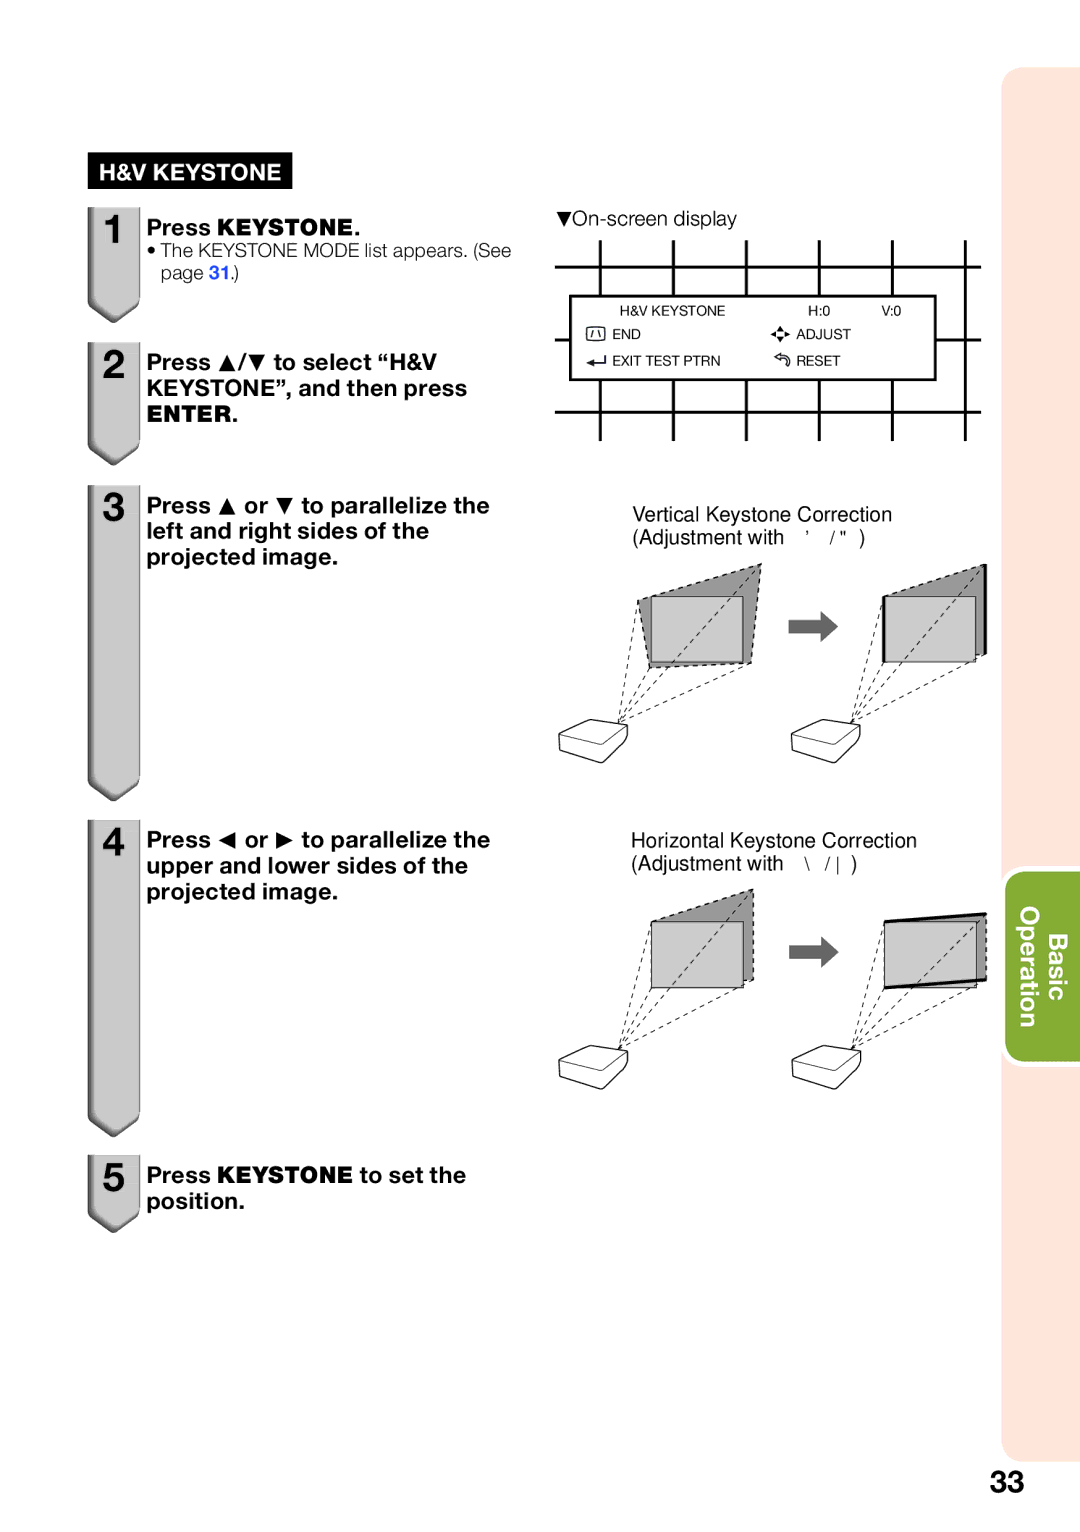
Press Keystone
Press P/R/O/Q to adjust Keystone Correction
Correcting Trapezoidal Distortion
Geometric Adjustment
Press Keystone to set the position
Press P/R to select H&V KEYSTONE, and then press
Press P or R to parallelize
Left and right sides
Sphere correction
Press P/R/O/Q to adjust
Press Keystone to set theAdjustment with R/O position
Press P/R to select SPHERE, and then press Enter
Hdmi 1/2, Component and Computer buttons
Switching the Input Mode
Input list
Press Resize on the remote control or on the projector
Resize Mode
Press image adjustment buttons
Operating with the Remote Control
Adjusting the Image
Selecting the Picture Mode
Hiding the Menu Temporarily Menu Hide
Switching the Iris Setting
Auto Sync Auto Sync Adjustment
Switching the Eco+Quiet Mode
Picture menu
Menu Items
RGB
3D Menu
Press Menu
Using the Menu Screen
Menu Selections Adjustments
Press Q or O and select Picture to adjust
Press Enter
To adjust the projected image while watching it
Press P or R and select Bright to adjust
Press O or Q to adjust the item selected
Menu operation n
Picture Adjustment Picture Menu
Selecting the Picture Mode
Eco+Quiet
Adjusting the Image
Switching the Iris Setting
Using the Advanced
Picker
Adjusting the Colors
Adjust the curve to adjust the image brightness
Custom Gamma
S. color adjustment screen
Resetting All Adjustment Items
Adjusting the Bright Boost
Selecting the Film Mode
Setting Detail Enhancement
Setting the Resolution
Computer Image Adjustment SIG-ADJ Menu
Signal Info
Signal Type Setting
Setting the Video Setup
Adjusting the Dynamic Range
Trigger
Adjusting the Projected Image SCR-ADJ Menu
Setting the Resize Mode
2Adjusting the Image Position
Black Mask
Adjusting the Projected Image SCR-ADJ Menu Continue
Adjusting the Overscan
Setting On-screen Display
Selecting the On-screen Display Language
See page 22 for details of Projection PRJ Mode
Selecting the Menu Screen Position
Reversing/Inverting Projected Images
Economy Mode
Setting No Operation Off Mode
Setting the Power Save Mode Economy Mode
Setting the Input Terminal Names Input Name
Setting One Touch Play
Setting the One-Touch Playback Function One Touch Play
Setting the System Standby Function System Standby
Turning LED Off
Adjusting the Projector Function PRJ-ADJ Menu
Setting the Demo Mode
Fan Mode Setting
Lamp Timer Life
Returning to the Default Settings
On the projector, press
Setting Up the Projector Network Environment Network Menu
Setting a Password
Select Password, then press Q
Enter IP Address using P, R, Q and O, then press Enter
Dhcp Client Setting
TCP/IP Setting
Returning to Default Settings Network
You can confirm the following items
Confirming the Projector Information
Enjoying 3D Image Viewing
Precautions on using the 3D Glasses
Precautions on installing the IR emitter
As you get more comfortable viewing 3D images
Precautions on viewing 3D images
Epilepsy
Part Names
Supplied Accessories for the 3D Glasses
Close the battery cover
Before Using the 3D Glasses
Replacing the Button Cell Battery
Remove the button cell battery
Attaching the 3D Glasses Band
Using the 3D Glasses
Attaching the Nose Pad
To 3D Synchro terminal IR emitter cable
Connecting the IR Emitter to the Projector
Install the IR emitter unit to the stand
Position the IR emitter
Turn on the 3D Glasses and place them over your eyes
When 3D Auto Change is set to No
When 3D Auto Change is set to Yes
Viewing 3D Images
Press P/R to select 3D Press O/Q to select On or Off
Press 3D Menu
Viewing Time Info
3D Depth Adjust
3D Auto Change
3D Format
Setting the 3D Format Menu
3D Glasses lenses
S 0 8 B Manufacture number Color
Specifications 3D Glasses
Effective Distance
Dimensions
Cleaning the exhaust and intake vents
Maintenance
Cleaning the projector
Cleaning the lens or lens cover
About the lamp indicator
Maintenance Indicators
About the temperature warning indicator
Red on Abnormally high Are high Lower than 95F +35ºC
Replacing the Lamp
Regarding the Lamp
Lamp
Lamp unit
Removing and Installing the Lamp Unit
Disconnect the power cord
Remove the lamp unit cover
Resetting the Lamp Timer
Computer
Compatibility Chart
DTV
23-27
Troubleshooting
Problem Check
68-70
For Sharp Assistance
Hdmi
Specifications
Dimensions
Index