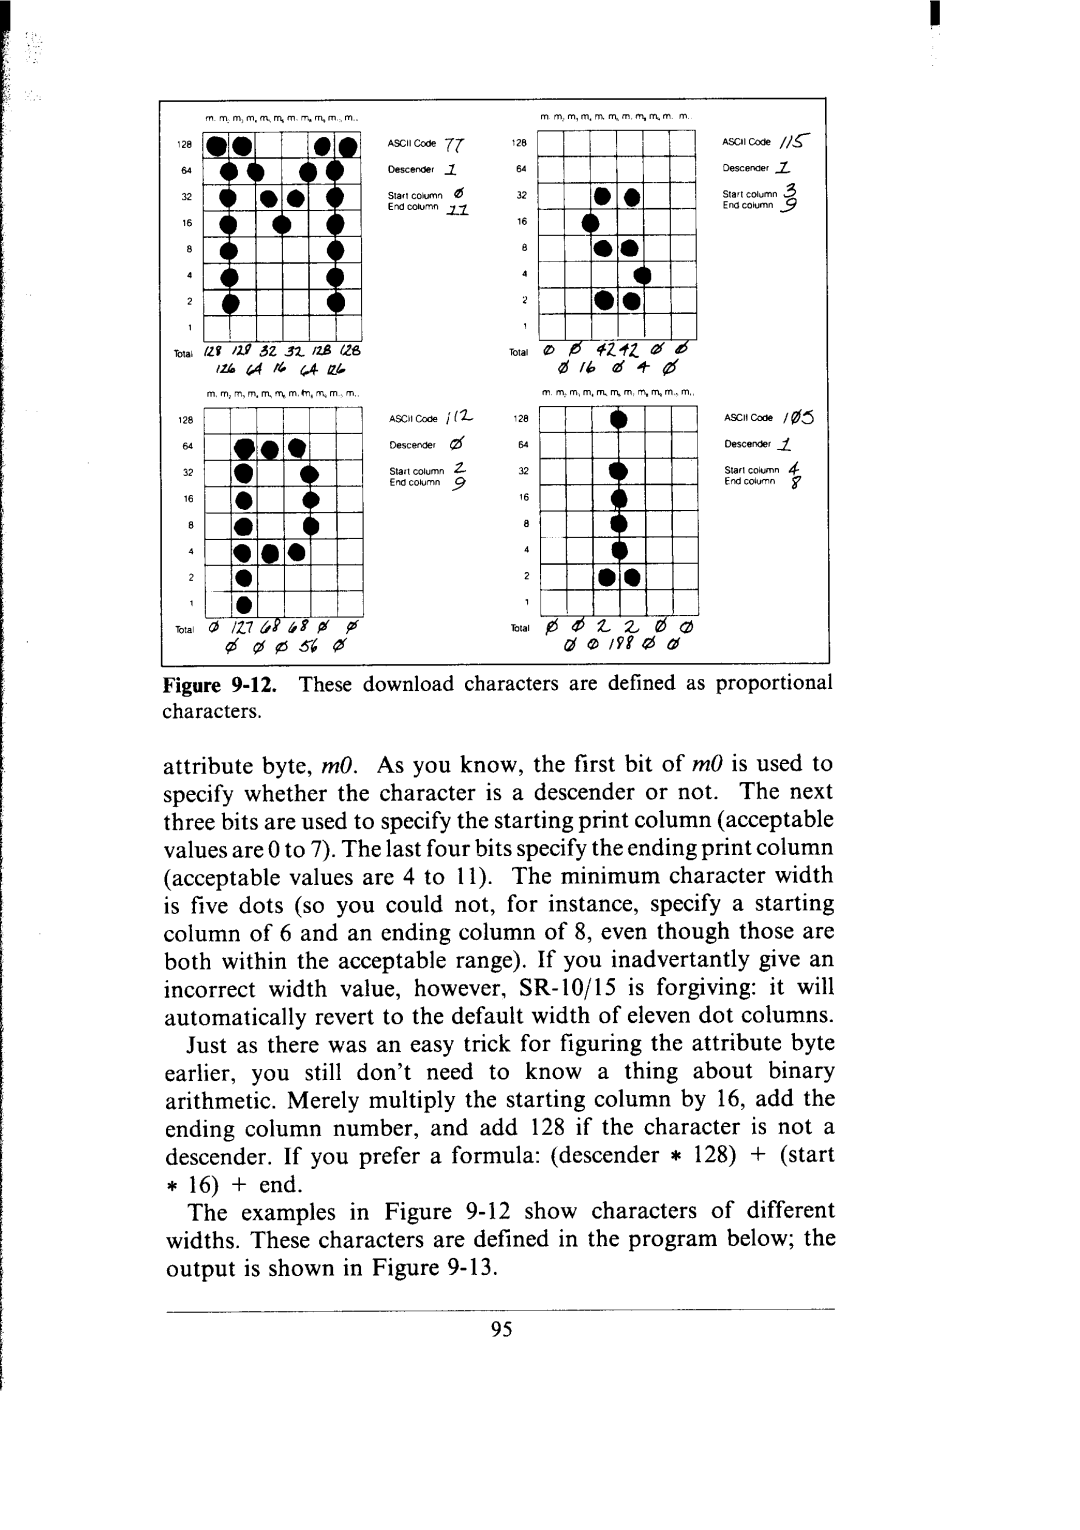
USER’S MANUAL
SR-IO/I5
Statement
Federal Communications Commission Radio Frequency Interference
A note about the programs in this manual
Trademark Acknowledgement
the new SR-lo/Is
A Special Message to the New Owner
So, gentle reader, with this manual we hand you the key to
Table of Contents
Self-Test
First
Changing
Starting
Line
Controls
Commands to Control Vertical Position of
Commands to Control Print Style
Commands to Control Horizontal Position of
Commands
Functions of the Connector Signals
Table of Tables
Page
WHERE SHALL WE PUT IT?
SETTING UP SR- 1O/15
CHAPTER
WHAT HAVE WE HERE?
on the next
n Removing packing and shipping screws
n Installing the platen knob
n Installing the ribbon cartridge
Figure l-5. A guide pin on each side of the ribbon cartridge helps to align the cartridge during installation
5. Now thread the ribbon carefully between the print head and the ribbon guide next to the platen. Take a good look at Figure l-7. You might want to use a ball point pen to lightly press the ribbon guide against the platen runbber roller while you insert the ribbon into the thin space between the print head and ribbon guide. Zmporiant Center the ribbon vertically in the middle of the print head to avoid misprints or the ribbon coming off during printing
Figure 1-8. SR-lo/15 has parallel interface as standard
CONNECTING SR-lo/15 TO YOUR COMPUTER
GETTING TO KNOW YOUR SR-lo/15
COMPONENTS AND CONTROLS
CHAPTER
Power cord connector
Figure 2-1. Front and rear views of SR-IO
Ground terminal
Power cord conndr
Figure 2-2. Front and rear views of SR-15
Bail lever Control ,Ll W
POWER LAMP - Glows green when the power is on
Page
PAPER SELECTION AND LOADING
Position of
Left margin on the single sheet guide
Distance
from Left-Hand
Figure 2-5. The metal guide is used to align the left margin
1. Turn off the power and remove the rear cover. After
Here’s the proper sequence for loading
you’ve practiced a few times, you’ll find it easy to load
Page
INSTALLATION
RIBBON
ADJUSTING THE GAP
SELF-TEST
SOME TIPS FOR SMOOTHER OPERATION
Page
USING COMMERCIAL SOFTWARE
Using SR-lo/15 with commercial software
GETTING STARTED WITH SR-lo/l5
CHAPTER
n First, some terminology
name
line feed
abbreviation
of its name
n The escape code
Selecting the right software mode
CHR$ function Problem codes Command syntax used in this manual
CONTROLLING SR-lo/15 WITH BASIC
Subjects covered in this chapter include
OPEN4,4 cMD4 LIST CLOSE4
PR#l LIST PR#@
LLIST it or however your computer does it. We’ve crossed the
NEW 10 LPRINT CHR$7 RUN
24LPRINT TESTING
ESC CHR$69
10 LPRINT CHR$27 CHRS69
COMMAND SYNTAX USED IN THIS MANUAL
SELECTING THE RIGHT SOFTWARE MODE
in STAR mode. There are some cases where you would use IBM mode with your computer, if you wish
Page
In this chapter we’ll cover Near letter quality characters Italics
PRINTING TEXT WITH SR-lo/15
Underlining Superscript and subscripts Print pitch Print emphasis
SOME SPECIAL KINDS OF TEXT
In this program, line 20 selects NLQ characters with the
Here is what you should get
n Superscripts and subscripts
CHANGING THE PRINT PITCH
30 LPRINT This line is CONDENSED pitch
Now the results look like this
This
Here’s what you should get from this program
line
pitch
This linm im DOUBLE-8TRIKE and EMPHASIZED
MAKING SR-lo/15 PRINT DARKER
MIXING MODES
Pitch Normal Emphasizzd Double-strike kEmphasized
Master Select and the 256 ASCII Codes Double-strike
SUMMARY
Control code
Function
LINE SPACING AND FORMS CONTROL
In this chapter we will learn how to Change the vertical spacing
Change the length of the page Set top and bottom margins
STARTING NEW LINES
CHANGING LINE SPACING
NEW 18 FOR I = 1 TO
This is what you will get
30 LPRINT CHR$27 A CHR$I 4@ LPRINT This line spacing is set to
60 LPRINT Line spacing is set to l/6 inch normal. 70 LPRINT CHR$27
30 LPRINT CHR$27 A CHR$I LPRINT CHR$27
command
79 LPRINT CHR$27 A CHR$12 LPRINT CHR$27 fl11
30 LPRINT CHR$27 3 CHR$I
STAR mode
spacing
CHR$h
10 Demo one-time line feeds
FORMS CONTROLS
Page
CHANGING THE PAGE LENGTH
Table 63 Form feed commands
Form length commands
TOP AND BOTTOM MARGINS
Control code
SUMMARY
Function
10 Demo top and bottom margins 20 LPRINT CHR$12 Form feed
feed
n/216 inch
ESC “j”CHR$n CHR$ ESC CHR$ ESC “C” CHR$n ESC “C” CHR$O
One-time reverse line feed of n/216 inch for IBM mode Form feed
ESC “R” CHR$n ESC “r” CHR$n ESC “N” CHR$n ESC “0”
Reverse form feed Set page length to n lines CHR$n
USING HORIZONTAL TABS
In this chapter we will discover how to use Horizontal tabs
FORMATTING YOUR OUTPUT
Vertical tabs Left and right margins
When you run the program now it produces this
The commands
SETTING LEFT AND RIGHT MARGINS
SR-10/15’s left and right margins work just like a
typewriter-once they are set all the printing is done between them
USING VERTICAL TABS
12 LPRINT CHR$27 P CHR$lfl 14 LPRINT CHR$2@ CHR$4@ CHR$50 CHR$@
60 LPRINT CHR$ll Fifth tab
First tab Second tab Third tab Fourth tab
SUMMARY
“B” nl n2 d
Control code
Function
Commands covered in this chapter include Bell Master reset
SPECIAL FEATURES OF THE SR-lo/15
Unidirectional printing Eighth bit control Block graphics
International character sets Macro instruction
You can try this by typing
n Printing to the bottom of the sheet
NEW 10 LPRINT BACKSPACE DOES NOT
50 LPRINT CHR$127 CHR$127 CHR$127 60 LPRINT WORK 74LPRINT CANCEL TEXT
20 LPRINT CHRS8 CHR$8 CHR$8 3@ LPRINT I===WORK
40 LPRINT DELETE DOES NOT
n Unidirectional printing
n The seven bit dilemma
n Block graphics characters and special symbols
Page
184 194 l 2!34 t 214 r 224 I-r L .J4 ? 244 c’ 254
134 A 144 154 ti 164 iT
n International character sets
The characters that change are shown beneath their ASCII code in Table
Define macro
SUMMARY
Control code CHRS7 ESC “Y”
ESC “Y” ESC “y” ESC “y” ESC “@” CHR$ CHRSl7 ESC “8”
Function
Page
In this chapter we’ll cover
CREATING YOUR OWN CHARACTERS
Designing and printing your own characters
Designing proportional characters
0.0 oao
THE PRINT MATRIX
DEFINING YOUR OWN CHARACTERS
n Rule 1 Download characters are eight dots high
12*I
WRONG
w Assigning a value to your character
Figure 9-9. Character designs for the three graph symbols
n Download character definition command
0 000 1011 = Ildecimal
10 LPRINT CHR$27 * CHR$l CHR$160 CHRS162 20 FOR N = 160 TO
PRINTING DOWNLOAD CHARACTERS
30 FOR M = 0 TO 40 READ MM 50 LPRINT CHR$MM 60 NEXT M 70 NEXT N
80 LPRINT 90 DATA 139,2,5,8,241,0,0,241,8,5,2,0
If it doesn’t, check the last program we ran for errors, then rerun it
140 LPRINT ESC$ $1 150 LPRINT wAutos TB$
DEFINING
ERASING DOWNLOAD CHARACTER DEFINITIONS
PROPORTIONAL
CHARACTERS
Page
240 DATA 112,41,0,0,127,0,68,0,68,56,0,0,0
230 DATA 105,200,0,0,0,0,2,~88,2,0,0,0,0
250 DATA 115,185,0,0,0,16,42,0,42,4,0,0,0
Standard characters without proportional spacing
W Connecting characters
10 Program to define and print numerals
420 DATA 11, 2, 0, 2, 0, 29 8, 2, 4, 10, 244
400 DATA 11, 0, 0, 0, 0, 0, 32, 0, 32, 0, 32
430 DATA9, 244, 10, 244, 2, 8, 2, 8, 2, 0, 0
450 DATA 11, 8, 8, 0, 0, 0, 48, 8, 112, 0, 96
0, 6, 0, 14, 0
DATA
70, 0, 70, 0, 70
DATA
1 nl n2 mO ml ...mZl
ESC “*”
Defines download character into RAM for STAR mode
Control code
Page
PRINTING WITH DOT GRAPHICS
High resolution graphics
SR-10/15’s bit image graphics capabilities
Printing a pre-defined shape Plotting a calculated shape
n Specifying the number of columns of dots
n Specifying the graphics data
49OPEN “LPTl” AS 111 WIDTH #1,255
10 ‘Demo dot graphics 20 PI = 30 WID =
50 PRINT #l,CHR$27 “K” CHR$WID MOD 256 CHR$INTWID/256
60 FOR I = 0 TO WID-1 70 PRINT #1,CHR$2”INTl+SINI*PI/32*3.5+.5
Page
Page
60 GRAPHICS = CHR$27+CHR$75 70 DIM LOG0$4 80 WIDTH LPT1,255
DATA 255,127,0,0,0,0,0,0,0,0
DATA 7,3,0,0,0,0,0,0,0,0
DATA 192,128,0,0,0,0,0,0,0,0
DATA 128,0,0,0,0,0,0,0,0,0
LYFAC = 87/LY
600 ’
you need to change are the values in line 40. The array MASK% contains the values of the dots. In order to make this program run on the most computers, we’re using only six pins for graphics. With many computers, you can use all eight available pins. In lines 90 and 100 we’ve defined some other variables you’ll be interested in LX, LXFAC, LY, and LYFAC are used as scaling factors. By changing these values, you can change the size of your printed image or even distort it you can, for example, make our circle print as an ellipse. Experiment a little bit
610 Subroutine to plot a star 620 630 RAD =
So what
They were all printed using the plotting program in this chapter
do these
different
or ESC “*” CHR$3 nl
Dot graphics commands
Double density/double speed ‘
Double density graphics
Quadruple
density graphics
Double density graphics Double density/double speed
Normal density graphics
Quadruple density graphics
CRT graphics
Star’s engineers have given programmers a unique shortcut for
ESC ‘2” nl n2 ml m2... Print quadruple density graphics for IBM mode
ESC “g” n0 nl n2 ml m2
Master graphics selection for STAR mode ESC 3” n0 nl n2 ml m2
Master graphics selection for IBM mode