and Operation
Introduction
Viewing ・ Listening
Recording
Set up
Others
Connecting the Camera and Personal Computer by Network (Cont.)
Connection Configuration
Two configurations are available for connection of network cameras. ・Crossover connection
・Connection via a hub, switch, or router
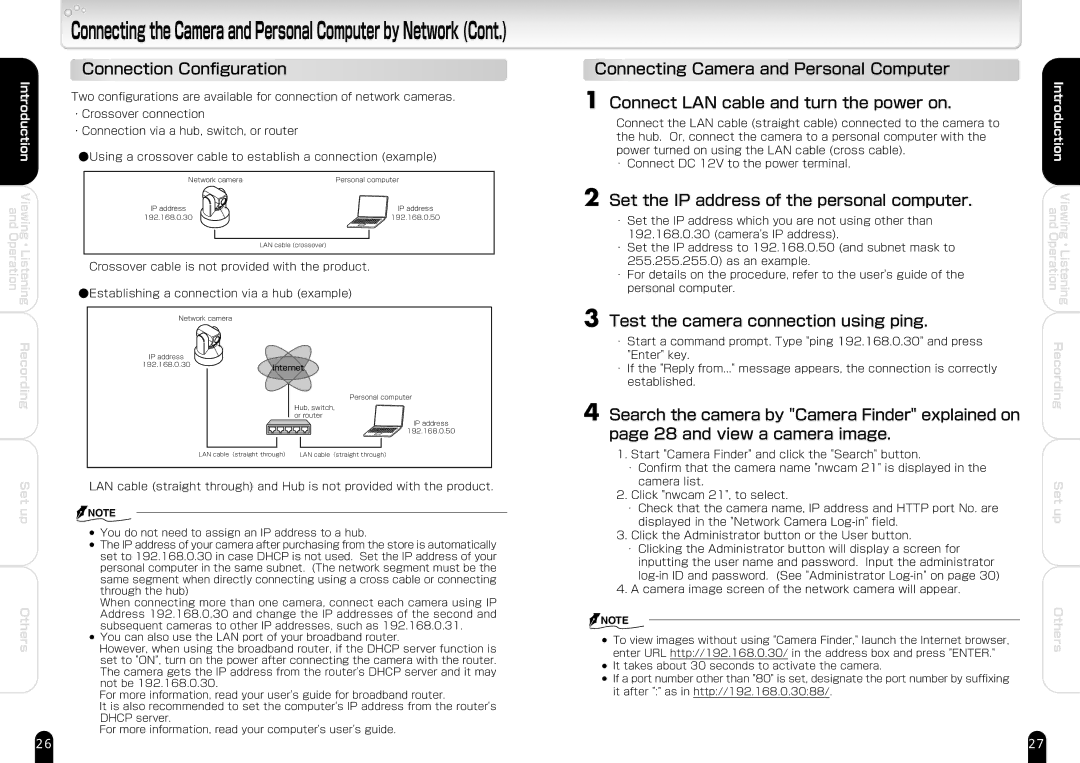
●Using a crossover cable to establish a connection (example)
Network camera | Personal computer |
IP address | IP address |
192.168.0.30 | 192.168.0.50 |
LAN cable (crossover)
Crossover cable is not provided with the product.
●Establishing a connection via a hub (example)
Network camera
IP address� |
|
192.168.0.30 | Internet |
| |
| Personal computer |
| Hub, switch, � |
| or router |
IP address� 192.168.0.50
LAN cable(straight through)� LAN cable(straight through)�
LAN cable (straight through) and Hub is not provided with the product.
![]() NOTE
NOTE
●You do not need to assign an IP address to a hub.
●The IP address of your camera after purchasing from the store is automatically set to 192.168.0.30 in case DHCP is not used. Set the IP address of your personal computer in the same subnet. (The network segment must be the same segment when directly connecting using a cross cable or connecting through the hub)
When connecting more than one camera, connect each camera using IP Address 192.168.0.30 and change the IP addresses of the second and subsequent cameras to other IP addresses, such as 192.168.0.31.
●You can also use the LAN port of your broadband router.
However, when using the broadband router, if the DHCP server function is set to "ON", turn on the power after connecting the camera with the router. The camera gets the IP address from the router's DHCP server and it may not be 192.168.0.30.
For more information, read your user's guide for broadband router.
It is also recommended to set the computer's IP address from the router's DHCP server.
For more information, read your computer's user's guide.
Connecting Camera and Personal Computer
1 Connect LAN cable and turn the power on.
Connect the LAN cable (straight cable) connected to the camera to the hub. Or, connect the camera to a personal computer with the power turned on using the LAN cable (cross cable).
・Connect DC 12V to the power terminal.
2 Set the IP address of the personal computer.
・Set the IP address which you are not using other than 192.168.0.30 (camera's IP address).
・Set the IP address to 192.168.0.50 (and subnet mask to 255.255.255.0) as an example.
・For details on the procedure, refer to the user's guide of the personal computer.
3 Test the camera connection using ping.
・Start a command prompt. Type "ping 192.168.0.30" and press "Enter" key.
・If the "Reply from..." message appears, the connection is correctly established.
4 Search the camera by "Camera Finder" explained on page 28 and view a camera image.
1.Start "Camera Finder" and click the "Search" button.
・Confirm that the camera name "nwcam 21" is displayed in the camera list.
2.Click "nwcam 21", to select.
・Check that the camera name, IP address and HTTP port No. are displayed in the "Network Camera
3.Click the Administrator button or the User button.
・Clicking the Administrator button will display a screen for inputting the user name and password. Input the administrator
4.A camera image screen of the network camera will appear.
![]() NOTE
NOTE
●To view images without using "Camera Finder," launch the Internet browser, enter URL http://192.168.0.30/ in the address box and press "ENTER."
●It takes about 30 seconds to activate the camera.
●If a port number other than "80" is set, designate the port number by suffixing it after ":" as in http://192.168.0.30:88/.
Introduction | |
and | Viewing |
Operation | Listening |
| ・ |
Recording | |
Set up
Others
26 | 27 |