Manuals
/
Uniden
/
Computer Equipment
/
Scanner
Uniden
BCD396T
owner manual
LTR/EDACS System Worksheet, 138
Models:
BCD396T
1
138
156
156
Download
156 pages
52.54 Kb
135
136
137
138
139
140
141
142
Troubleshooting
Specification
Setting the Channel Delay Time
Connecting the Antenna
Warranty
Maintenance
Preset Fleet Maps
Optional Accessories
Setting Up Your Scanner
Adjusting the Key Beep
Page 138
Image 138
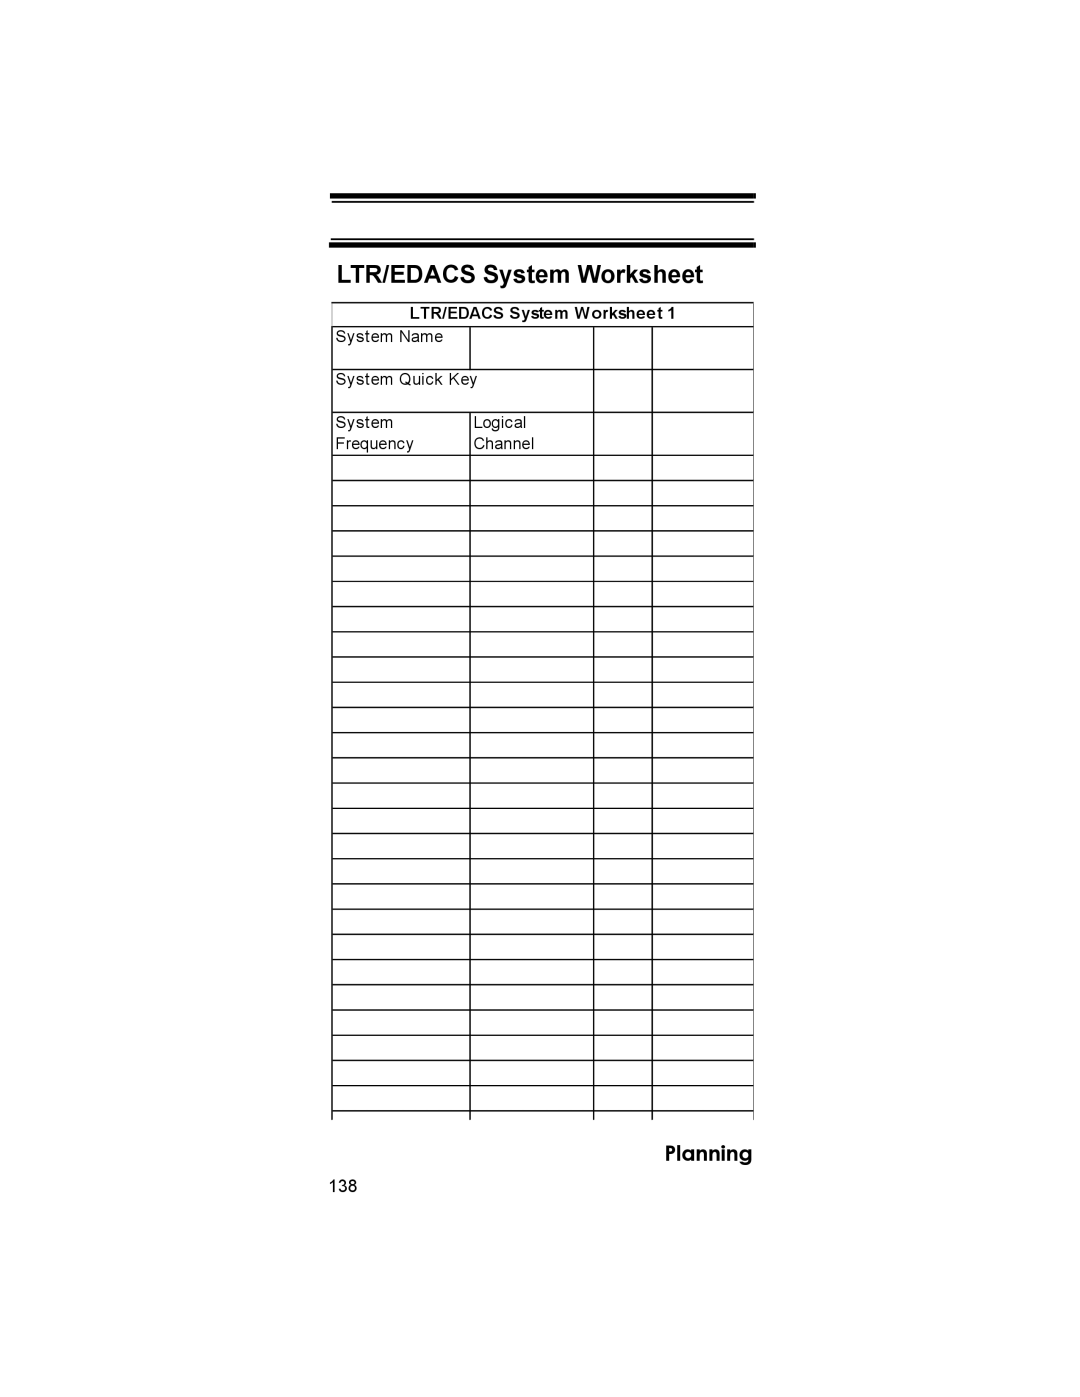
LTR/EDACS System Worksheet
LTR/EDACS System Worksheet 1
System Name
System Quick Key
System Frequency
Logical Channel
Planning
138
Page 137
Page 139
Page 138
Image 138
Page 137
Page 139
Contents
BCD396T OWNER’S Manual
Precautions
Precautions
Precautions
Contents
Contents
Contents
Contents
FCC Wants You to Know
Scanning Legally
FCC Wants You to Know
FCC Wants You to Know
Introduction
Introduction
Feature Highlights
Feature Highlights
Feature Highlights
Trunk Tracking
Weather
Priority
Using the Multifunction Scroll Control
About This Manual
Entering Text
Menu Program System
How the Scanner’s Controls Are Represented in This Manual
Or rotate the scroll control to the left. To move
Select the system
= Edacs = LTR
Understanding the Scanner’s Memory
What is Scanning?
Understanding Scanning
Understanding Scanning
What is Searching?
What is CTCSS/DCS?
Ctcss Frequencies Hz
Conventional Scanning
What is Trunk Tracking?
Simplex Operation
Repeater Operation
Trunked Scanning
Types of Trunking Systems
Motorola Trunking
Understanding Scanning
Edacs Trunking
LTR Trunking
Where To Get More Information
Call Motorola/EDACS
Information On The Internet
Understanding Scanning
Included With Your Scanner
Included With Your Scanner
Setting Up Your Scanner
Using Internal Batteries
Setting Up Your Scanner
Illus show batteries being installed in batt compartment
Install 3 AA batteries, matching the polarity sym- bols +
Using Rechargeable Batteries
Replace the cover
Connecting an Optional Antenna
Using AC Power
Connecting the Antenna
Removing the Display Sticker
Attaching the Belt Clip
Connecting an Earphone Headphone
Connecting an Extension Speaker
Attaching the Wrist Strap
Look At The Keypad
Or off. Press quickly to cancel a
Scan or Scan Hold mode
Search or Search Hold mode
Quick key in scan mode
Key Name Description Enters a + WX Selects the weather
Mode Enters a Moves the active
Channel in the scan hold mode
Function in the menu in the Hold
Items, to quickly edit a channel
Key Name Description
Press to select input and menu
Scan Hold Mode, and store a fre
Look At The Display
Illus show display
Using Menu
Using Func
Scanning Systems
Turning On the Scanner and Setting the Squelch
Basic Operation
Basic Operation
Preprogrammed System Tips
Selecting Systems to Scan
Selecting System Channel Groups
ID Scan/ID Search Mode
Locking/Unlocking Systems
Locking/Unlocking Channels
Quickly Storing an ID During ID Search
Temporarily Holding On a System
Holding On a Channel
Quick-Storing Channels or Talk Group ID’s
Quickly Recalling Channels
Monitoring Trunking Activity
Using the Menu
Using the Menu
Menu Item
Programming Systems Menu
Menu Option Menu Submenu
Set Frequencies Set Modulation Set Attenuator
Displaying System Information
Other Settings
Adjusting the Key Beep
Locking/Unlocking the Keypad
Turning Power Save On or Off
Using the Backlight
Priority Scan
Settings Set Audio AGC
Setting the Audio AGC
Adjusting the Display Contrast
Settings Adjust Contrast
Connecting Your Scanner to a Personal Computer
Using the Cloning Options
Settings PC Control
Master scanner Clone Master Press Scan Key
Wired Cloning
Xfer Information Wired Clone
Master scanner Clone Slave Press Scan Key
On-Air Cloning
Menu Xfer Information On-Air Clone
Programming Radio Systems
Programming Radio Systems
Programming Conventional Systems
Entering/Editing Conventional Channel Groups
Program System New System Conventional Confirm? Yes=E / No=
Edit Group New Group
Entering/Editing Conventional Channels
Program System
New System Conventional Confirm? Yes=E / No=
Programming Motorola Systems
Program System New System
Setting System Frequencies
Set Frequencies
Input a system frequency, then press the scroll control
Set Modulation
Setting Modulation
Setting Attenuation
Set Attenuator
Entering/Editing Motorola Channel Groups
Edit Group
Programming Edacs Systems
Entering/Editing Motorola Channels
Programming Radio Systems
Entering/Editing Edacs Channel Groups
Set Frequencies New Frequency
Programming LTR Systems
Entering/Editing Edacs Channels
Program System New System Confirm? Yes=E / No=
Entering/Editing LTR Channel Groups
Entering/Editing LTR Channels/ Talkgroups
These settings apply to the entire system
System-Level Settings
Programming/Editing Optional Settings
Editing the System Name
Edit Sys Option Set Quick Key
Setting System Lockout
Editing the System Quick Key
Edit Sys Option Set Lockout
Edit Sys Option Set Delay Time
Setting the System Hold Time
Setting the Channel Delay Time
Edit Sys Option Set Hold Time
Edit Sys Option ID Scan/Search
Setting ID Scan/Search Trunked Systems Only
Editing the Fleet Map Motorola Systems Only
Edit Sys Option Edit Fleet Map
Setting the Motorola Status Bit Motorola Systems Only
Edit Sys Option Set Status Bit
Edit Sys Option Set End Code
Setting the End Code Operation Motorola Systems Only
Setting I-Call Motorola Analog and Edacs Systems Only
Edit Sys Option Set I-Call
Edit Sys Option Emergency Alert
Setting Emergency Alert Motorola and Edacs Systems Only
Setting Control-Channel Only Motorola Systems Only
Set Level
Clearing All Locked-Out IDs
Edit Sys Option Adjust P25 Level
Reviewing Locked Out Frequencies
Edit Sys Option Rvw ID Srch L/O
Setting the Edacs ID Format Edacs Systems Only
Edit Sys Option Edcs ID Format
Copying Systems
Setting System Attenuation Trunked Systems Only
Deleting Systems
Delete System
Copy System New Sys Name?
Group-Level Settings
Entering/Editing the Group Name
Enter a name for the copied system, then press E
Setting the Group Quick Key
Setting Group Lockout
Deleting Groups
Delete Group
Channel-Level Settings
Editing the Channel Name
Edit Channel
Setting Channel Priority Conventional Channels Only
Setting Channel Alert
Setting CTCSS/DCS Conventional Channels Only
Set Alert
Set CTCSS/DCS
Setting the System Frequency Modulation
Srch/CloCall Opt Set Modulation
Setting Channel Attenuation Conventional Channels Only
Setting the Frequency Step Conventional Channels Only
Correct modulation type for the system you are programming
Setting Channel Lockout
Deleting Channels
Set Step
Delete Channel
To copy a channel including all settings
Copying/Pasting Channels
Copy Channel
Service Search
Searching and Storing
Searching and Storing
Quick Search
CTCSS/DCS Search
Custom Search
Editing a Custom Search Range
Editing a Service Search
Searching and Storing
Auto Search and Store
Selecting a System
Storing a Conventional System
Storing a Trunked System
Searching and Storing
Using the Close Call Feature
Using the Close Call Feature
100
Setting Close Call Options
101
Set CC Pause
Select Mode
Select Beep
102
Close Call Hits
103
Searching for Subaudible Tones
Search and Close Call Options
Managing Locked-Out Frequencies
Unlocking All Frequencies
Screening Out Broadcast Sources
Srch/CloCall Opt Broadcast Screen
105
Finding Repeater Output Frequencies
Srch/CloCall Opt Repeater Find
106
Setting Attenuation
Setting the Maximum Auto Store Value
Setting the Modulation Type
Srch/CloCall Opt Max Auto Store
Srch/CloCall Opt Set Delay Time
Setting Data Skip
Setting the Delay Time
Srch/CloCall Opt Set Data Skip
50.0 kHz, 100.0 kHz The scanner uses the selected step
Setting the Search Frequency Step
MenuSrch/CloCall Opt Set Step
109
Searching For a Weather Broadcast
Using Weather Alert Same
Using Weather Alert Same
Fire Tone Out Operation
MenuTone-Out for Tone-Out Setup
Setting Tone-Out Standby
Setting up Tone-Out
Tone-Out for Tone-Out Standby
Turning Weather Alert On/Off
WX Operation Weather Alert
112
Programming a Same Group
113
WX Operation WX Alt Priority
Setting WX Alert Priority
WX Operation Program Same
114
Care and Maintenance
Care and Maintenance
Cleaning
General Use
Repairs
Birdies
116
If your BCD396T is not performing properly, try these steps
Troubleshooting
Troubleshooting
117
118
119
Edacs
120
Specifications
Specifications
121
122
123
Optional Accessories
Optional Accessories
124
Preset Fleet Maps
Appendix
Appendix
Preset Map 13Preset Map
Preset Map 9Preset Map
Preset Map 11Preset Map
Preset Map 15Preset Map
User Defined Fleet Maps
Type I Programming Information
127
Size Code Restrictions
128
Planning
Planning
Collecting Information
Tips
130
Group Name and Quick Key
Filling Out The Motorola Worksheet
System Name and Quick Key
Frequency-Alpha Tag-Priority
Fleet Map Type I or Type I/Type II Hybrid Only
System Type
System Frequencies
Fill in the fleet map used by this agency
Talk Group ID-Alpha Tag-Alert
Filling Out the LTR and Edacs Worksheet
Band Plan VHF or UHF Only
133
System Frequencies and LCN
134
Conventional System Worksheet
135
Motorola System Worksheet
136
137
LTR/EDACS System Worksheet
138
139
Preprogrammed Systems
Preprogrammed Systems
140
141
State County City System Arizona
142
State County City System
143
144
145
Florida
146
Michigan
147
New York
148
149
Texas
150
151
One-Year Limited Warranty
One-Year Limited Warranty
152
153
154
155
Register Online Today
Top
Page
Image
Contents