User Guide Guide dutilisation
Page
Contents
Printing
Contents Selecting Print Options
Maintenance
Recycling and Disposal
Contents ColorQube 8570/8870 Color Printer User Guide
Safety1
Power Cord
Electrical Safety
General Guidelines
See also
Printer Location
Operational Safety
Operational Guidelines
Printer Supplies
Maintenance Safety
Symbol Description
Printer Symbols
Safety ColorQube 8570/8870 Color Printer User Guide
Features2
Right-Front View
Parts of the Printer
Rear View
Right-Side View
Down Arrow button
Control Panel
Standard Features
Printer Configurations and Options
Options and Upgrades
Menu Map
Configuration
Select Information Pages OK Select Configuration Page OK
Information Pages
Information Description
Other Information Pages
Select Sample Pages OK
Sample Pages
ColorQube 8570 Printer
More Information
ColorQube 8870 Printer
Xerox Support Centre
Installation and Setup
Choosing a Connection Method
Installation and Setup Overview
Printing the Connection Setup
Select Connection Setup OK Select Connection Setup Page OK
Connecting Directly Using USB
Connecting to a Network
Automatically Assigning the IPv4 Address
Assigning the Printer’s IP Address
Select IPv4 Address OK
Manually Assigning the IPv4 Address
Enabling IPv6
Configuring IPv6
Enabling IPv6 Using the Control Panel
Enabling IPv6 Using CentreWare is
Automatically Assigning the IPv6 Address
Setting the Interface ID
Select User Interface ID from MAC address
Setting DHCPv6 Options Using the Control Panel
Using DHCPv6
Setting DHCPv6 Options Using CentreWare is
Setting the IPv6 Address Using CentreWare is
Setting the IPv6 Address Using the Control Panel
Manually Assigning an IPv6 Address
Setting Address Precedence
Resetting the TCP/IP Configuration
Accessing CentreWare is
Using CentreWare Internet Services
Select Printer Identification OK
Finding the Printer’s IP Address
TCP/IPv4 Address TCP/IPv6 Addresses
Unix and Linux
Installing the Software
Operating System Requirements
Available Printer Drivers
Click Install Print Driver
Installing the Printer Driver for Windows
Installing the Printer for Macintosh OS X Version
Installing the Printer Driver for Macintosh OS
Bonjour Rendezvous Connection
LPD/LPR Connection
Installing the Printer for Macintosh OS X Version 10.4
USB Connection
Click Continue
Installing the Printer Driver for Unix Linux
Installing the Printer When Using Cups as the Print Spooler
Installing Other Drivers
Click the PPD Files using Cups Printing Services link
Installing Xerox Support Centre
Select Printer Controls OK Select Warmup Mode OK
Power Saver Settings
Power Saver Mode
Configuring Power Saver Mode
Fast Resume
Enabling and Disabling Power Saver Mode
Select Printer Controls OK
Page
Printing4
Printing Overview
ColorQube 8570 printer ColorQube 8870 printer
Supported Media
Recommended Media Lists
Ordering Media
Media That Can Damage Your Printer
General Media Loading Guidelines
Paper Storage Guidelines
Supported Paper Sizes and Weights
Select Information Pages OK
Loading Paper in Tray
Loading Media
Open the tray extension
Select Tray 1 Paper OK Select Change Setup OK
Using Manual Feed
Loading Paper in Tray 2, 3, 4, or
8X70-002
8X70-092 8X70-113
Press OK Select the desired paper type and then press OK
Select Tray 1 Mode OK
Setting Paper Handling Options
Selecting the Tray 1 Mode
Tray 1 Mode Setting Description
Select Tray 1 Prompt OK
Setting the Tray 1 Prompt
Tray 2 Mode Setting Description
Selecting the Tray 2-N Mode
Select Tray 2 Mode OK
Printing on Transparencies
Printing on Specialty Media
Printing on Transparencies from Tray
Transparency Printing Guidelines
Printing on Transparencies from Tray 2, 3, 4, or
8X70-104
Envelope Printing Guidelines
Printing on Envelopes
Printing on Envelopes from Tray
Printing on Envelopes from Tray 2, 3, 4, or
8X70-127
Label Printing Guidelines
Printing on Labels
Printing on Labels from Tray
Printing on Labels from Tray 2, 3, 4, or
If necessary, adjust the paper guides to fit the labels
Glossy Paper Printing Guidelines
Printing on Glossy Paper
Printing on Glossy Paper from Tray
Printing on Glossy Paper from Tray 2, 3, 4 or
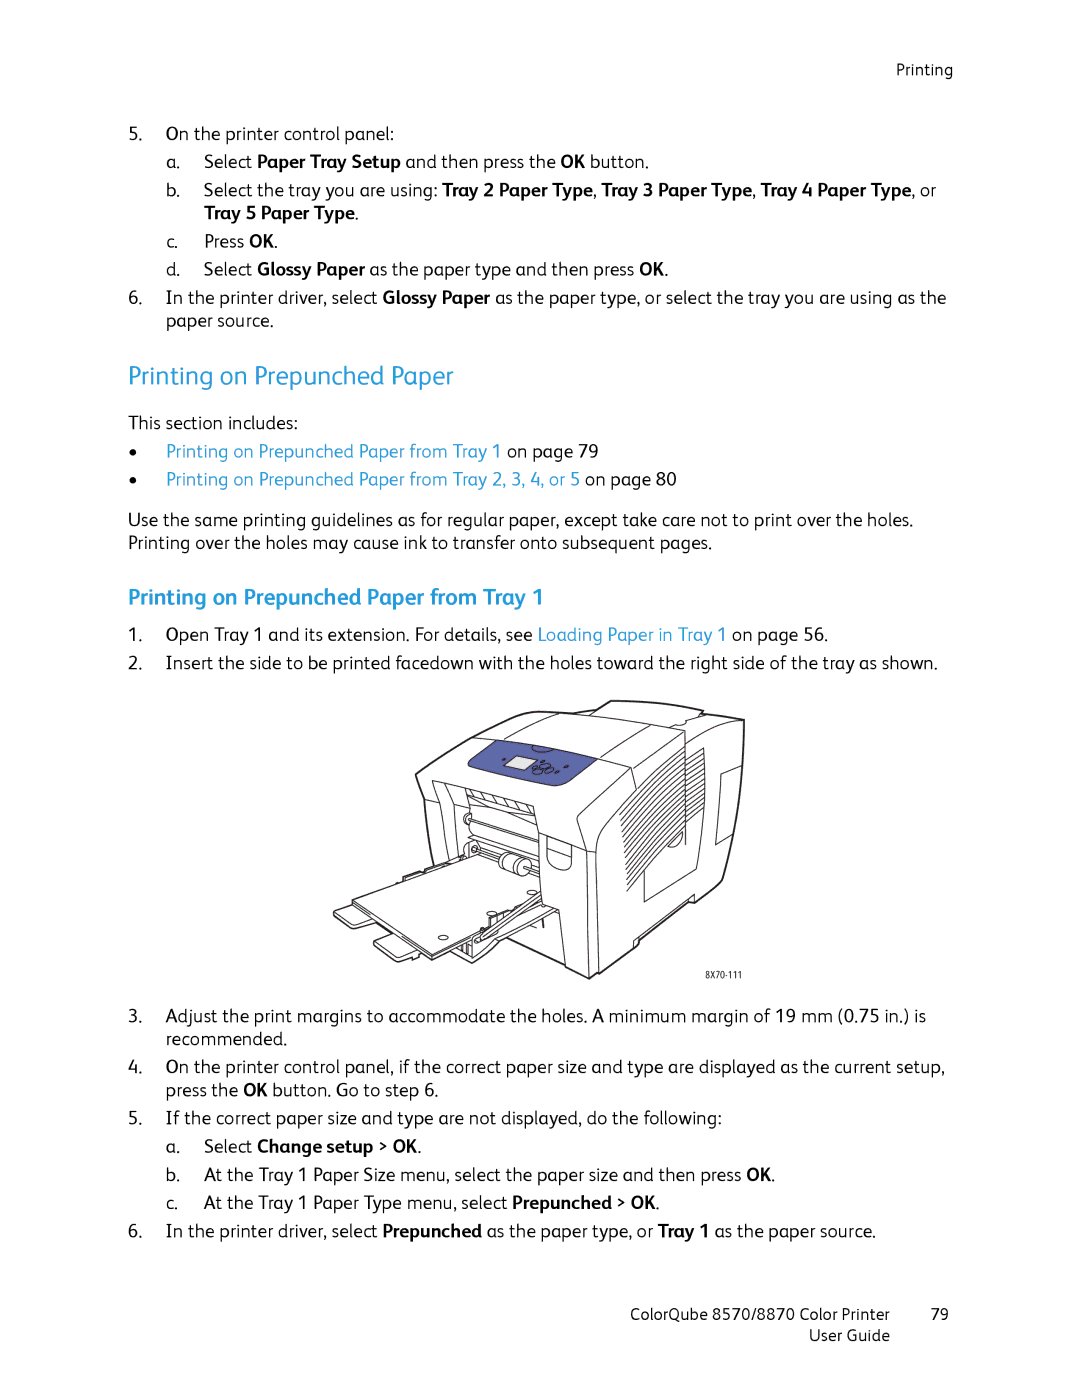
Printing on Prepunched Paper from Tray
Printing on Prepunched Paper
Printing on Prepunched Paper from Tray 2, 3, 4, or
Defining a Custom Paper Size at the Printer
Using Custom Paper Sizes
Sided Printing
Defining a Custom Paper Size in the Printer Driver
Select the Scale to fit paper size check box
Printing on Custom-size Paper
Click the Custom Paper Types link
Creating Custom Paper Types
Selecting Print Options
Setting Default Print Options in Windows
Selecting Print Options for an Individual Job in Windows
Driver Tab Printing Options
Print Options for Windows
PostScript Language Level 2
Selecting Print Options for an Individual Job in Macintosh
Saving a Set of Commonly-Used Print Options in Windows
Print Options for Macintosh
Xerox Features Menu Printing Options
Saving a Set of Commonly-Used Print Options in Macintosh
Job Completion Notification
Using Earth Smart Features
Enabling or Disabling Earth Smart Features
Automatic 2-Sided Printing Guidelines
Printing on Both Sides of the Paper
Printing a 2-Sided Document Automatically
Binding Edge Options
Portrait Landscape
Sided Print Sided Print, Flip on Short Edge
Printing a 2-Sided Document Manually
Printing Side Two
Printing Side One
Printing N-Up in Macintosh OS X Version 10.3 or Higher
Printing Multiple Pages on a Single Sheet N-Up
Printing N-Up in a Supported Driver
Printing N-Up in Windows XP SP1 or Later
Printing Booklets
Select the Layout/Watermark tab
Selecting Booklet Printing in a Supported Driver
Printing Booklets in Windows XP SP1 or Later
Printing Booklets in Macintosh OS X Version 10.3 or Higher
Scaling by Output Page Size
Enlarging and Reducing Pages
Scaling by Percentage of Original
Using Color by Words
Using Color Corrections
Selecting Color Correction
Adjusting Color Correction
Adjusting Automatic Color Correction
Making Custom Color Adjustments
Custom Automatic Color Description
Printing in Black and White in a Supported Driver
Printing in Black and White
Printing in Black and White in Windows XP SP1 or Later
Printing Separators in Mac OS X Version 10.3 or Higher
Printing Separators
Printing Separators in a Supported Driver
Printing Separators in Windows XP SP1 or Later
Cover Print Option Pages Printed on Cover
Printing Cover Pages
Print Option Last Page of Text Blank Pages
Printing Cover Pages in Windows XP SP1 or Later
Printing Cover Pages in a Supported Driver
Printing Watermarks in a Supported Driver
Printing Watermarks
Printing Watermarks in Windows XP SP1 or Later
Printing Watermarks in Macintosh OS X Version 10.3 or Higher
Printing Mirror Images in a Supported Driver
Printing Mirror Images
Printing Mirror Images in Windows XP SP1 or Later
Printing
Printing Special Job Types
Setting Up a Special Print Job in Windows XP SP1 or Later
Sending Secure, Proof, Personal Print, or Saved Print Jobs
Click Print to send the print job
Sending Print With Jobs in Windows XP SP1 or Later
Sending Print With Jobs
Select Proof Print Jobs OK
Printing or Deleting Secure Print Jobs
Printing or Deleting Proof Print Jobs
Select Secure Print Jobs OK
Select Personal Saved Print Jobs OK
Printing or Deleting Personal Print Jobs
Printing or Deleting Saved Jobs
Select Personal Print Jobs OK
Click Shared Saved Jobs
Maintenance5
General Precautions
Maintenance and Cleaning
Cleaning the Printer Exterior
Cleaning the Printer
Cleaning the Paper Release Blade
Lower the paper guide to its original position
Cleaning the Feed Rollers
Open Tray 1 and clean the gray pick roller. Close the tray
125
Billing Meters
Usage Counters
Adding Ink
Routine Maintenance
Supplies Usage
Usage Profile
To load ink Remove paper from the output tray
8570
Emptying the Waste Tray
To empty the waste tray Open side door D
Close side door D
Replacing the Maintenance Kit
133
Locating the Printer Serial Number
Ordering Supplies
Consumables
Customer Replaceable Parts
Routine Maintenance Items
When to Order Supplies
Select Supplies Info OK Select Maintenance Kit Life OK
Recycling Supplies
Moving and Repacking the Printer
Precautions for Moving the Printer
Moving the Printer Within the Office
Preparing the Printer for Shipping
Removing the Maintenance Kit and Waste Tray
Remove the waste tray labeled B from the waste tray slot
Packing the Printer
Turning Off the Printer
Maintenance ColorQube 8570/8870 Color Printer User Guide
Troubleshooting6
Restarting the Printer
General Troubleshooting
Cannot Print to the Printer with a Network Connection
Printer is Powered On But There is No Power
Probable Cause Solution
Probable Cause Solutions
Printing Takes Too Long
Cannot Print to the Printer with a USB Connection
Date and Time are Incorrect
Printer is Making Unusual Noises
Automatic 2-Sided Printing Prints 1-Sided
Printing a 2-Sided Document Manually on
Clearing Paper Jams
Paper Jams
Jam at Exit Door B
If you did not find paper in , lift up the paper guides
Jam at Front Door a
8X70-061
Jam at Tray
Remove the top sheet from the tray
155
8X70-012
Close front door a
Jam at Trays 3, 4, or
159
Confirm that all paper fragments have been removed
161
Multiple Sheets are Pulled Together
Troubleshooting Paper Jams
Probable Causes Solutions
Minimizing Paper Jams
Media Misfeeds
Paper Jam Message Stays On
Printing the Troubleshooting Print Quality
Print-Quality Problems
Controlling the Quality of Your Prints
PostScript Driver
Selecting a Print-Quality Mode
Click the Troubleshooting Pages link
Print-Quality Mode Type of Print Job
PCL Driver
Adjusting Color
Automatic Color Correction
Using Color Sampler Pages
Nothing Prints or Pages are Blank
Troubleshooting Print-Quality Problems
Ink or Debris on
Random Light Stripes
Predominant Light Stripes Ink Missing from Print
Transparency Images are Too Light or Too Dark
Image Prints Too Light or Too Dark
Colors are Off or Wrong
Select Spot Colors
Pantone Colors Do Not Match
Eliminating Light Stripes
Removing Print Smears
Printing the Light Stripes Test
Enabling Jet Substitution Mode
Select Jet Substitution Mode OK
Substituting an Ink Jet
Disabling Jet Substitution Mode
Control Panel Messages
Getting Help
Control Panel Help
ColorQube 8570 Printer
PrintingScout Alerts
Online Support Assistant
Web Links
ColorQube 8870 Printer
Troubleshooting ColorQube 8570/8870 Color Printer User Guide
Printer Specifications
Clearance Requirements
Physical Specifications
Base Unit
Optional Trays 3, 4,
Temperature
Environmental Specifications
Relative Humidity
Electrical Specifications
Tray Tray 2, 3, 4 or
Performance Specifications
Resolution
Print Speed
Interfaces
Controller Specifications
Processor
Memory
Regulatory Information
United States FCC Regulations
Basic Regulations
Canada Regulations
European Union
Turkey RoHS Regulation
Other Regulations
Material Safety Data Sheets
Page
Recycling and Disposal
All Countries North America European Union
Guidelines and Information
Domestic/Household Environment
For Business Users in the European Union
Professional/Business Environment
Removal
Other Countries
Index
Linux driver
Printing side 1, 96 printing side 2, 96 manual feed printing
Selecting for a print job in Windows
Routine maintenance items, 135 routine maintenance tasks
Troubleshooting Print Quality Page, 24 printing