HP SP 3300 manual Loading paper

Page 21

Type


Guidelines


Transparencies

To avoid damaging the printer, use only


transparencies designed for use in laser


printers.


• Transparencies used in the printer must be able


to withstand the machine’s fusing temperature.


Check your machine’s specification to view the


fusing temperature, see page 11.1.


Place them on a flat surface after removing


them from the printer.


Do not leave them in the paper tray for long


periods of time. Dust and dirt may accumulate


on them, resulting in spotty printing.


To avoid smudging caused by fingerprints,


handle them carefully.


To avoid fading, do not expose printed


transparencies to prolonged sunlight.


Ensure that transparencies are not wrinkled,


curled, or have any torn edges.


Labels

To avoid damaging the printer, use only labels


designed for use in laser printers.


When selecting labels, consider the following


factors:


-

Adhesives: The adhesive material should be


stable at 180° C (356° F), the printer’s fusing


temperature.


-

Arrangement: Only use labels with no


exposed backing between them. Labels can


peel off sheets that have spaces between the


labels, causing serious jams.


-

Curl: Prior to printing, labels must lie flat with


no more than 13 mm (5 inches) of curl in any


direction.


-

Condition: Do not use labels with wrinkles,


bubbles, or other indications of separation.


Make sure that there is no exposed adhesive


material between labels. Exposed areas can


cause labels to peel off during printing, which


can cause paper jams. Exposed adhesive can


also cause damage to printer components.


Do not run a sheet of labels through the printer


more than once. The adhesive backing is


designed for only a single pass through the


printer.


Do not use labels that are separating from the


backing sheet or are wrinkled, bubbled, or


otherwise damaged.


Card stock or

Do not print on print media smaller than 76 mm

custom-sized


(3 inches) wide or 127 mm (5 inches) long.

materials

In the software application, set margins at least


6.4 mm (0.25 inches) away from the edges of


the material.


Type


Guidelines


Preprinted

Letterhead must be printed with heat-resistant

paper


ink that will not melt, vaporize, or release


hazardous emissions when subjected to the


printer’s fusing temperature for 0.1 second.


Check your machine’s specification to view the


fusing temperature, see page 11.1.


Letterhead ink must be non-flammable and


should not adversely affect printer rollers.


Forms and letterhead should be sealed in a


moisture-proof wrapping to prevent changes


during storage.


Before you load preprinted paper, such as


forms and letterhead, verify that the ink on the


paper is dry. During the fusing process, wet ink


can come off preprinted paper, reducing print


quality.


Loading paper

Load the print media you use for the majority of your print jobs in the tray

1.The tray 1 can hold a maximum of 250 sheets of 75 g/m2 (20 lb) plain paper.

You can purchase an optional tray (tray 2) and attach it below the standard tray to load an additional 250 sheets of paper.

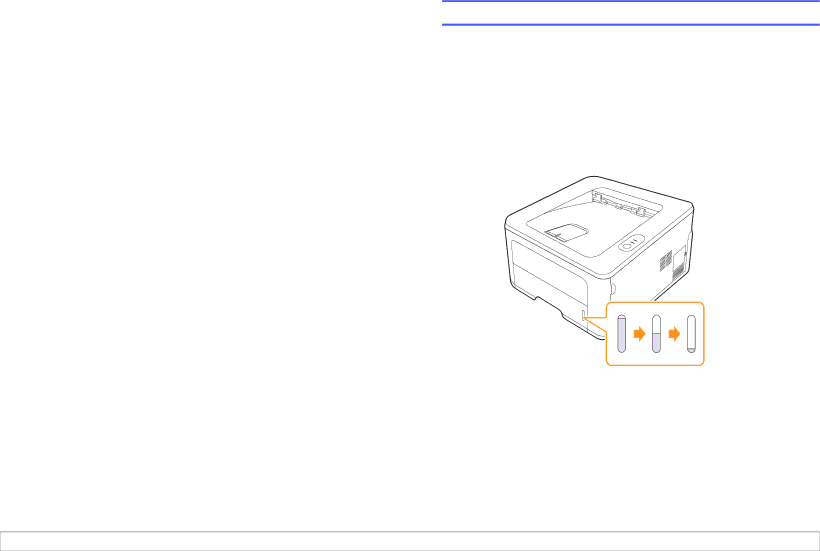
The paper level indicator on the front of the tray 1 and the optional tray 2 shows the amount of paper currently left in the tray. When the tray is empty, the indicator of the bar is completely lowered.

Full ▲

▲ Empty

5.4 <Loading print media>

Image 21
Contents SP 3300 Series Page Contents Troubleshooting MaintenanceInstalling accessories SpecificationsSafety During Operation Safety InformationPower Saver Power SupplyEnergy Star Program RecyclingRemarque concernant les utilisateurs au Canada Laser SafetyCdrh Regulations AvertissementIntroduction Special featuresFeatures SP 3300D SP 3300DN Printer overviewFront view Understanding the LEDs Control panel overviewRear view Status DescriptionFinding more information Setting up the hardwareAltitude adjustment Click Emulation Changing the font settingUsing toner save mode Basic setupPrinting a demo Using toner save mode Printing a demoPrinter driver features Software overviewSupplied software System requirements WindowsMacintosh Using SetIP program Network setup SP 3300DN onlySupported operating systems RequirementsSelecting print media Loading print mediaType Size Weight Type Size Dimensions Weighta CapacitybSupported sizes of paper Print media for duplex printingGuidelines for selecting and storing print media Guidelines for special print mediaType Guidelines Loading paper Changing the size of the paper in the tray Using the tray 1 or the optional trayLoad the paper with the side to be printed on facing up Using manual feederKnowing an output location Printing a document Canceling a print job Canceling a print jobBasic printing Printing a documentAccessory Supplies and accessoriesToner cartridge Accessory Accessory DescriptionCleaning the printer MaintenanceCleaning the outside of the printer Cleaning the inside of the printerMaintaining the toner cartridge Toner cartridge storageExpected cartridge life Redistributing toner cartridge Replacing the toner cartridge Printing a configuration Maintenance partsItems Yield Average Clearing paper jams TroubleshootingPaper feed area TrayManual tray Around the toner cartridgePaper exit area Duplex unit areaDuplex jam Tips for avoiding paper jams Solving general printing problems Troubleshooting checklistDpi Normal. See Dpi Best, change it toSolving print quality problems Gray Condition Suggested solutions Vertical linesBackground Toner smearCommon Windows problems Common Macintosh problems Common PostScript problemsPrecautions to take when installing accessories Installing accessoriesInstalling a memory module Disconnect the power cordActivating the added memory in the PS printer properties Specifications Printer specificationsSpecifications and description Index Software section Contents Using Windows PostScript Driver Installing Printer Software Installing Printer Software in WindowsInstalling Software for Local Printing Typical InstallationSelect Typical installation for a local printer. Click Next Custom InstallationSelect Custom installation. Click Next Installing Software for Network Printing Custom Installation Installing Printer Software in Windows Reinstalling Printer Software Removing Printer Software Printing a Document Basic PrintingPrinting to a file PRN Printer SettingsSelect Printers and Faxes Select your printer driver icon Printing PreferencesPaper Tab Layout TabGraphics Tab Advanced Options Extras TabWatermark OverlayUsing Help Using a Favorite SettingAbout Tab Printer TabPrinting Multiple Pages on One Sheet of Paper N-Up Printing Advanced PrintingPrinting Booklets Printing PostersPrinting a Reduced or Enlarged Document Printing on Both Sides of PaperFitting Your Document to a Selected Paper Size NoneUsing an Existing Watermark Using WatermarksCreating a Watermark Editing a WatermarkWhat is an Overlay? Using OverlaysUsing a Page Overlay Creating a New Page OverlayAdvanced Using Windows PostScript DriverSetting Up a Client Computer Setting Up a Host ComputerSharing the Printer Locally Check the Share this printer boxUsing Printer Settings Utility Using Utility ApplicationsOpening the Troubleshooting Guide Changing the Status Monitor Program SettingsInstalling Software Using Your Printer with a MacintoshInstalling the printer driver Uninstalling the printer driverFor a Network-connected Setting Up the PrinterFor a USB-connected Mac OS 8.6 ~Printing Changing Printer SettingsPrinting a Document LayoutPrinting Multiple Pages on One Sheet of Paper N-Up Printing Printer FeaturesDuplex Printing Index Page M000-8650 Network Printer User’s Guide SP 3300DN only OpenSSL License Page Programs supplied on the CD Appendix Introduction Getting startedSupported network environments Network Printer CardClick Typical installation for a network printer Uninstalling softwarePrograms supplied on System requirementsIP address setup Using SetIPUsing Web Image Monitor SP 3300 Series Workstation Setup Print Driver Installation for Networked PrintersWindows Vista TCP/IP Windows XP TCP/IPDisk Windows 2000 TCP/IPTest Print Configuring Snmp Configuring DHCP/BOOTPUsing Snmp TCP/IP environmentUsing SLP Configuring SLPConfiguring Ddns Configuring WinsUsing UPnP Configuring UPnPBonjour UPnPStandard TCP/IP port Printing protocolsLPR port Printer PortConfiguring a Windows client Configuring IPP in the print serverSetting IPP security IPP portAdditional functions Configuring the printer Configuring EtherTalkEtherTalk environment EtherTalk printingBonjour printer TCP/IP printingMaintenance using Internet Services Administration ToolsAppendix SpecificationsOpenSSL Statements OpenSSL LicenseBootp M000-8651 Page Page