HP SP 3300 Using the tray 1 or the optional tray, Changing the size of the paper in the tray

Page 22

Using the tray 1 or the optional tray 2

Use the print material you use for the majority of your print jobs in the tray 1. The tray 1 can hold a maximum of 250 sheets of 75 g/m2 (20 lb) paper.

You can purchase an optional tray 2 and attach it below the tray 1 to load an additional 250 sheets of paper.

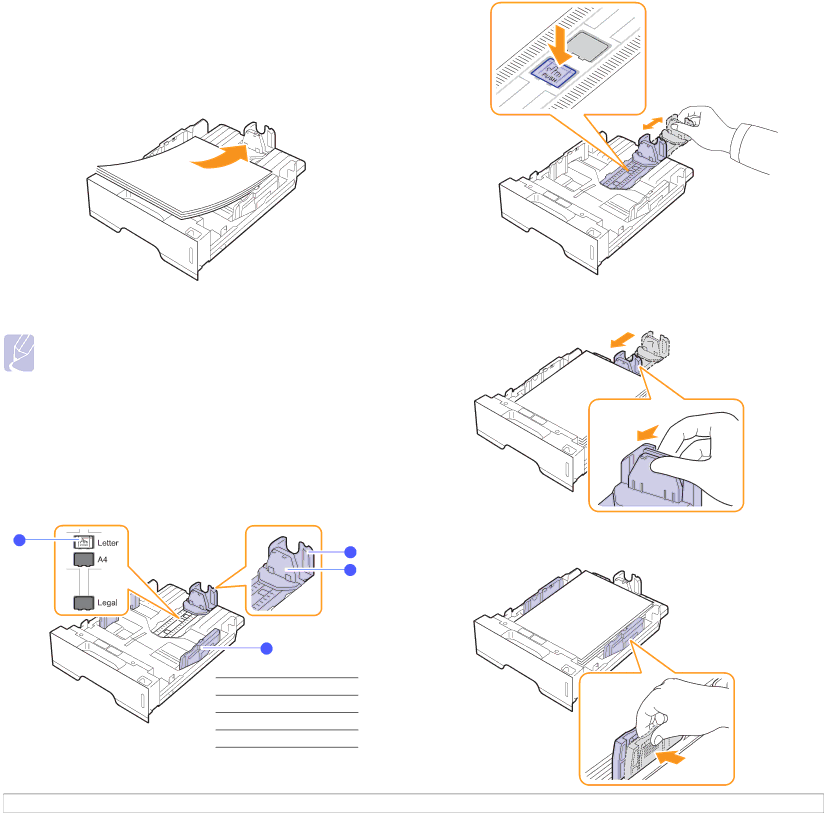
To load paper, pull open the tray and load paper with the side to be printed on face down.

You can load letterhead paper with the design side face down. The top edge of the sheet with the logo should be placed at the front of the tray.

Notes

• If you experience problems with paper feed, place one sheet at a time in the manual feed.

You can load previously printed paper. The printed side should be facing up with an uncurled edge at the front. If you experience problems with paper feed, turn the paper around. Note that the print quality is not guaranteed.

Changing the size of the paper in the tray 1

To load longer sizes of paper, such as Legal-sized paper, you need to adjust the paper guides to extend the paper tray.

3

1 2

4

1 paper length guide

2 support guide

3 guide lock

4 paper width guides

1Press and hold the guide lock, and slide the paper length guide to locate it in the correct paper size slot.

2After inserting paper into the tray, adjust the support guide so that it lightly touches the paper stack.

3Squeeze the paper width guides, as shown and slide them to the stack of paper until it lightly touches the side of the stack.

5.5 <Loading print media>

Image 22
Contents SP 3300 Series Page Contents Installing accessories MaintenanceTroubleshooting SpecificationsSafety Information Safety During OperationEnergy Star Program Power SupplyPower Saver RecyclingCdrh Regulations Laser SafetyRemarque concernant les utilisateurs au Canada AvertissementSpecial features IntroductionPrinter overview Features SP 3300D SP 3300DNFront view Rear view Control panel overviewUnderstanding the LEDs Status DescriptionSetting up the hardware Finding more informationAltitude adjustment Changing the font setting Click EmulationPrinting a demo Using toner save mode Basic setupUsing toner save mode Printing a demoSoftware overview Printer driver featuresSupplied software Windows System requirementsMacintosh Supported operating systems Network setup SP 3300DN onlyUsing SetIP program RequirementsLoading print media Selecting print mediaSupported sizes of paper Type Size Dimensions Weighta CapacitybType Size Weight Print media for duplex printingGuidelines for special print media Guidelines for selecting and storing print mediaType Guidelines Loading paper Using the tray 1 or the optional tray Changing the size of the paper in the trayUsing manual feeder Load the paper with the side to be printed on facing upKnowing an output location Basic printing Canceling a print jobPrinting a document Canceling a print job Printing a documentToner cartridge Accessory Supplies and accessoriesAccessory Accessory DescriptionCleaning the outside of the printer MaintenanceCleaning the printer Cleaning the inside of the printerToner cartridge storage Maintaining the toner cartridgeExpected cartridge life Redistributing toner cartridge Replacing the toner cartridge Maintenance parts Printing a configurationItems Yield Average Paper feed area TroubleshootingClearing paper jams TrayAround the toner cartridge Manual trayDuplex unit area Paper exit areaDuplex jam Tips for avoiding paper jams Troubleshooting checklist Solving general printing problemsDpi Best, change it to Dpi Normal. SeeSolving print quality problems Background Condition Suggested solutions Vertical linesGray Toner smearCommon Windows problems Common PostScript problems Common Macintosh problemsInstalling a memory module Installing accessoriesPrecautions to take when installing accessories Disconnect the power cordActivating the added memory in the PS printer properties Printer specifications SpecificationsSpecifications and description Index Software section Contents Using Windows PostScript Driver Installing Software for Local Printing Installing Printer Software in WindowsInstalling Printer Software Typical InstallationCustom Installation Select Typical installation for a local printer. Click NextSelect Custom installation. Click Next Installing Software for Network Printing Custom Installation Installing Printer Software in Windows Reinstalling Printer Software Removing Printer Software Basic Printing Printing a DocumentSelect Printers and Faxes Select your printer driver icon Printer SettingsPrinting to a file PRN Printing PreferencesLayout Tab Paper TabGraphics Tab Watermark Extras TabAdvanced Options OverlayAbout Tab Using a Favorite SettingUsing Help Printer TabAdvanced Printing Printing Multiple Pages on One Sheet of Paper N-Up PrintingPrinting Posters Printing BookletsFitting Your Document to a Selected Paper Size Printing on Both Sides of PaperPrinting a Reduced or Enlarged Document NoneCreating a Watermark Using WatermarksUsing an Existing Watermark Editing a WatermarkUsing a Page Overlay Using OverlaysWhat is an Overlay? Creating a New Page OverlayUsing Windows PostScript Driver AdvancedSharing the Printer Locally Setting Up a Host ComputerSetting Up a Client Computer Check the Share this printer boxOpening the Troubleshooting Guide Using Utility ApplicationsUsing Printer Settings Utility Changing the Status Monitor Program SettingsInstalling the printer driver Using Your Printer with a MacintoshInstalling Software Uninstalling the printer driverFor a USB-connected Setting Up the PrinterFor a Network-connected Mac OS 8.6 ~Printing a Document Changing Printer SettingsPrinting LayoutPrinter Features Printing Multiple Pages on One Sheet of Paper N-Up PrintingDuplex Printing Index Page M000-8650 Network Printer User’s Guide SP 3300DN only OpenSSL License Page Programs supplied on the CD Appendix Supported network environments Getting startedIntroduction Network Printer CardPrograms supplied on Uninstalling softwareClick Typical installation for a network printer System requirementsUsing SetIP IP address setupUsing Web Image Monitor SP 3300 Series Windows Vista TCP/IP Print Driver Installation for Networked PrintersWorkstation Setup Windows XP TCP/IPWindows 2000 TCP/IP DiskTest Print Using Snmp Configuring DHCP/BOOTPConfiguring Snmp TCP/IP environmentConfiguring Ddns Configuring SLPUsing SLP Configuring WinsBonjour Configuring UPnPUsing UPnP UPnPLPR port Printing protocolsStandard TCP/IP port Printer PortSetting IPP security Configuring IPP in the print serverConfiguring a Windows client IPP portAdditional functions EtherTalk environment Configuring EtherTalkConfiguring the printer EtherTalk printingTCP/IP printing Bonjour printerAdministration Tools Maintenance using Internet ServicesOpenSSL Statements SpecificationsAppendix OpenSSL LicenseBootp M000-8651 Page Page