PROGRAMMING YOUR BREVILLE
THE ART OF TEXTURING MILK
RESETTING DEFAULT VOLUMES
To reset the machine to the default one and two cup pour quantities, press and hold the ‘PROGRAM’ button, until the machine beeps three times. Release button. This indicates the machine has returned to its original default settings.
NOTE:
Default settings: one cup ![]() pour is
pour is
approximately 1 oz. Two cups ![]()
![]() is approximately 2 oz.
is approximately 2 oz.
MANUAL ESPRESSO
The Manual function
Press and hold the single ![]() or
or
two cup ![]()
![]() button. Release the button once suffi cient espresso has fl owed into the cup.
button. Release the button once suffi cient espresso has fl owed into the cup.
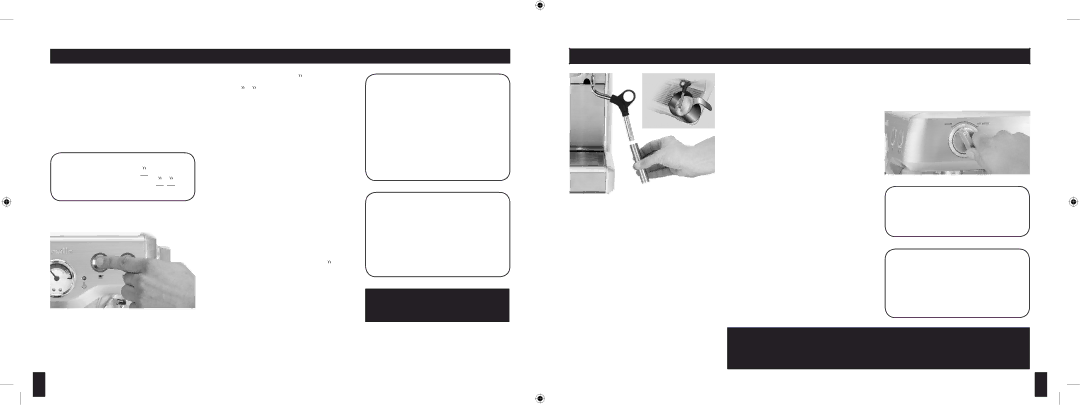
STEP 9 – EMPTYING THE
PORTAFILTER
Remove the portafi lter from the group head by rotating the portafi lter to the left until it releases.
To empty the used grounds, turn the portafi lter upside down in a bin and gently knock out the grounds. Used grounds should be thrown away with domestic waste. Discarding of used grounds in a sink can cause drains to become blocked.
With the fi lter still in place, hold the portafi lter underneath the group head,
press and hold down the one cup ![]() button to release hot water. Rinse the portafi lter until water runs clear.
button to release hot water. Rinse the portafi lter until water runs clear.
Insert the portafi lter back into the group head to dry out and keep warm.
NOTE:
PRE-BREW FUNCTION
When a single or double coffee is selected, the machine will pump water momentarily, followed by a pause then continues to pump the water through to the ground coffee in the portafilter. The ground coffee is moistened by a small amount of water before full extraction then expands resulting in greater pressure
NOTE:
You may notice that the espresso coffee in the filter holder is still wet after extraction. Due to the high water pressure created by the
This is normal, this is how we get the perfect créma.
WARNING: THE METAL PARTS OF THE PORTAFILTER MAY STILL BE VERY HOT.
The
If less froth is required, remove the frothing attachment from the steam wand and steam the milk using the steam wand. To remove the frothing attachment, ensure it is cool then simply pull down and remove.
To refi t the frothing attachment ensure it is securely attached to the steam wand by inserting it, from either opening, onto the steam wand and pushing fi rmly upwards onto the rubber surround.
•Fill the stainless steel frothing jug maximum ½ full with cold, fresh milk.
•Turn the Steam selector dial to the ‘Steam’ position. The red steam light will start to fl ash indicating that the machine is heating to create steam.
•When the steam light stops fl ashing it is ready to use.
•Before inserting the wand into the milk, pause the steam by returning the dial back to the ‘STAND BY’ position. This will avoid splashing the milk out of the jug (this pause function lasts for 6 seconds before exiting steam mode).
•Insert the wand into the milk and return the Steam dial back to ‘Steam’.
•To stop, return the steam dial to the ‘STAND BY’ position and remove the jug.
NOTE:
When the espresso machine creates steam, a pumping noise can be heard. This is the normal operation of the 15 Bar pump.
NOTE:
If steam starts coming from the
steam wand before it is immersed in the milk, pause the steam by turning the Selector Control back to the ‘Standby’ position. This will avoid the steam pressure blowing milk out of the jug.
save the shot size like in programming mode.
The frothing attachment can be stored in the storage tray inside the machine if not used regularly.
WARNING: MILK SHOULD NOT BE ALLOWED TO RUN OVER THE TOP OF THE FROTHING ATTACHMENT, OTHERWISE IT WILL NOT FUNCTION PROPERLY. TO AVOID SPLATTERING OF HOT MILK, DO NOT LIFT THE END OF THE FROTHING ATTACHMENT ABOVE THE SURFACE OF THE MILK WHILE FROTHING. ENSURE THE STEAM DIAL IS IN THE ‘STAND BY’ POSITION BEFORE REMOVING THE FROTHING JUG.
24
BES830XL_IB_Issue1,09.indd
25
4/1/10 11:02:44 AM