DeLonghi DO1289 Installation, Accessories and utensils, Preheating the oven, Setting the Clock

Page 8

chap. 2 using the controls and setting the modes en

1.6 INSTALLATION

1)Check that the appliance has not suffered any damage due to transportation.

2)Place the appliance on a flat, stable surface out of the re- ach of children (the glass door becomes very hot while the oven is in operation).

3)Before using this appliance, move it two inches away from the wall or any object on the counter top. Remove any object that may have been placed on top of the appliance. Do not use on surfaces where heat may be a problem.

4)Initial start-up operation may result in minimal smell and smoke (about 15 min.).

This is normal. It is due to the protective substance on heating elements which protects them from salt effects during shipping from the factory.

5)When a function is started, the Start/STOP button will light.

6)If ERR message is shown on display, the oven has been damaged. Please contact an authorized service center.

1.7 IMPORTANT TIPS AND TECHNIQUES

Accessories and utensils

The bake pan (H) is designed to permit the circulating heat to surround the food (except for the bottom surface) more effec- tively. Use it as you would any shallow baking or roasting pan. Other utensils you own can be used provided that an inch or so of space remains open to allow circulation of the fan-forced heat. Casserole covers should not be used and glass ovenware should not be placed closer than two inches from the upper heating element.

Preheating the oven

To pre-heat the oven, press the required function (BAKE, FAN & BAKE) and set the desired temperature (only for BAKE and FAN

&BAKE). After having pressed START/STOP, if no duration has been set, the display will show the countdown starting from the default duration of 30 minutes. On reaching the set tempe- rature, the control will emit 3 “beeps” 3 times.

bake, keep warm, broil, toast, dehydrate, smart cookie and piz- za functions.

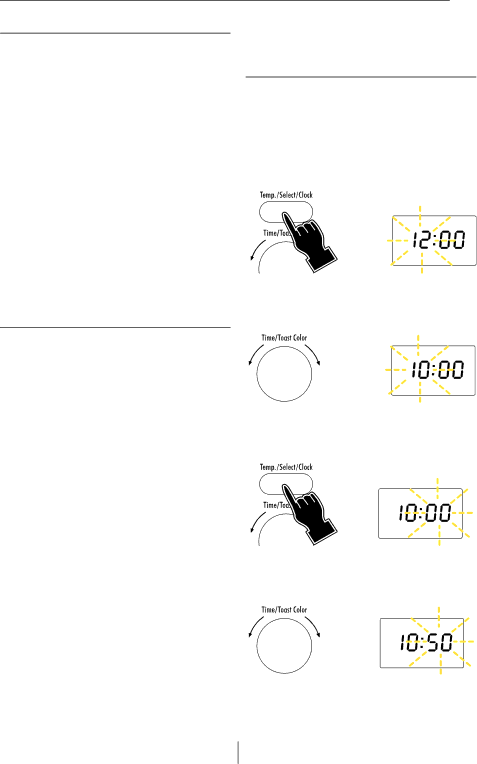
2.1 SETTING THE CLOCK

When the appliance is connected to the power supply for the first time, or after a power outage, four dashes will appear on the display (--:--). In order to set the time of day, proceed as described below:

1Press the TEMP./SELECT/CLOCK button (11). (the hours flash on display)

2Turn the TIME/TOAST COLOR knob (12) to the desired time. The times set will begin blinking on the display.

3Press the TEMP./SELECT/CLOCK button (11) the minutes begin to flash on the display.

4Turn the TIME/TOAST COLOR knob (12) to the desired time. The time set will begin blinking on the display.

Using aluminum foil

Do NOT allow foil to touch sides of the oven or the heating

elements. Foil can be used to cover foods or the bake pan (for


easier clean-up) provided foil is tucked in securely around the


food or the edges of the pan or dish. DO NOT cover the broiling


rack as this can cause accumulated grease to catch fire. DO NOT

5

Press the TEMP./SELECT/CLOCK button (11) at any time

cover the crumb tray (C). Unlike an ordinary toaster-oven, the

DE’LONGHI features 8 functions: convection/defrost, traditional

during cooking process to display the current time. (the


7

Image 8
Contents 5711810711/08.11 DO1289 Conversion Table ContentsElectrical Connection Pizza-shaped wire rack H Black durastone bake pan Control PanelDescription of the Appliance Interior lightImportant Safeguards Use maximum care when removing the bake pan orSummary Table Program ModesThis, refer to Be crunchy on the surface auCorrect Wire Rack Position BrlKit 2trInstallation Accessories and utensilsSetting the Clock Using aluminum foilTop heating element Bottom heating element Bake and FAN/BAKE ModesDisplay shows the time set General guidelines Convection baking of convenience foodsApprox. time Smart Cookies Mode Dehydrating ModePizza Mode Insert wire rack G in the slotDehydrating kit Slot Wire rack For dehydratingCorrect wire rack position Single cooking Double cooking Vidual preferencesMelt perfectly without overburning Display indicationStand-by Defrost ModeBroil Mode Food Weight or Approx. time Turn at half timeToast Mode KEEP WARM ModeCARE AND Cleaning When the oven is on, the light inside the oven is always onCrumb tray Interior lightLimited Warranty Branchement Electrique Tableau DE ConversionTable DES Matières Mise a TerreTableau DE Commande Tableau de commande Porte en verreDescription DE L’APPAREIL Lèchefrite en Durastone noirAvertissements Pain Tableau RécapitulatifPour le pain Position Correcte DE LA Grille Accessoires ET Ustensiles Réglage DE L’HORLOGEPréchauffer LE Four Utilisation DU Papier D’ALUMINIUMFonction Bake ET FAN/BAKE RemarquesCuisson simultanée sur deux niveaux cha- leur tournante Affiche l’heure programméeCuisson Chaleur Tournante Pour ’ALIMENTS Prêts AvertissementsIndicatif Températures ET Temps DE Cuisson Pour PrépaRations Typiques cuisson chaleur tournante Fonction Smart cookies Fonction DehydPour Sécher Fonction PizzaKit de séchage Glissière Grille renversée Pizza maison avec une pâte fraîche étendez la pâte sur laQuement Indication de l’écranCuisson Processeur se remettra en veille Fonction DefrostFonction Broil Retourner à mi-cuisson IngrédientsTemps de cuissons indicatif Fonction Toast RemarqueFonction KEEP WARM Sélecteur TIME/TOAST Color TranchesÉclairage intérieur Plateau ramasse-miettesNettoyage ET Entretien Garantie Limitée Qu’est-ce qui est couvert par la garantie?Combien de temps dure la garantie? Qu’est ce qui n’est pas couvert par cette garantie?Conexión Eléctrica Tabla DE ConversiónÍndice Instrucciones para la puesta a tierraPanel DE Mandos Descripción DEL AparatoParrilla para asar Durastone negra Panel de mandos B Puerta de cristalAdvertencias No use el aparato para fines diferentes a los finesTabla Resumen Notas/ConsejosChos, etc De las galletasPosición Correcta DE LA Parrilla Para cocer dos platos contemporáneamenteInstalación Accesorios Y EnseresPrecalentar EL Horno 1PROGRAMACIÓN DEL RelojNotas Cocer contemporáneamente en dos niveles con horno ventiladoLas temperaturas previstas son Resistencia superior Resistencia inferiorAdvertencias Generales Talles, lea los párrafos siguientesConsideración algunas reglas generales simples Riesgos, programe una temperatura 25F más bajaIndicativo Minutos durante la cocción, gire el mando TIME/TOAST Color Cocción DE LAS GalletasFunción DE Deshidratación Notas Y Consejos Para Cocer LA Pizza Para DeshidratarFunción Pizza Indicación DEL Display 500 g800 g Los beeps la función se activará automáticamenteFunción Descongelación Cocción CON GrillNotas En el frigoríficoIngredientes Tostado Atrás del tiempo de cocciónEn el display aparecerá de nuevo el reloj Nivel de tostado RebanadasRìecogemigas Limpieza Y MantenimientoLuz interna No deje que la grasa se acumule dentro del aparatoGarantia Limitata Duración de la garantíaExclusiones de la garantía Obtención de servicios de garantía