Page
imageCLASS 2300 Copying Guide
Facsimile Guide Sending Guide Remote UI Guide Network Guide
Manuals for the Machine
Set-Up Sheet for the Machine Set-Up Sheet for Networking and Printing
Basic Guide Reference Guide Copying Guide This Document
Chapter 5 Appendix
Chapter 1 Introduction to Copying Chapter 2 Basic Copying Features
Chapter 3 Special Copying Features Chapter 4 Customizing Settings
How This Manual Is Organized
Contents
Chapter 2 Basic Copying Features
Chapter 1 Introduction to Copying
Chapter 3 Special Copying Features
Chapter 4 Customizing Settings
Chapter 5 Appendix
Preface
How to Use This Manual
Symbols Used in This Manual
Keys Used in This Manual
Press F4
Function Keys Key icon + Key Function
Example
Press F3 DENSITY
Disclaimers
Legal Notices
Trademarks
Copyright
CHAPTER
Introduction to Copying
Copy Basic Features Screen
Special Features Screen
Overview of the imageCLASS
Additional Functions Menu
Introduction to Copying
Overview of the imageCLASS
Introduction to Copying
1 Press COPY to display the Copy Basic Features screen
If the message ENTER DEPARTMENT ID AND PASSWORD appears
Flow of Copy Operations
Introduction to Copying
2 Place your original
Press Special Features
3 Set the desired copy mode on the Copy Basic Features screen
4 Set the desired copy modes on the Special Features screen
5 Enter the copy quantity
6 Press Start
If you want to stop a copy job while scanning
Introduction to Copying
If you want to interrupt a copy job
8 When scanning is complete, remove your original
If you want to cancel a copy job in the standby mode
9 If you have set Department ID Management, press ID
Introduction to Copying
Placing Originals
Platen Glass
Feeder
Place the
Orientation
Introduction to Copying
Place the original face down
Introduction to Copying
Platen Glass
1 Lift up the feeder
2 Place your original face down
1 Copyingto Introduction CAUTION
3 Gently lower the feeder
Specifications
Feeder
You can place the following originals in the original supply tray
Introduction to Copying
2 Adjust the slide guides to fit the size of your originals
1 Neatly place your originals face up in the original supply tray
Introduction to Copying
to Copying
Original Output Tray
1-15
1 Press Stop to stop scanning
Canceling a Copy Job
Using the Stop Key
You can cancel a copy job in several ways
Press Monitor
Using the System Monitor Screen
2 Press F2 or F3 to select the job to be canceled
press F4 CANCEL
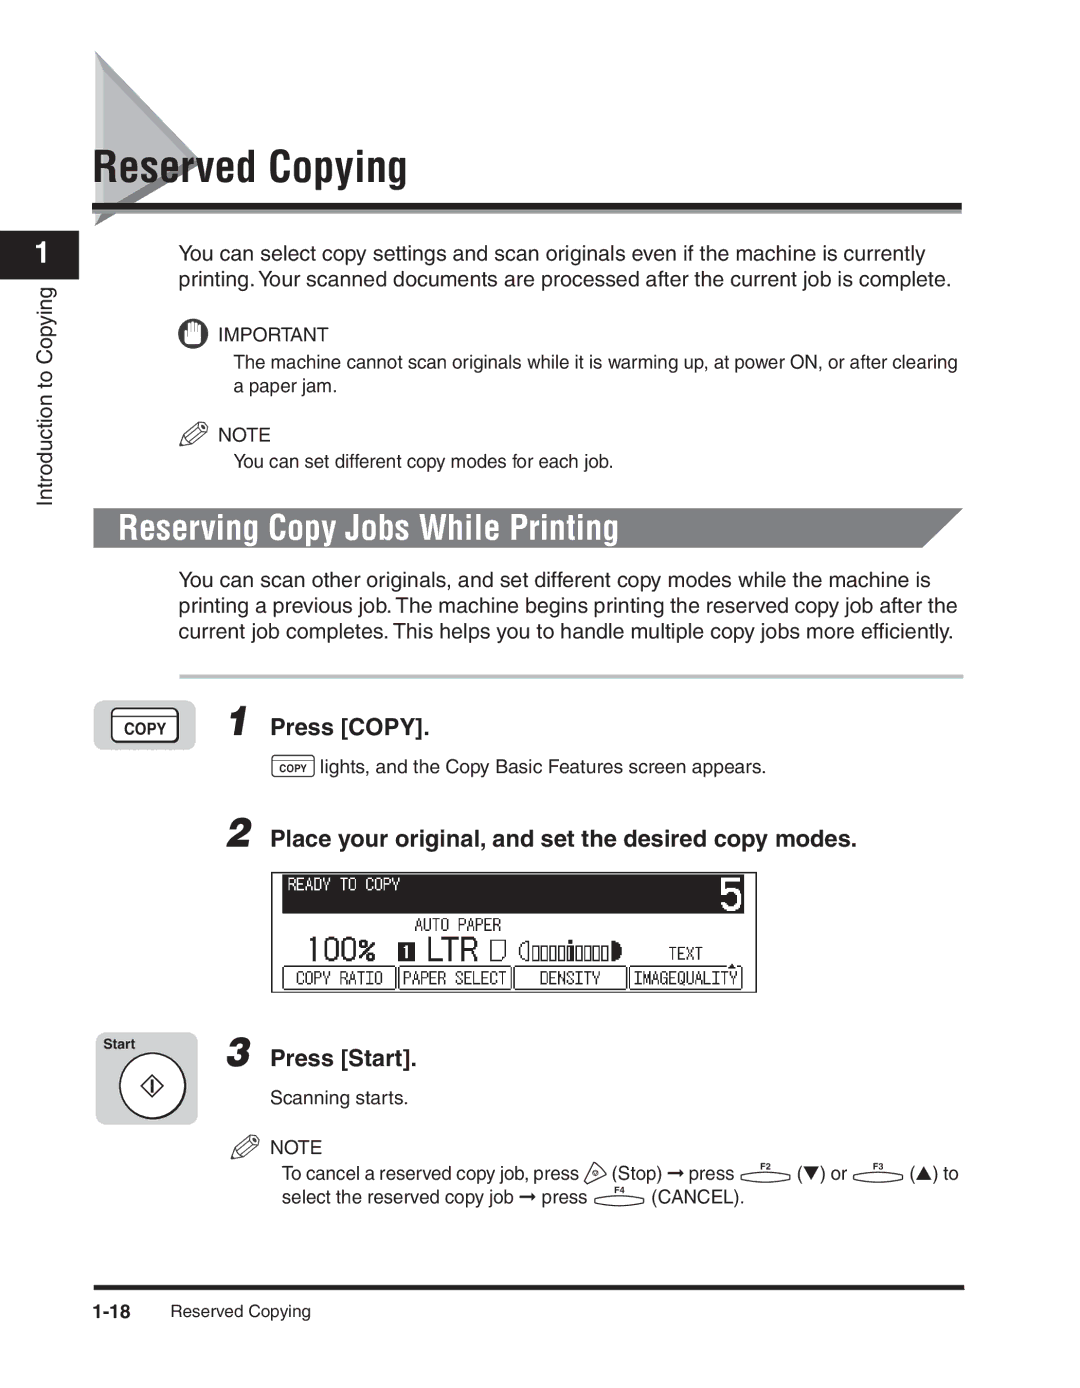
2 Place your original, and set the desired copy modes
Reserved Copying
Reserving Copy Jobs While Printing
COPY 1 Press COPY
Reserved Copying
4 When scanning is complete, remove the original from the machine
Features
Introduction to Copying
COPY 1 Press COPY
Interrupt Mode
Press Interrupt
3 Place your original, and set the desired copy modes
4 Press Start
5 Once the original is scanned, remove it from the machine
Introduction to Copying
1-22 Interrupt Mode
CHAPTER
Basic Copying Features
This chapter describes the basic copying features Copy Quantity
Copy Exposure and Image Quality Adjustments
Specifying the Required Number of Copies
2 Enter the desired copy quantity 1 to 99 using the numeric
Basic Copying Features
Copy Quantity
Copy Quantity
2 Enter the desired copy quantity 1 to 99 using the numeric keys
Basic Copying Features
OPER SYMBOLS
Basic Copying Features
Paper Selection
Automatic Paper Selection
The machine automatically selects the copy paper
1 Press COPY
2 Place your original press F2 PAPER SELECT
3 Make sure that AUTO PAPER is selected press OK
Basic Copying Features
2 Place your original press F2 PAPER SELECT
Manual Paper Selection
Basic Copying Features
COPY 1 Press COPY
3 Press F3 or F4 to select the desired paper size
If you want to use the stack bypass
Basic Copying Features
2-8 Paper Selection
Press Start
Basic Copying Features
Press F3 or F4 to select the paper size press OK
Copy Exposure and Image Quality Automatic
Copy Exposure and Image Quality Adjustments
Copy Exposure Manual
Image Quality Manual
Basic Copying Features
3 Press F1 LIGHT or F3 DARK to adjust the exposure press OK
Copy Exposure Manual
2 Place your original press F3 DENSITY
COPY 1 Press COPY
Image Quality Manual
TEXT/PHOTO, or PHOTO press OK
Copy Exposure and Image Quality Automatic
2 Place your original press F4 IMAGEQUALITY
3 Press F4 to select the image quality of the original TEXT
4 Press Start
3 Press F2 AUTO EXPOSUR OK
Basic Copying Features
2 Place your original press F3 DENSITY
Auto Zoom
Preset Zoom
Changing the Copy Zoom Ratio
Zoom by Percentage
Enlarge
Preset Zoom
2 Place your original press F1 COPY RATIO
Reduce
COPY 1 Press COPY
Zoom by Percentage
Basic Copying Features
Press Start
Press Start
3 Set the copy ratio using the numeric keys press OK
Auto Zoom
Basic Copying Features
press OK
4 Press F1 COPY RATIO
5 Press F2 AUTO ZOOM OK
Basic Copying Features
6 Press Start
Changing the Copy Zoom Ratio
If the Collate Mode Is Set
If the Rotate Mode Is Set
Collating Copies
Place your originals press Collate
Features
If you want to set the Rotate mode
Page Order Collate
2-22 Collating Copies
Enter the desired copy quantity 1 to 99 using the numeric keys
Basic Copying Features
Press Start
CHAPTER
Special Copying Features
2 Place your original on the platen glass press Special
Features to select a copy function
Copying Features
Two-Page Separation
Press F3 LEFT OPENING or F4 RGHT OPENING to select
Features
Cover
Press F1 2-PAGE SEP
7 Press Start
6 Enter the desired copy quantity 1 to 99 using the numeric keys
Special Copying Features
5 Press F4 ORIGNAL SIZE to select the paper size press OK
COPY 1 Press COPY
Margin Mode
2 Place your original press Special Features
Copying Features
5 Press F3 - or F4 + to set the margin width 1 mm to
3 Press F2 MARGIN
MARGIN, or F4 BOTTOM MRGN to specify the type of
margin press OK
Press Start
6 Enter the desired copy quantity 1 to 99 using the numeric
Special Copying Features
keys
Frame Erase
Original Frame Erase
Special Copying Features
Frame Erase
Book Frame Erase
Hole Punch Erase
Special Copying Features
3 Press F3 FRAME ERASE
Place your original press Special Features
Original Frame Erase
Press COPY
7 Press Start
5 Press F4 ORIGNAL SIZE to select the size of the original press OK
6 Enter the desired copy quantity 1 to 99 using the numeric keys
Special Copying Features
4 Press F3 BOOK FR ERS OK
Features
Book Frame Erase
2 Place your original on the platen glass press Special
F4 OK F3 F4 OK
keys
7 Enter the desired copy quantity 1 to 99 using the numeric
Hole Punch Erase
8 Press Start
Special Copying Features
5 Press F4 ORIGNAL SIZE to select the size of the original
4 Press F4 HOLE/P ERASE OK
2 Place your original press Special Features
7 Enter the desired copy quantity 1 to 99 using the numeric keys
Special Copying Features
8 Press Start
Image Combination
2 on
Special Copying Features
Special
4 on
Features
COPY 1 Press COPY
Special Copying Features
2 Place your originals press Special Features
3 Press F4 LAYOUT COPY
4 Press F4 ORIGNAL SIZE to select the size of the original
If you selected 4 on 1 in step
5 Press F2 2 ON 1 COMB or F3 4 on 1 to select the type of layout
6 Press F4 OPTIONS to select the layout order of the originals
If you selected 2 ON 1 COMB in step
Special Copying Features
8 Enter the desired copy quantity 1 to 99 using the numeric
paper size press OK
7 Press F2 STACK BYPASS, F3 , or F4 to select the
Place your originals in the feeder press the Shortcut key
1 to 4 where you registered the Different Size Originals
Different Size Originals
mode
3 Set the desired copy modes 4 Press Start
Special Copying Features
Different Size Originals
3-24 Different Size Originals
Special Copying Features
CHAPTER
Customizing Settings
Copy Settings Table
Changing the Current Standard Settings
Image Quality and Copy Exposure
Press Additional Functions
2 Press F3 or F4 to highlight 02 COPY SETTINGS press OK
5 Press Reset to return to the Basic Features screen
3 Press F3 or F4 to highlight 01 STD IMAGE QUAL/ EXP press OK
Customizing Settings
This setting enables you to set the standard copy zoom ratio
Zoom Ratio
2 Press F3 or F4 to highlight 02 STD ZOOM RATIO press OK
50% to 200% press OK
Press Reset to return to the Basic Features screen
This setting enables you to set the standard copy quantity
Copy Quantity
F3 F4 OK F2 F3 OK Reset
4 Press Reset to return to the Basic Features screen
2 Press F3 or F4 to highlight 03 STANDARD COPY QTY press OK
Customizing Settings
4-8 Changing the Current Standard Settings
Frame Erase Width
2 Press F3 or F4 to highlight 04 FRAME ERASE WIDTH press OK
Customizing Settings
Press Reset to return to the Basic Features screen
Auto Sort
3 Press F2 - or F3 + to set the desired frame erase width
01 mm to 20 mm press OK
Press Reset to return to the Basic Features screen
Sort Rotate
2 Press F3 or F4 to highlight 05 AUTO SORT
3 Press F3 or F4 to select 01 ON or 02 OFF
2 Press F3 or F4 to highlight 06 SORT ROTATE
Press Reset to return to the Basic Features screen
press OK
Customizing Settings
Sharpness
Dull
Sharp
2 Press F3 or F4 to highlight 08 SHARPNESS press OK
4 Press Reset to return to the Basic Features screen
F3 F4 OK F3 F4 OK F2 F3 OK Reset
2 Press F3 or F4 to highlight 09 PRESCAN press OK
Prescan
3 Press F3 or F4 to select 01 ON or 02 OFF
Press Reset to return to the Basic Features screen
Customizing Settings
Changing the Current Standard Settings
Assigning Functions
Using Shortcut Keys
2 Press F3 or F4 to highlight 07 SHORTCUT KEY SET press OK
5 Press Reset to return to the Basic Features screen
F3 F4 OK F3 F4 OK F3 F4 OK Reset
Place your original press the desired Shortcut key 1 to
4 that contains the copy mode you want to set
3 If necessary, specify the settings for each mode
Making Copies
Appendix
This chapter provides the Combination of Functions Chart and index
CHAPTER
Appendix
Combination of Functions Chart
Combination available Combination unavailable
Appendix
5-4 Combination of Functions Chart
Appendix
Function to Be Set
Appendix
1 on
Erase
Numerics
Index
Appendix
Stop key, 1-7
Using Shortcut Keys Assigning Functions Making Copies
Vertical placement
Appendix