ENG
Page
Contents
Handling Paper 108
Working With Various Print Jobs 165
Enhanced Printing Options 206
240
236
239
242
Windows Software 394
Mac OS X Software 447
Network Setting 479
Hard Disk 518
Adjustments for Better Print Quality 572
Maintenance 614
Troubleshooting 654
Error Message 684
Printhead error x is Left or Right 702
Ink Level Check 698 No ink tank loaded Ink tank error
Cannot adjust printhead 701 Cannot adjust band
Hard disk error 704
707
Multi-sensor error 707 Roll feed unit err No Roll Feed Unit
Unknown file 707
How to use this manual
How to use this manual
How to use this manual
Enter a term and click the Search button
Searching Topics
Search results are listed at left
Introduction
Html Version of the Manual for Printing
Printing a group of topics in the manual
Click Access to the Html for printing in the title area
Introduction
Under Basic Printing Workow, click Printing Procedure
Printing a group of individual topics in the manual
Click Access to the Html for printing in the title area
Printing selected topics
Windows Introduction
How to use this manual
Printer parts
Front
Back
Top Cover Inside
Tray Feed Area
Holder Stopper
Roll Feed Unit Cover Inside
Roll Holder
Roll Holder Slot
Printhead
Carriage
Printhead Fixer Cover
Printhead Fixer Lever
Ink Tank Cover Inside
Vents
Roll Media lamp Green Rolls
Control Panel
Cut Sheet lamp Green
Information Button
Online Button
Feeder Selection Button
Load/Eject Button
Printer parts Stop Button
Control Panel
Control Panel Color Label
Control Panel Stop Button
Turning the Printer On and Off
Turning the printer on
Turning the printer off
Printer Modes
Modes
Mode transition
Online, and state of the Control Panel
Ofine, and state of the Control Panel
Menu mode, and state of the Control Panel
Main menu Menu items and settings Main menu during printing
Submenu mode, and state of the Control Panel
Switching Modes
Switching the Printer Online/Ofine
Printer Status When Online is Pressed
Switching to Menu Mode
Printer Status When Menu is Pressed
Printer Menu Operations
Main menu operations when no print job is in progress
Main menu operations during printing
Job Management Menu Operations
Submenu operations
Main Menu Operations
Accessing Menus
Specifying menu items
Specifying numerical values
Executing menu commands
Menu Structure
Main Menu
First Level Second Level Third Level Fourth Level
Manual PaperSize ISO A1
ISO A4 ISO B2 ISO B3 ISO B4 JIS B2 JIS B3 JIS B4
Control Panel
Control Panel
Control Panel
Control Panel
IP Mode Automatic Manual Protocol *4
Rarp
Control Panel
Control Panel
Control Panel
Available if Feed Priority is Automatic or Print Length
Head Cleaning, Fine Band Adj., and Information are displayed
Submenus
Main menu during printing
HDD
Level
Setting Item Description, Instructions Paper Cutting
Main Menu Settings
By Head Cleaning a
Manual PaperSize *1
Setting Item Description, Instructions Manual PaperType *1
Media Menu
Roll Media Type *1
Adjust Length Displayed if Feed Priority is Print Length
Setting Item Description, Instructions
Paper Details
Specify whether or not to cut with the standard round-bladed
Job Management
Auto Band Adj Standard Adj
Adjust Printer
Calibration Auto Adjust
Standard Adj. . →P.577
Interface Setup
Maintenance
Setting Item Description, Instructions Repl. maint cart
System Setup
PaprSetngs
Setting Item Description, Instructions Length Unit
Reset
Erase HDD Data High Speed
Information
MAC
Fine Band Adj
Main Menu Settings During Printing
Job Mgmt Menu
Error Log ########-####
Ext I/F
Job Mgmt Menu
Information on the loaded paper
Remaining Maintenance Cartridge capacity and ink levels
Submenu Display
Printer information
Printing Status Print Reports
Status Print
Checking the information in the Status Print report
Control Panel
IP Setting values
Ethernet Driver settings
RAM
Network RemoteUI Current network settings used by RemoteUI
Values set when NetWare Print Service Bindery PServer is
Cutter
Optional accessories
Optional accessories
Stand
Roll Holder Set
Printer
Printer Specications
Specications
Printer Specications
Printing performance
Interface
Ink
Paper *1
Hard Disk
Basic Environmental Performance
Packaging materials
Sheets
Print Area
Printable Area Recommended Print Area Top Edge Bottom Sides
Rolls
Printing procedure
Printing procedure
Printing Options Using Rolls and Sheets
Roll printing
Sheet printing
Loading and Printing on Rolls
Printing procedure Load a roll on the Roll Holder. →P.119
Load the roll in the Roll Feed Unit. →P.121
Basic Printing Workow
Papr Type Mismatch →P.688 RollWdthMismatch →P.689
Printing procedure Send the print job
Start printing
Loading and Printing on Sheets in the Paper Feed Slot
Printing procedure Send the print job
Printing from Windows
Printing from the application software
Printing from Mac OS
Registering the printer
Select the printer in the Printer list
Basic Printing Workow
Canceling Print Jobs from the Control Panel
Canceling print jobs
Canceling print jobs
Canceling print jobs
Right-click the job to cancel and select Cancel
Canceling Print Jobs from Windows
On the Printer Status sheet, click Cancel Job
Canceling Print Jobs from Mac OS
Click Utility to display imagePROGRAF Printmonitor
Basic Printing Workow
Types of Paper
Paper
Paper
Viewing the Paper Reference Guide
Select Paper Reference Guide
Paper
Updating paper information
Select Stay Informed
Paper
22x34ANSI D
Paper Size Dimensions
Paper Sizes
20x24
Paper
Rolls
Handling rolls
Handling rolls
Selecting the Paper Source
Or the Cut Sheet lamp b
Selecting the Paper Type Roll
Specifying the Paper Length Roll
Loading Rolls on the Roll Holder
Handling rolls
Loading Rolls in the Roll Feed Unit
Loading the Roll in the Printer
Printer now starts advancing the paper
Handling rolls Close the Roll Feed Unit Cover
Removing the Roll from the Printer
Removing Rolls from the Roll Feed Unit
Removing Rolls From the Roll Holder
Clearing Jammed Roll Paper
Press Load/Eject button Remove the jammed paper
Handling rolls
Press OK
Clearing Jammed Paper Paper Feed Slot
Feeding Roll Paper Manually
Detection of the Remaining Roll Paper
Windows
Specifying the Ink Drying Time for Rolls
Display the printer driver dialog box. →P.406
Mac OS
Specifying the Cutting Method for Rolls
Eject waiting for ink to dry after printing
Handling rolls
Handling Paper
Paper Cutting to have the roll cut at your specied position
Cutting the Leading Edge of Roll Paper Automatically
Reducing Dust from Cutting Rolls
Roll Holder Set
Mounting the 3-Inch Paper Core Attachment
Attaching Accessories to the Roll Holder
Removing the 3-Inch Paper Core Attachment
Attaching the Spacer for Borderless Printing
Removing the Spacer for Borderless Printing
Feeding Paper from the Roll Feed Unit
Removing the Roll Feed Unit
Installing the Roll Feed Unit
Handling sheets
Handling sheets
Selecting the Paper Type Sheet
Selecting the Paper Size Sheet
Loading Sheets Manually
Loading paper in the Top Paper Feed Slot
Handling Paper
Loading heavyweight paper in the Front Paper Feed Slot
Page
Page
Handling Paper
Removing Sheets from the Top Paper Feed Slot
Removing Heavyweight Paper from the Front Paper Feed Slot
Remove the sheet by pulling it forward, keeping it at
Clearing Jammed Paper from the Tray
Press the Load/Eject button Remove the jammed paper
Handling sheets
Press the OK button
Output Stacker Precautions
Output Stacker
Using the Output Stacker
Output Stacker
Printing Photos and Images
Easy Settings
Printing Photos and Images
Print Target
Printing Photos and Images
Printing Photos and Images Windows
Click Roll Paper in the L Paper Source list
Printing Photos and Images Mac OS
Access the Page Setup pane
Click Roll Paper in the a Paper Source list
.0mm
Printing Photos in Monochrome
Printing Photos in Monochrome Windows
Click Roll Paper in the L Paper Source list
Printing Photos in Monochrome Mac OS
Click Roll Paper in the a Paper Source list
.0mm
Fine-Tuning Monochrome Settings When Printing Photos Windows
Click Monochrome Photo in the G Color Mode list
Page
Fine-Tuning Monochrome Settings When Printing Photos Mac OS
Click Monochrome Photo in the H Color Mode list
Page
Using the Printer Driver to Print
Using the Plug-in to Print
Printing from Photoshop
Photoshop, create an image in the Adobe RGB color space
Printing Adobe RGB Images Windows
Color Handling list in Options, click No Color Management
Click Image in the E Print Priority list
Select the print quality in the F Print Quality list
Click Roll Paper in the L Paper Source list
Printing Adobe RGB Images Mac OS
Click Image in the E Print Priority list
10-in. Roll 254.0mm
Printing Line Drawings and Text
Printing CAD Drawings
Printing CAD Drawings
Print targets for line drawings and text
Printing Line Drawings and Text Windows
Page
Printing Line Drawings and Text Mac OS
Target list
Printing CAD Drawings Access the Page Setup pane
Printing CAD Drawings
Print targets for ofce documents
Printing Ofce Documents
Printing Ofce Documents
Printing Ofce Documents
Printing Ofce Documents Windows
Page
Printing Ofce Documents Mac OS
Page
Using the Printer With a Color imageRUNNER
Using the Printer With a Color imageRUNNER
Completing the scanning settings on the Color imageRUNNER
Registering a hot folder on your computer
Scanning the original and print an enlargement
Registering a hot folder on your computer
Completing the scanning settings on the Color imageRUNNER
Color Mode
Adjusting Images
Adjusting the Color in the Printer Driver
Color Adjustment
Matching
Perceptual People
Matching Method Description Auto
Perceptual
Dark Areas
Highlight
Gray Tone Adjustment
Gray Adjustment Description Items Color Balance
Shadow
Fine-Tuning Colors of Photos and Images Windows
Magenta
Adjustment Item Description Cyan
Gray Tone Adjustment
Yellow Brightness
Page
Fine-Tuning Colors of Photos and Images Mac OS
Enhanced Printing Options
Adjustment Item Description Cyan
Print Priority *1 Description Image
Advanced Settings
Print Priority
Line Drawing/Text
High
Print Quality
Print Quality *1 Description Print Priority Highest
Ofce Document Draft
Color Settings
Unidirectional Printing
Setting Item Description Thicken Fine Lines *1
Enhancing Printing Quality
High-Precision Printing
Choosing the Document Type and Printing Conditions Windows
Click Monochrome in the G Color Mode list
Choosing the Document Type and Printing Conditions Mac OS
Click Monochrome in the H Color Mode list
To adjust the brightness and contrast, click I Set
Page
Media type
Choosing Paper for Printing
Choosing a Paper for Printing
If the paper type is not listed for selection
Selecting the Paper Type Roll
Selecting the Paper Type Sheet
Specifying Paper in the Printer Driver
Specifying Paper in the Printer Driver Windows
Page
Specifying Paper in the Printer Driver Mac OS
Page
Enlarged/Reduced Printing
Printing enlargements or reductions
Resizing Originals to Match the Paper Size
Fit Paper Size
Resizing Originals to Match the Paper Size Windows
Select the C Enlarged/Reduced Printing check box
Resizing Originals to Match the Paper Size Mac OS
Click Roll Paper in the a Paper Source list
Printing enlargements or reductions
Resizing Originals to Fit the Roll Width
Fit Roll Paper Width
Resizing Originals to Fit the Roll Width Windows
Click E Fit Roll Paper Width
Borderless Printing check box
Resizing Originals to Fit the Roll Width Mac OS
Click Roll Paper in the a Paper Source list
Page
Resizing Originals by Entering a Scaling Value
Scaling
Resizing Originals by Entering a Scaling Value Windows
Conrm the print settings and print as desired
Resizing Originals by Entering a Scaling Value Mac OS
Click Roll Paper in the a Paper Source list
Click G Scaling and enter
Printing enlargements or reductions
Registering a hot folder on your computer
Completing the scanning settings on the Color imageRUNNER
Registering a hot folder on your computer
Completing the scanning settings on the Color imageRUNNER
Oversize
Printing at full size
Printing on Oversized Paper
Printing at full size
Printing at full size
Printing at Full Size Windows
Oversize
Printing at Full Size Mac OS
Printing at full size Access the Page Setup pane
Printing at full size
Borderless Printing
Borderless Printing at Actual Size
Borderless Printing Method
Print Image with Actual Size
Borderless Printing at Actual Size Windows
Click OK to close the Information dialog box
Borderless Printing at Actual Size Mac OS
Conrm that the roll paper width matches the paper size
Printing at full size
Borderless Printing on Paper of Equivalent Size
Borderless Printing
Borderless Printing
Fit Paper Size
Borderless Printing
Click Roll Paper in the L Paper Source list
Borderless Printing
Click Roll Paper in the a Paper Source list
Select the H Borderless Printing check box
Click E Fit Paper Size under D Enlarged/Reduced Printing
Borderless Printing
Scale to t Roll Paper Width
Borderless Printing
Click Roll Paper in the L Paper Source list
Borderless Printing
Click Roll Paper in the a Paper Source list
Select the D Enlarged/Reduced Printing check box
Borderless Printing at Actual Size
Print Image with Actual Size
Borderless Printing at Actual Size Windows
Click Roll Paper in the L Paper Source list
Borderless Printing at Actual Size Mac OS
Click Roll Paper in the a Paper Source list
Borderless Printing
Printing banners or at other non-standard sizes
Printing banners or at other non-standard sizes
Registering a Custom Media Size
Register a Custom Media Size
Creating the banner in the application
Set the printing orientation to horizontal Create the banner
Printing the banner
FineZoom Settings list, click Yes
Printing banners or at other non-standard sizes
Register a Custom Page Size
Print the banner
.4mm
Registering non-standard paper size in the printer driver
Printing on Non-Standard Paper Sizes
Specifying custom media sizes for temporary use
Printing by using Custom Size
Printing on Non-Standard Paper Sizes Windows
Click Manual in the L Paper Source list
Printing by using Custom Media Size
Click Manual in the L Paper Source list
Printing on Non-Standard Paper Sizes Mac OS
Width
Click Manual in the a Paper Source list
Free Layout Windows
Tiling and multiple pages per sheet
Printing Multiple Originals Next to Each Other
Tiling and multiple pages per sheet
ImagePROGRAF Free Layout Macintosh
Printing Multiple Originals Next to Each Other Windows
Click Free Layout in the B Page Layout list
Print from the imagePROGRAF Free Layout menu
Printing Multiple Originals Next to Each Other Mac OS
Canon imagePROGRAF Free Layout window is displayed
Print from the Canon imagePROGRAF Free Layout menu
Printing Multiple Pages Continuously
Roll paper banner
Printing Multiple Pages Continuously Windows
Conrm the print settings and start printing
Click Roll Paper Banner in the L Paper Source list
Printing Multiple Pages Continuously Mac OS
Click Roll Paper Banner in the a Paper Source list
Printing Multiple Pages Per Sheet
Layout
Printing Multiple Pages Per Sheet Windows
Click 4 Pages/Sheet in the B Page Layout list
Printing Multiple Pages Per Sheet Mac OS
Click 4.0 in the a Pages per Sheet list
Click Roll Paper in the a Paper Source list
Tiling and multiple pages per sheet
Printing Posters in Sections
Printing Large Posters Windows
Click Poster Graphic Image in the E Print Target list
ISO A2
Click Poster 2 x 2 in the B Page Layout list
Centering originals relative to roll paper width
Centering originals
Printing Originals Centered on Rolls
Centering originals
Printing Originals Centered on Rolls Windows
Centering originals
Printing Originals Centered on Rolls Mac OS
Centering originals Access the Page Setup pane
Page
Printing Originals Centered on Sheets
Centering originals on sheets
Printing Originals Centered on Sheets Windows
Click Match Page Size in the G Media Size list
Printing Originals Centered on Sheets Mac OS
Click Manual in the a Paper Source list
Rotate Page 90 degrees Conserve Paper
Conserving roll paper
Conserving Roll Paper by Rotating Originals 90 Degrees
Conserving roll paper
Conserving roll paper
Conrm the print settings and print as desired
Conserving roll paper
Conserving roll paper Access the Page Setup pane
Select the L Rotate Page 90 degrees check box
No Spaces at Top or Bottom Conserve Paper
Conserving roll paper
297.0mm
Conserving roll paper
Click Roll Paper in the a Paper Source list
Select the K No Spaces at Top or Bottom check box
Checking the Layout in a Preview Before Printing
Open Preview When Print Job Starts Windows
Checking Images Before Printing
Checking Images Before Printing
Preview Macintosh
Select the L Open Preview When Print Job Starts check box
Checking the Layout in a Preview Before Printing Windows
Page
Canon imagePROGRAF Preview window is displayed
Checking the Layout in a Preview Before Printing Mac OS
Print from the Canon imagePROGRAF Preview menu
Printing With Watermarks
Other useful settings
Other useful settings
Watermark
Printing with Watermarks-COPY, File COPY, and so on Windows
Click File Copy in the E Watermarks list
Orientation Rotate 180 degrees
Making the Original Orientation Match the Paper Orientation
Mirror
Other useful settings
Conrm the print settings and print as desired
Other useful settings
Other useful settings Access the Page Setup pane
Page
Using Favorites
Favorites
Using Favorites Windows
Registering a favorite
Printing using the favorite
Using Favorites Mac OS
Cutting Roll Paper After Printing
Automatic Cutting
Cutting Roll Paper After Printing Windows
Roll paper will be automatically cut after printing
Cutting Roll Paper After Printing Mac OS
Page
By selecting color tones on Charts before printing
Printing in Colors Matching the Measured Ambient Light
Selecting Color Tones on Charts Before Printing Windows
Select E Use ambient light adjustment
F Print Quality, click Highest or High
Other useful settings
Click OK Conrm the print settings and print as desired
Selecting Color Tones on Charts Before Printing Mac OS
F Print Quality, click Highest or High
Other useful settings
Click OK Conrm the print settings and print as desired
Other useful settings
F Print Quality, click Highest or High
Click OK Conrm the print settings and print as desired
Other useful settings
F Print Quality, click Highest or High
Click OK Conrm the print settings and print as desired
Printing Images to Match Monitor Colors
Congure and adjust printer driver settings
Monitor Matching
Printing Images to Match Monitor Colors Windows
F Print Quality, click Highest or High
Click OK Conrm the print settings and print as desired
Printing Images to Match Monitor Colors Mac OS
F Print Quality, click Highest or High
Click OK Conrm the print settings and print as desired
Printer Driver
Printer Driver Settings Windows
Printer Driver
Printer Driver
Specifying Paper in the Printer Driver Windows
Paper Width
Display Area Information Displayed Top illustrations
Conrming Print Settings Windows
Checking a preview of the settings
Middle, bordered area
Checking a print preview
Checking the Layout in a Preview Before Printing Windows
Page
Using Favorites Windows
Printing using the favorite
Printer Driver
Printer Driver
Click start Printers and Faxes or Printers
Favorites, Utility, and Support
Conguration using Easy Settings
Main Sheet Windows
Color Settings
Conguration using Advanced Settings
Setting Item Description Status Monitor
Print Quality
Open Preview When Print
Setting Item Description Thicken Fine Lines
Job Starts
Paper Information on Printer Dialog Box Windows
Media Detailed Settings Dialog Box Windows
Printer Driver
Color Adjustment Sheet Color Windows
Object Adjustment dialog box
Printer Driver
Driver Matching Mode Kyuanos
Matching Sheet Windows
Ambient Light Adjust
Light Source Check Tool
Input Prole Settings
ICC Matching Mode, Driver ICM Mode and Host ICM Mode
Setting Item Description Matching Mode
Printer Prole Settings
Color Adjustment Sheet Monochrome Windows
Object Adjustment dialog box
Setting Item Description Sample
Gray Adjustment Sheet Windows
Gray Adjustment
Sample List
Setup Sheet Windows
Conserve Paper
Setting Item Description Orientation
Rotate Page 90 degrees
Roll Paper Width
Paper Size Options Dialog Box Windows
Layout Sheet Windows
Setting Item Description Options
Special Settings
Options Dialog Box Windows
Special Settings Dialog Box Windows
Favorites Sheet Windows
Printer Driver
Utility Sheet Windows
Button Corresponding Utility Maintenance
Color imageRUNNER Enlargement Copy
Support Sheet Windows
Settings Summaries
Button Corresponding Utility Support Information
Device Settings Sheet Windows
Settings Summaries Dialog Box Windows
Printing Adobe RGB Images Windows
Click Image in the E Print Priority list
Page
ImagePROGRAF Status Monitor Windows
Status Monitor
Status Monitor
Digital Photo Front-Access
Digital Photo Front-Access
Digital Photo Front-Access
PosterArtist
Using PosterArtist to Compose Originals
Edit Using PosterArtist
PosterArtist
Using PosterArtist to Compose Originals Windows
Print from the PosterArtist menu
ImagePROGRAF Device Setup Utility
Device Setup Utility
Device Setup Utility
On the Setup Menu window, click Install Individual Software
Installing imagePROGRAF Device Setup Utility
Insert the User Software CD-ROM in the CD-ROM drive
DHCP, BOOTP, or Rarp
Printer Driver Settings Mac OS
Mac OS X Software
Specifying Paper in the Printer Driver Mac OS
Page
Conrming Print Settings Mac OS
Display Area Information Displayed
Checking a print preview
Checking the Layout in a Preview Before Printing Mac OS
Using Favorites Mac OS
Printer Driver
View set
Main Pane Mac OS
Printer
Using Mac OS X
Setting Item Description Input Bit Depth
Paper Information on Printer Dialog Box Mac OS
Media Detailed Settings Dialog Box Mac OS
Automatic Cutting
View Settings Dialog Box for the Printing Application Mac OS
Color Settings Pane Color
Object Adjustment dialog box
Driver Matching Mode Using Mac OS X 10.2.8
Matching Pane
Driver Matching Mode Kyuanos Using Mac OS X 10.4 or later
Select No Correction
Ambient Light Adjust
Main pane
ICC Matching Mode
Color Settings Pane Monochrome Mac OS
Color Adjustment pane Monochrome
Gray Adjustment Pane Mac OS
DEnlarged/ReducedPrinting
Setup Pane Mac OS
Setting Item Description Paper Source
Source list
Setting Item Description Print Centered
Utility Pane Mac OS
Setting Item Description
View
Additional Settings Pane Mac OS
Settings
Support Pane Mac OS
Printing Adobe RGB Images Mac OS
Click Image in the E Print Priority list
Click Roll Paper in the a Paper Source list
ImagePROGRAF Printmonitor Macintosh
Printmonitor
Printmonitor
Network Environment
Network Setting
Network Setting
System requirements
Network environment
Conguring the IP Address on the Printer
DHCP, BOOTP, or Rarp
Conguring the IP Address Using the Printer Control Panel
Conguring the IP Address Using ARP and Ping Commands
Page
Using RemoteUI
Conguring the Printer’s TCP/IP Network Settings
Select Administrator Mode and click Logon
Click OK to display the Network
Phase
Conguring the Printer’s AppleTalk Network Settings
Details Default Setting Phase Type
Name *1
Conguring the Printer’s NetWare Network Settings
Context Name
Details Default Setting Printer Number
Tree Name
NPrinter Print Server Name
Click OK to activate the settings
Security settings items
Specifying Printer-Related Information
Email Notication When Printing is Finished or Errors Occur
Initializing the Network Settings
Conguring the Printer Driver Destination Windows
Network Setting Windows
Network Setting Windows
Open the Printers and Faxes or Printers window
Sharing the Printer in Windows
Click OK
Conguring the Printer’s NetWare Network Settings
Click OK to display the Network
Choose Protocol Settings from the Printer menu
Specifying the Printer’s Frame Type
Specifying the frame type using the printer Control Panel
Specifying NetWare Print Services
Choosing the type of print services
Choose Print Services Quick Setup in the Tools menu
Using Nwadmin or Pconsole to set up the print server
Set a password
Connection Type to Manual Load
Set a password
Print Application, click the print service to be used
Specifying NetWare Protocols
Network Setting Windows
Conguring NetWare Network Settings
Open the Printers and Faxes or Printers window
Installing imagePROGRAF Device Setup Utility
DHCP, BOOTP, or Rarp
Network Setting Mac OS
Network Setting Mac OS
Conguring the Printer Driver Destination Macintosh
Conguring the Printer’s AppleTalk Network Settings
Conguring the Destination for AppleTalk Network Macintosh
Activating AppleTalk on the printer
Conguring the Destination Mac OS
Network Setting
Click Add to display the Printer Browser window
Conguring the Destination for TCP/IP Network Macintosh
Click More Printers
Page
Conguring the Destination for Bonjour Network Macintosh
Printer Hard Disk Operations
Hard Disk
Hard Disk
Panel
Saved Print Jobs
Output Method Send job to
Storage destination
Press or to select the box, and then press the OK button
Specifying Output Method
Print Auto Del
Specifying Save and Print
Using imagePROGRAF Preview Mac OS
Using imagePROGRAF Preview Windows
Saving Print Jobs
Using the printer driver Windows
Choose an Output Method
Click OK to close the Output Method dialog box
Using the printer driver Mac OS
Access the Additional Settings pane
Choose an Send job to
Do Not Save Print Jobs in the Common Box
Managing Queued Jobs Deleting or Preempting Other Jobs
Using the Control Panel
Using RemoteUI
Using imagePROGRAF Status Monitor
Using imagePROGRAF Printmonitor
Setting Passwords for Personal Boxes
Using imagePROGRAF Status Monitor Windows
For details, refer to the RemoteUI help
Page
Using imagePROGRAF Printmonitor Mac OS
Naming Personal Boxes
On the Stored Job page, select the personal box to identify
Using imagePROGRAF Status Monitor Windows
Page
Using imagePROGRAF Printmonitor Mac OS
Displaying a List of Saved Jobs
Using RemoteUI
Using imagePROGRAF Status Monitor Windows
Using imagePROGRAF Printmonitor Macintosh
Printing a List of Saved Jobs
Printing Saved Jobs
On the Stored Job page, choose the mail box
Select the print job in the list and click Print
For details, refer to the RemoteUI help le
Page
Using imagePROGRAF Printmonitor Mac OS
Page
Moving Saved Jobs
For details, refer to the RemoteUI help le Hard Disk
Using imagePROGRAF Status Monitor Windows
Using imagePROGRAF Printmonitor Mac OS
Page
Displaying Details of Saved Jobs
Select the saved job in the list and click Details
Details of the saved document page is displayed
Page
Using imagePROGRAF Printmonitor Mac OS
Renaming Saved Jobs
For details, refer to the RemoteUI help Hard Disk
Using imagePROGRAF Status Monitor Windows
Select the saved job in the list and click Set
Page
Deleting Saved Jobs
Select the saved job in the list and click Delete
Using imagePROGRAF Status Monitor Windows
Using imagePROGRAF Printmonitor Mac OS
Checking the Free Hard Disk Space
Hard Disk Sheet in imagePROGRAF Status Monitor
Hard Disk Pane in imagePROGRAF Printmonitor
Erasing Data on the Printer’s Hard Disk
Erasure Method Time Required Details High Speed
Adjusting the Printhead
Adjusting the Printhead
Adjusting the Printhead Alignment Automatically
Correcting Print Misalignment
Page
Adjusting the Printhead Alignment Manually
Adjustments for Better Print Quality
Adjusting the Printhead Height
Adjusting the Feed Amount Automatically
Adjusting the feed amount
Adjusting the feed amount
Adjusting the feed amount
Adjusting the feed amount during printing
Press the Online button to resume printing
Adjusting the Feed Amount Manually
Follow the steps below to adjust the feed amount manually
Adjusting the feed amount during printing
Adjusting the Measurement Scale for Better Accuracy
Follow these steps to adjust the scale for better accuracy
Adjusting Color on the Trailing Edge of Sheets
Load a sheet of unused paper A4/Letter-sized or larger
Page
Adjusting the Vacuum Strength
Using Color Calibration to Adjust Colors
Color adjustment
Color adjustment
Comm Proong
Photo Pro Plat
FineArt Photo
RC Proong
Follow these steps to execute color calibration
By selecting color tones on Charts before printing
Selecting Color Tones on Charts Before Printing Windows
F Print Quality, click Highest or High
Color adjustment
Click OK Conrm the print settings and print as desired
Selecting Color Tones on Charts Before Printing Mac OS
F Print Quality, click Highest or High
Color adjustment
Click OK Conrm the print settings and print as desired
Color adjustment
F Print Quality, click Highest or High
Click OK Conrm the print settings and print as desired
Color adjustment
F Print Quality, click Highest or High
Click OK Conrm the print settings and print as desired
Printing Images to Match Monitor Colors
Monitor Matching
Printing Images to Match Monitor Colors Windows
F Print Quality, click Highest or High
Click OK Conrm the print settings and print as desired
Printing Images to Match Monitor Colors Mac OS
F Print Quality, click Highest or High
Click OK Conrm the print settings and print as desired
Ink Tanks
Ink Tanks
Ink Tanks
Replacing Ink Tanks
Precautions when handling an Ink Tank
Compatible Ink Tank
Replacing an Ink Tank
Maintenance
Page
Ink Tanks Open the pouch and remove the Ink Tank
Ink Lamp ashes when there is little ink left
Checking Ink Tank Levels
When to Replace Ink Tanks
Before print jobs and maintenance that consume a lot of ink
Checking the Print Quality
Printheads
Printhead
Improving the Print Quality
Checking for Nozzle Clogging
Load unused paper
Printheads
Replacing the Printhead
When to replace the Printhead
Precautions when handling the Printhead
Compatible Printhead
Replacing the Printhead
Maintenance
Page
Page
Maintenance
Page
Replacing the Maintenance Cartridge
Maintenance Cartridge
Maintenance Cartridge
Compatible Maintenance Cartridge
Replacing the Maintenance Cartridge
Page
Page
Page
Checking the Remaining Maintenance Cartridge Capacity
When to Replace the Maintenance Cartridge
When much of the Maintenance Cartridge capacity is depleted
Cleaning the Printer
Cleaning the Printer
Cleaning the Printer Exterior
Plug the power cord into the outlet
Cleaning Inside the Top Cover
If the Cleaning Brush is dirty, rinse it in water
Close the Top Cover
Cleaning the Paper Retainer
Cleaning Spurs Used in Paper Feeding
Maintenance
Cleaning the Printer
Page
Preparing to Transfer the Printer
Other Maintenance
Other Maintenance
Remove the paper
Maintenance
Do not remove the Maintenance Cartridge during this process
Maintenance
Conrming the rmware version
Updating the Firmware
Updating the rmware
Frequently Asked Questions
Frequently Asked Questions
Frequently Asked Questions
Question Answer
ImageRUNNER ?
ImageRUNNER ? Color imageRUNNER
Problems Regarding Paper
Problems Regarding Paper
Press Load/Eject button
Problems Regarding Paper Remove the jammed paper
Press OK
Problems Regarding Paper
Press Load/Eject
Problems Regarding Paper
Press OK button
Paper is not cut straight
Roll paper cannot be inserted into the Paper Feed Slot
Cannot Load Sheets
Paper cannot be cut
Printer Does Not Respond Even if Print Jobs are Sent
Printing does not start
Data lamp on the Control Panel does not light up
Display Screen indicates the system is lling with ink
Printer ejects blank, unprinted paper
An error message is shown on the Display Screen
Printer stops during a print job
Printer stops during a print job
Problems with the printing quality
Problems with the printing quality
Printing is faint
Paper rubs against the Printhead
Margin to 20mm
Edges of the paper are dirty
Back side of the paper is dirty
Settings in Media Type
Surface of the paper is dirty
List of Drying Time
Printed colors are inaccurate
Access Color Settings in Color Mode to adjust
Printer driver, Application Color Matching
Banding in different colors occurs
Quality too low
Colors in printed images are uneven
Highest or High in Print Quality
Select Unidirectional Printing in the Advanced
Length of printed images is inaccurate
Image Edges are Blurred or White Banding Occurs
Contrast becomes uneven during printing
Set VacuumStrngth to Weakest . →P.587
Line thickness is not uniform Windows
Documents are printed crooked
Lines are misaligned
Cannot connect the printer to the network
Cannot print over a network
Cannot print over a network
Conguring the Communication Mode Manually
Cannot print over a TCP/IP network
Cannot print over a NetWare network
Cannot print over AppleTalk or Bonjour networks
Removing imagePROGRAF Device Setup Utility Windows
Installation problems
Removing Installed Printer Drivers
Removing printer drivers Windows
Printer does not go on
Other problems
Other problems
If the Printer Makes a Strange Sound
Ink level detection
Ink Level Detection
Disabling ink level detection
Troubleshooting
Responding to Messages
Error messages if action can be taken
Error messages if no action can be taken
Responding to Messages
Other Messages
Error Messages
Error messages
Other Messages
Papr Type Mismatch
Messages regarding paper
Paper Mismatch
Messages regarding paper
Pause in Detect Mismatch
RollWdthMismatch
Roll Paper Width in the printer
Paper size not detected
Insufcient paper for job
Roll printing is selected, but sheets are loaded
This paper cannot be used
Roll printing is selected
Check supported paper sizes
No Roll Feed Unit
Roll is empty
Roll feed unit err
Sheet printing is selected
Wrong paper feed slot for this paper type
Manual printing is selected, but a roll is loaded
Paper jam
Cannot detect papr
Paper loaded askew
Cannot feed paper
Cannot cut paper
End of paper feed
Check roll width and spacers
Borderless printng not possible
Check supported paper
Ink insufcient
Ink tank empty. Canceling printing of this
Messages regarding ink
No ink left
Ink Level Check
Ink tank error
Remaining level of the ink cannot be correctly detected
No ink tank loaded
Messages regarding printing or adjusment
Cannot execute this command. Use other paper
Cannot adjust band
Use another paper
Excessive temperature or humidity
Cannot adjust printhead
Cannot calibrate
PHeads wrong pos
Printhead needs cleaning. x is Left or Right
Messages regarding printheads
Messages regarding printheads
Problem with Printhead x x is L, R, or LR
Printhead error x is Left or Right
Messages regarding the maintenance cartridge
Messages regarding the hard disk
Mail box full. Delete unwanted data
Mail box full. Cannot save
Other Messages
Error Exxx-xxxx x represents a letter or number
Prepare for parts replacement
Garo Wxxxx x represents a number
Multi-sensor error
Parts replacement time has passed
Calibration There is a problem with the multi-sensor
Unknown le
708
Index
664
346
148
358
671
Printing Multiple Pages Continuously Windows 314
560
505
622
Page
Canon INC

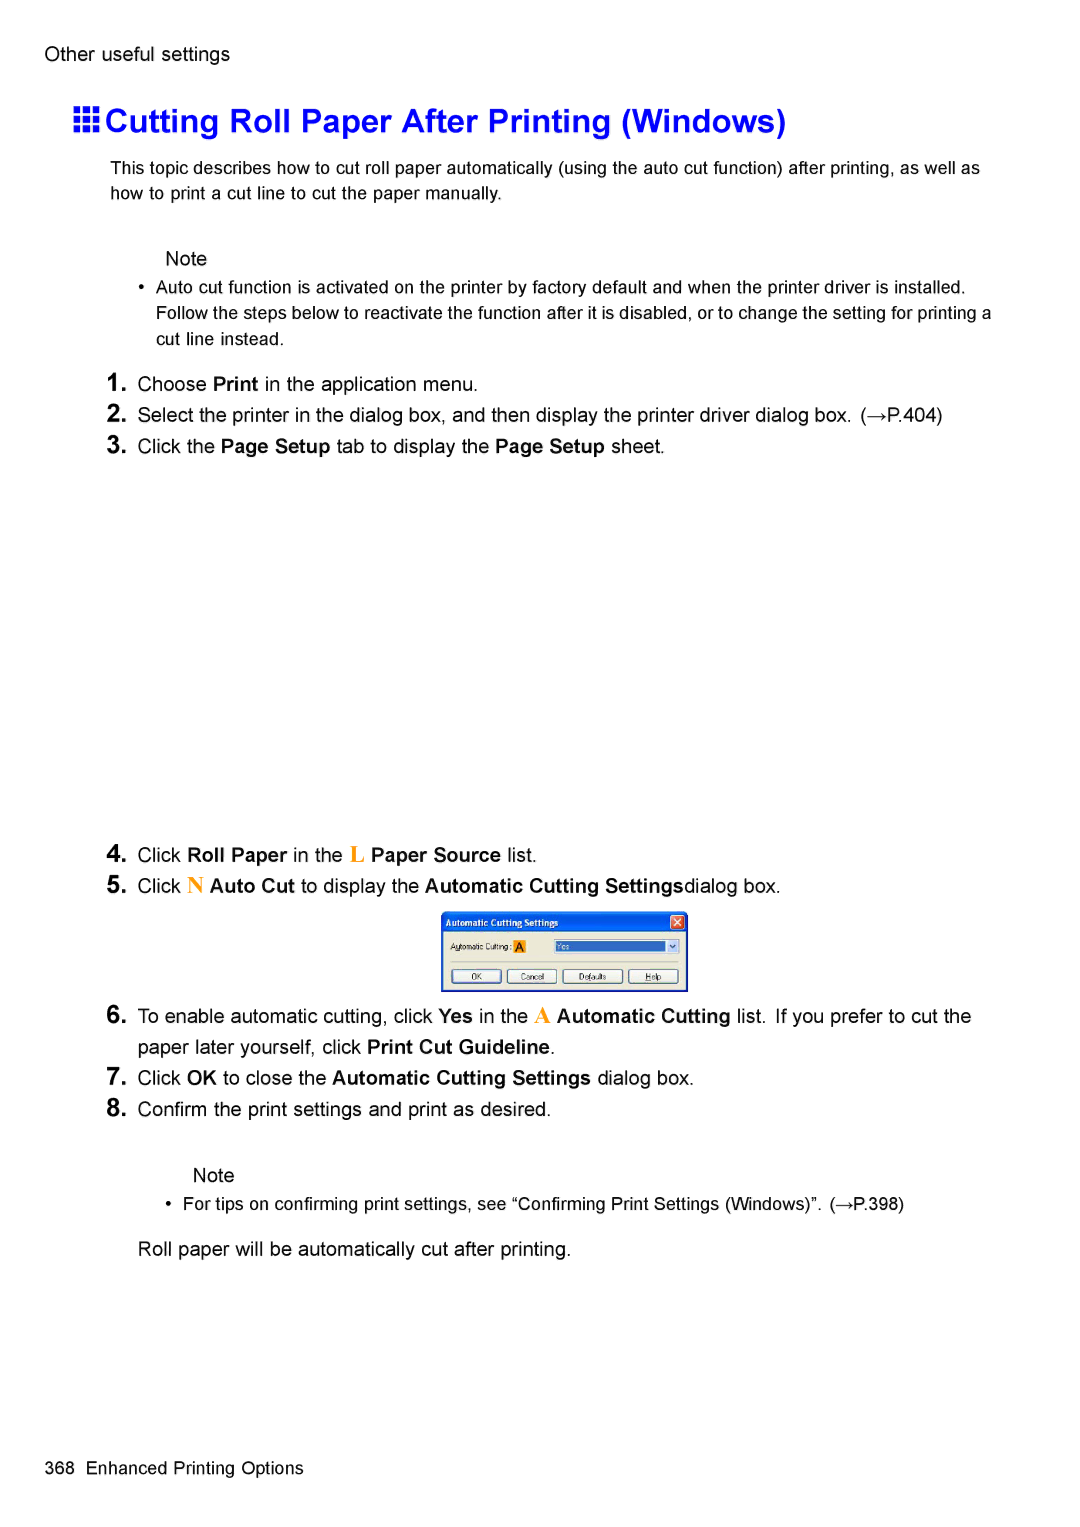
 Cutting Roll Paper After Printing (Windows)